Once you master the art of cooking beans, the world is your oyster. You can save money, control the ingredients you add to your food, and generally feel like a boss in the kitchen.
With that in mind, allow us to demonstrate how easy it is to make your own hummus — from scratch!
But before we begin, let’s learn about hummus!
Origins of Hummus
Like many foods, the exact origin of hummus is debated. But it’s believed that the first recipes appeared in 13th century cookbooks (source).
Hummus is an Arabic word that simply means “chickpeas.” And chickpeas have been grown in the Middle East and India for thousands of years.
Hummus bi tahini (but often just referred to as “hummus”) is made with chickpeas, tahini, garlic, and lemon. It’s a common dish in Turkish, Lebanese, Syrian, and Egyptian cuisine, among others. And it’s now gained popularity throughout the world.
Those looking for a deeper dive into the history of hummus can find more information here and here.
Our recipe strays a bit from traditional, adding kombu to aid digestion, baking soda for a creamier texture, and garlic powder and fresh herbs for additional flavor. You can find more traditional preparations here and here.
How to Make Hummus From Scratch
This 6-ingredient recipe starts with quick-soaking your chickpeas — which takes about 1 hour. And then cooking, which takes 1 more hour. Just like that you went from dry chickpeas to cooked chickpeas in 2 hours. You’re already a pro!
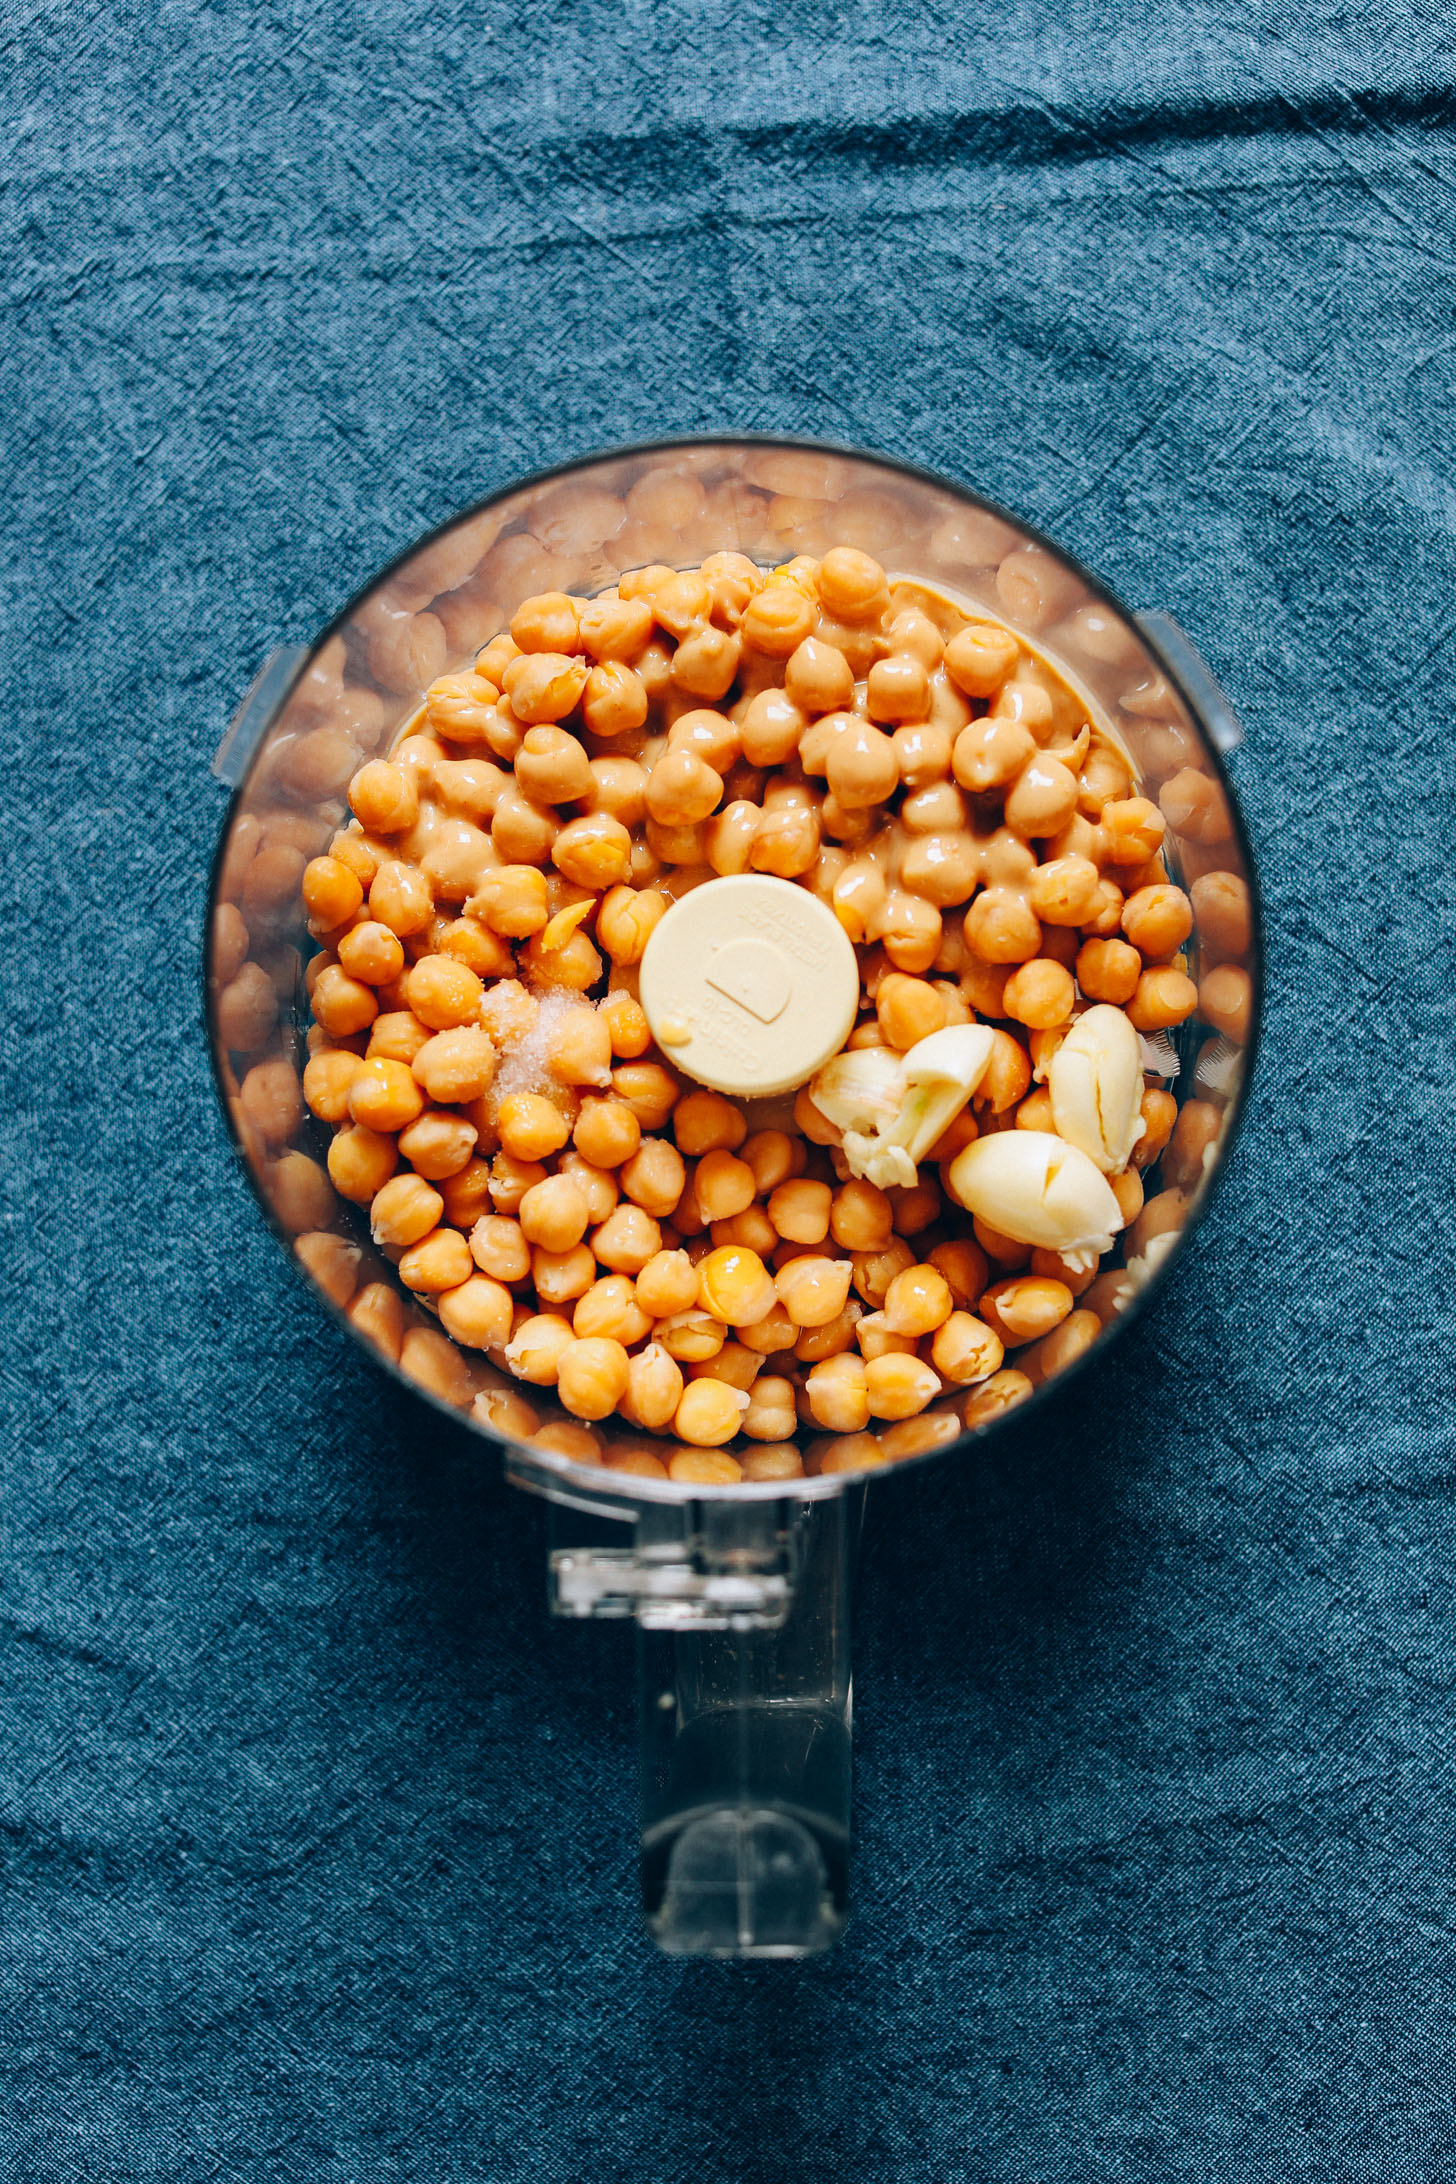
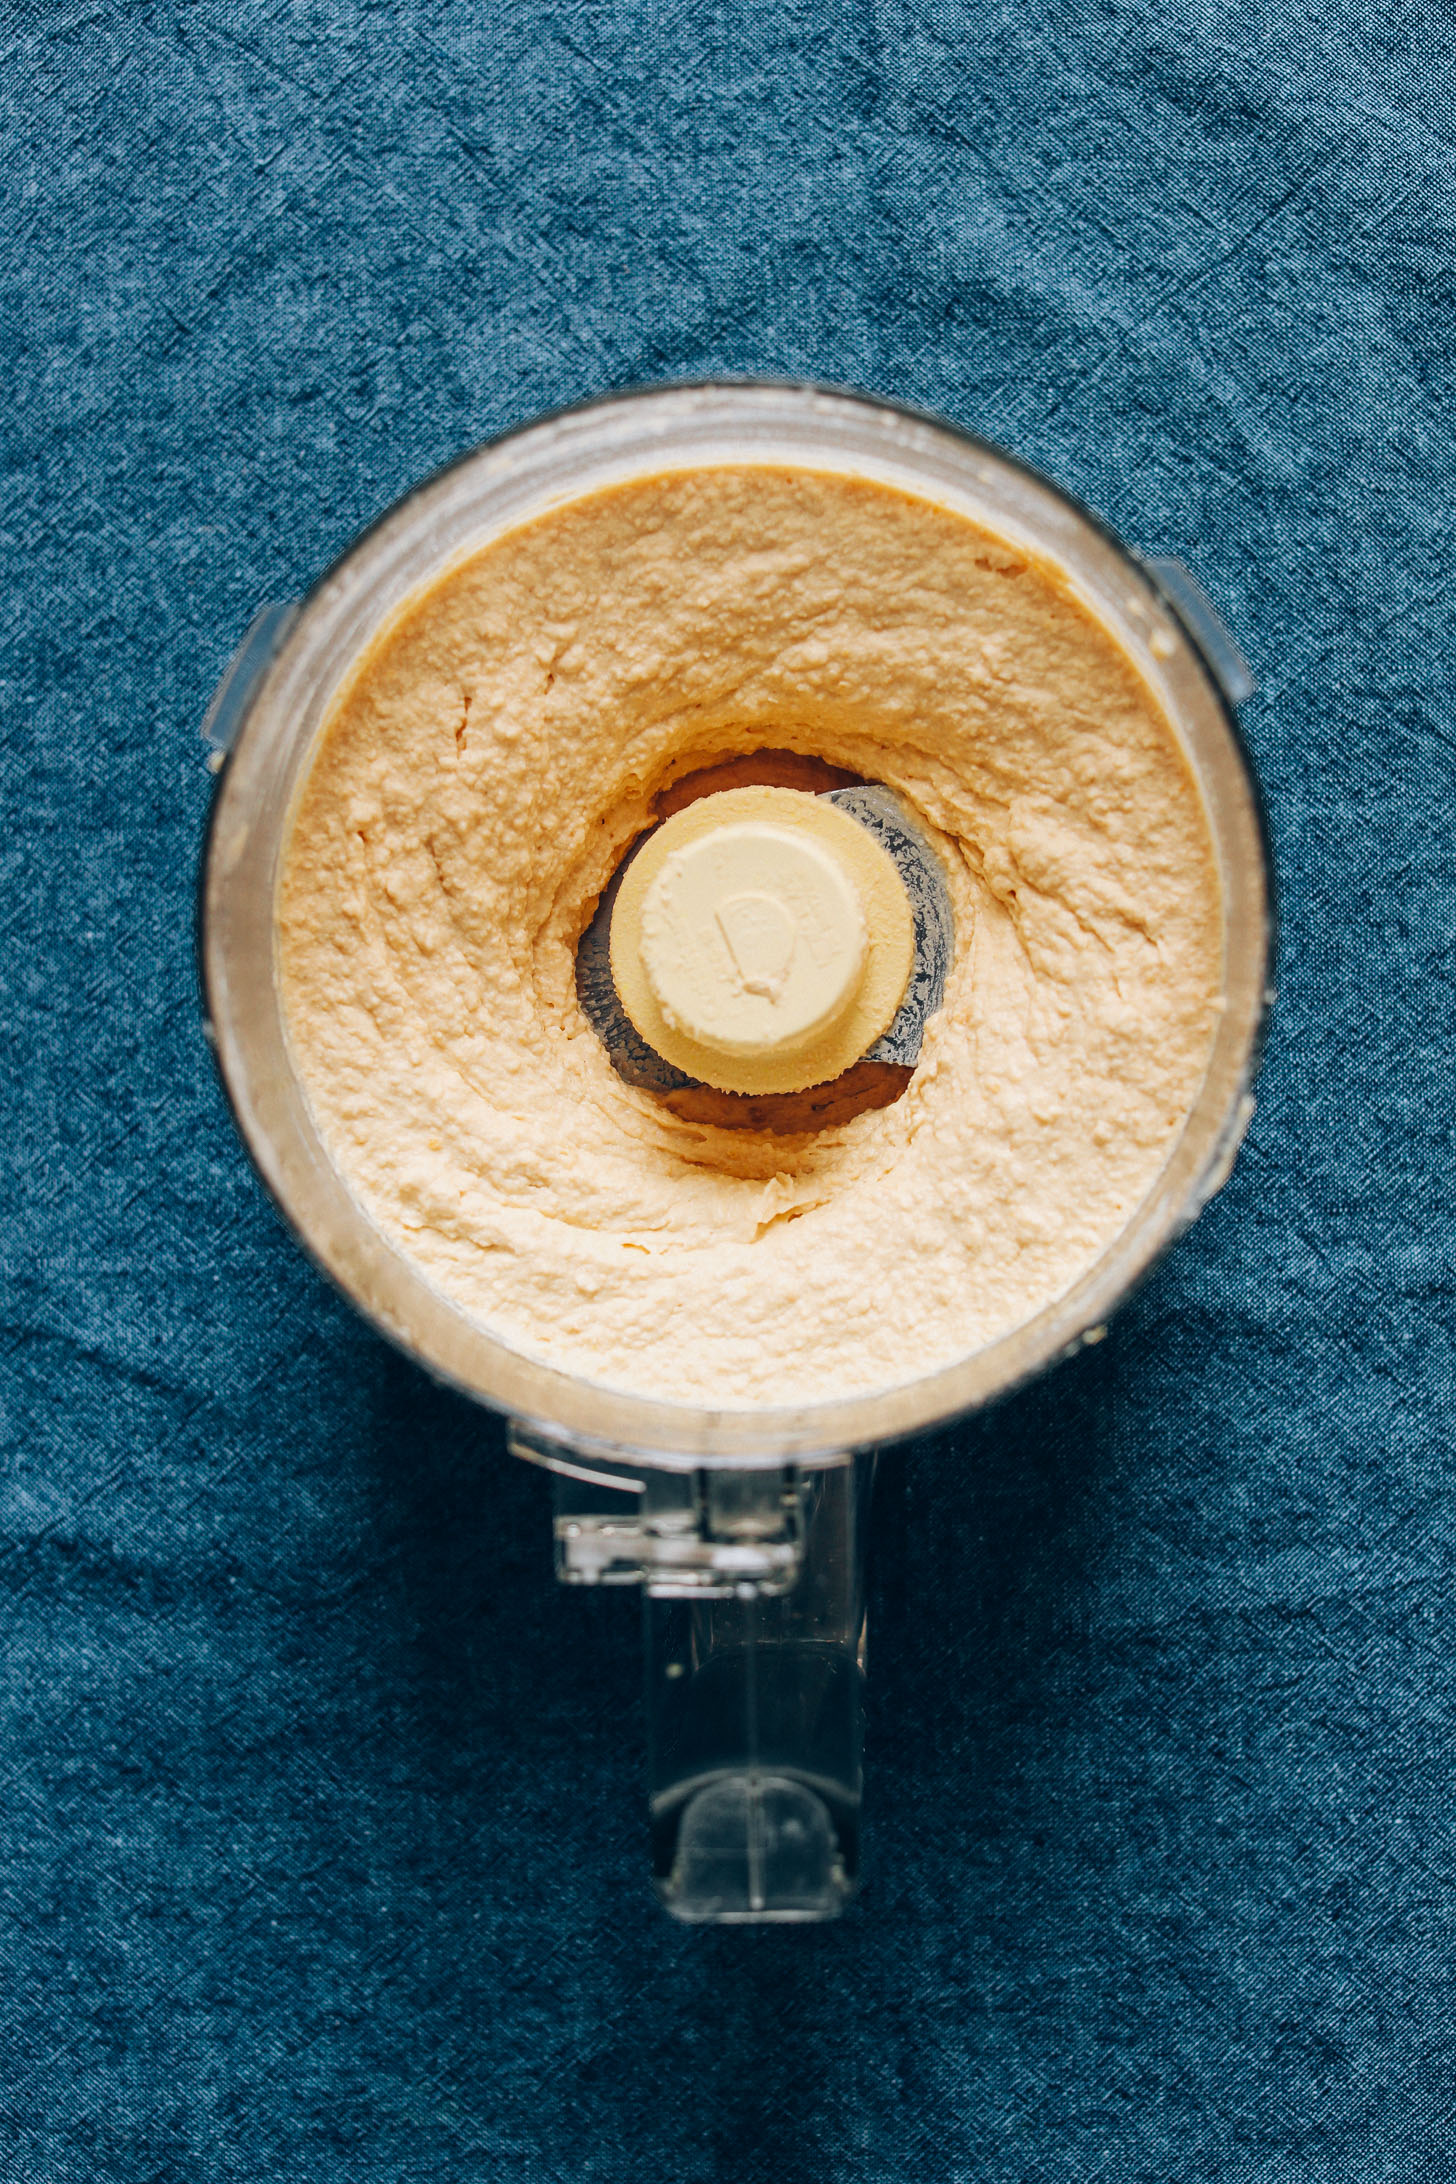
Once your chickpeas are tender, drain and add them to a food processor. Throw in some garlic, tahini, lemon juice, and salt — the basics. A little olive oil adds creaminess and flavor, but it can be subbed with water if you’re avoiding oil.
Blend until creamy and smooth. Then add in fresh herbs or any other flavor you crave: think roasted jalapeño, roasted red pepper, lots of basil, lots of cilantro, or even curry paste! The sky is the limit.
We hope you LOVE this hummus! It’s:
Creamy
Hearty
Lemony
Garlic-infused
Easy to make
Customizable
& SO delicious
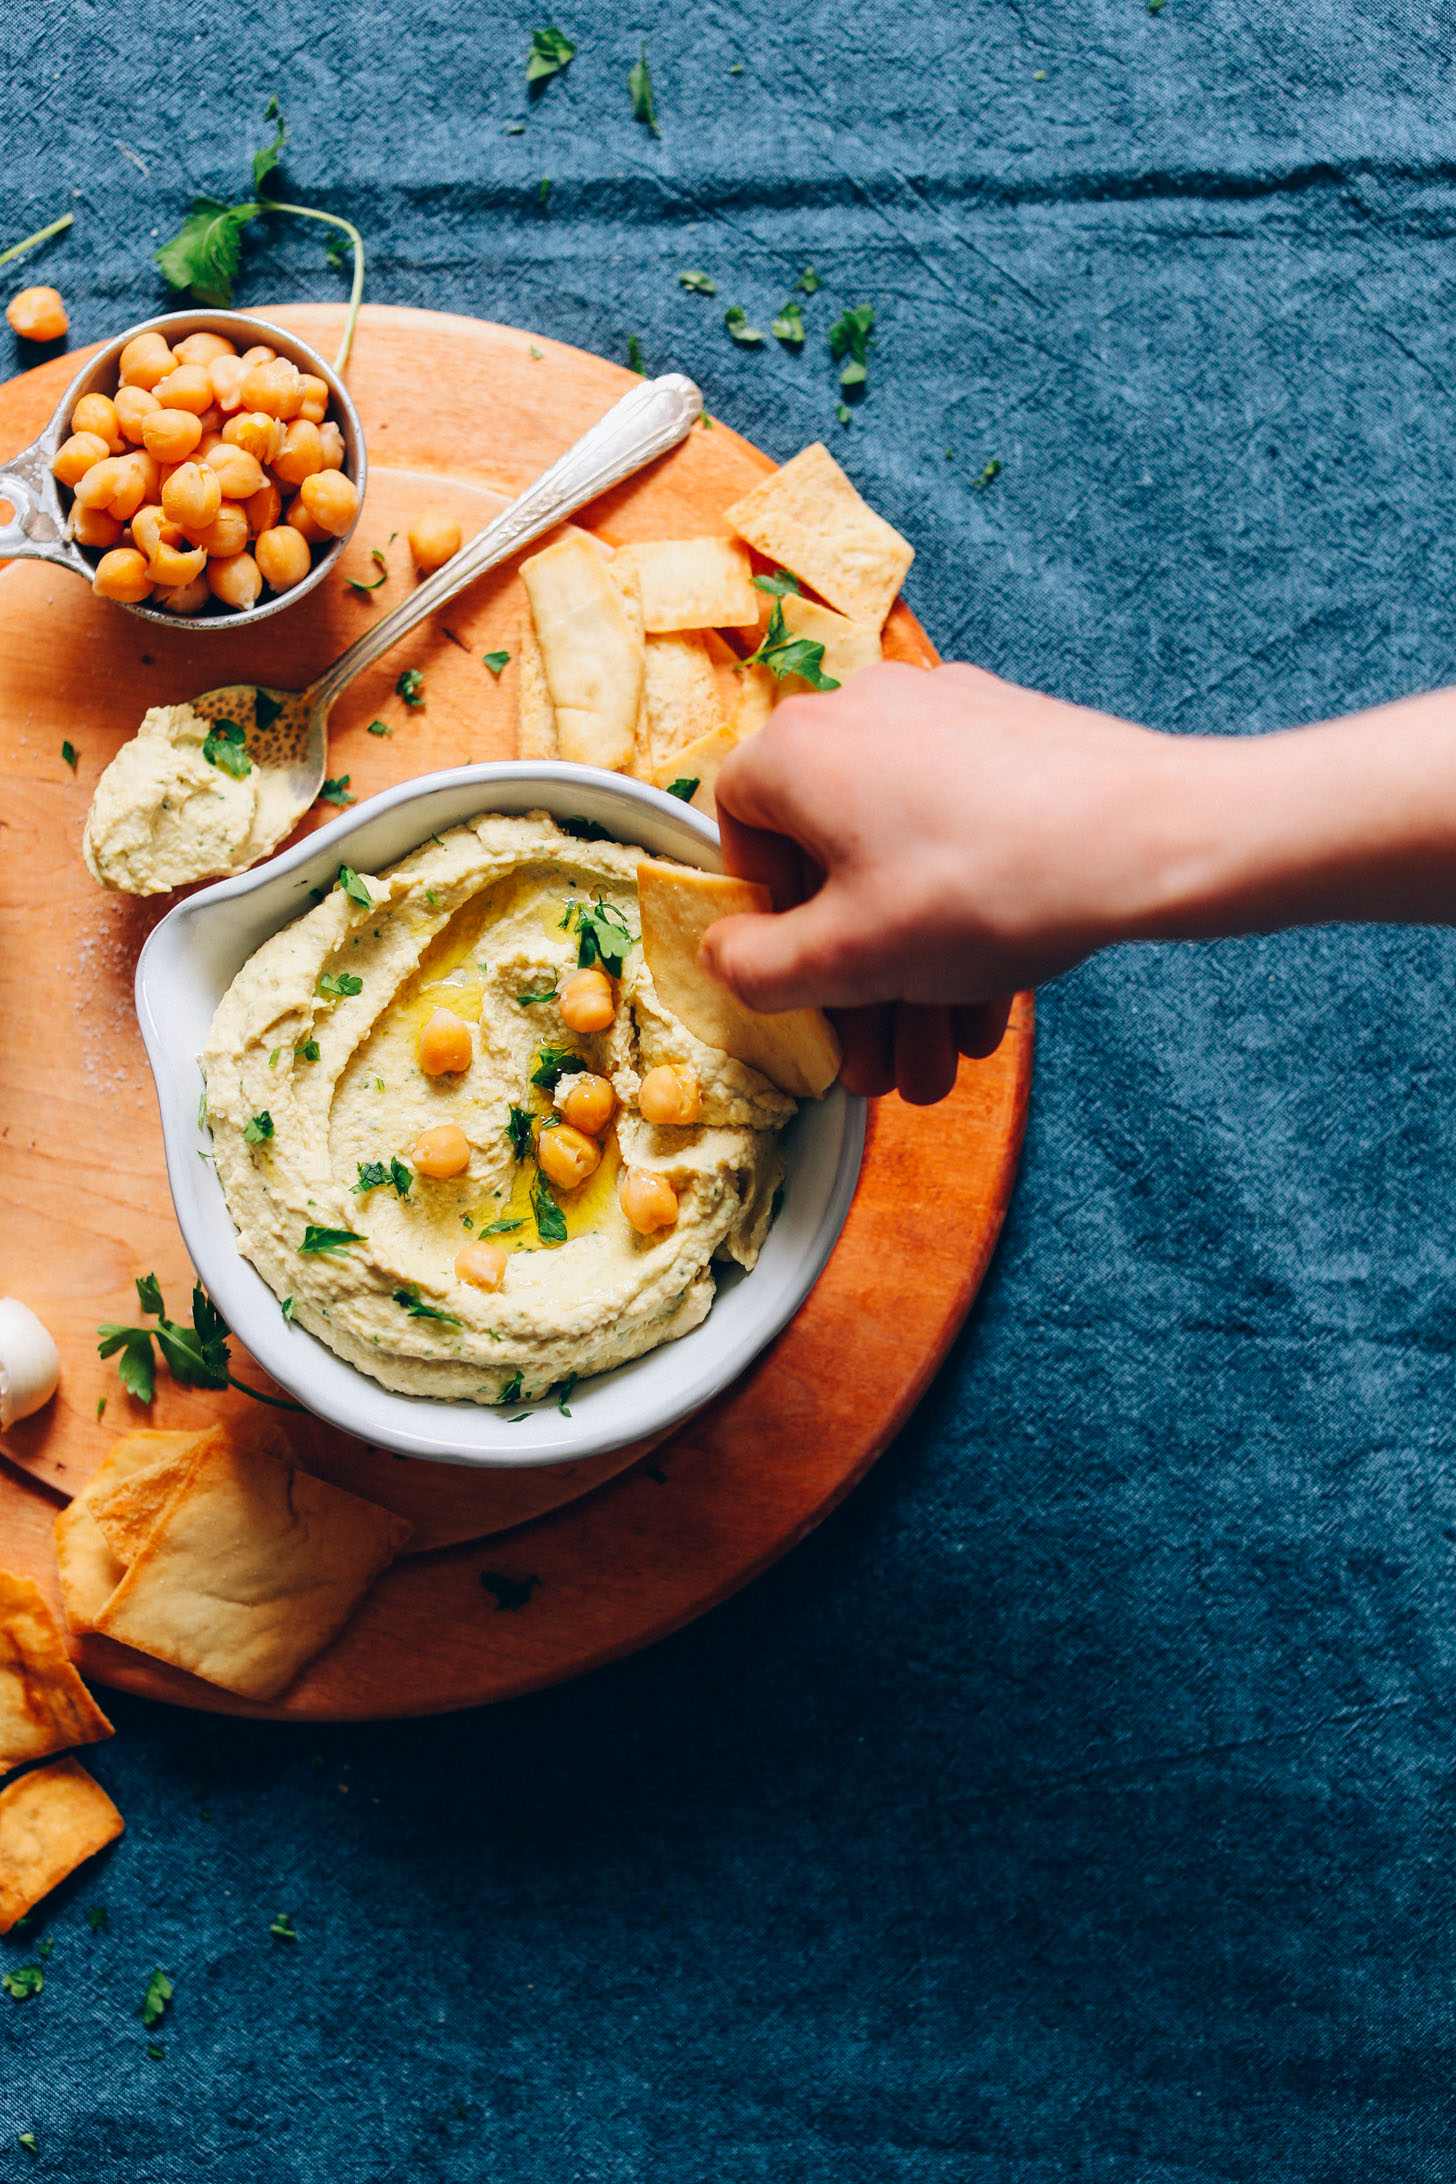
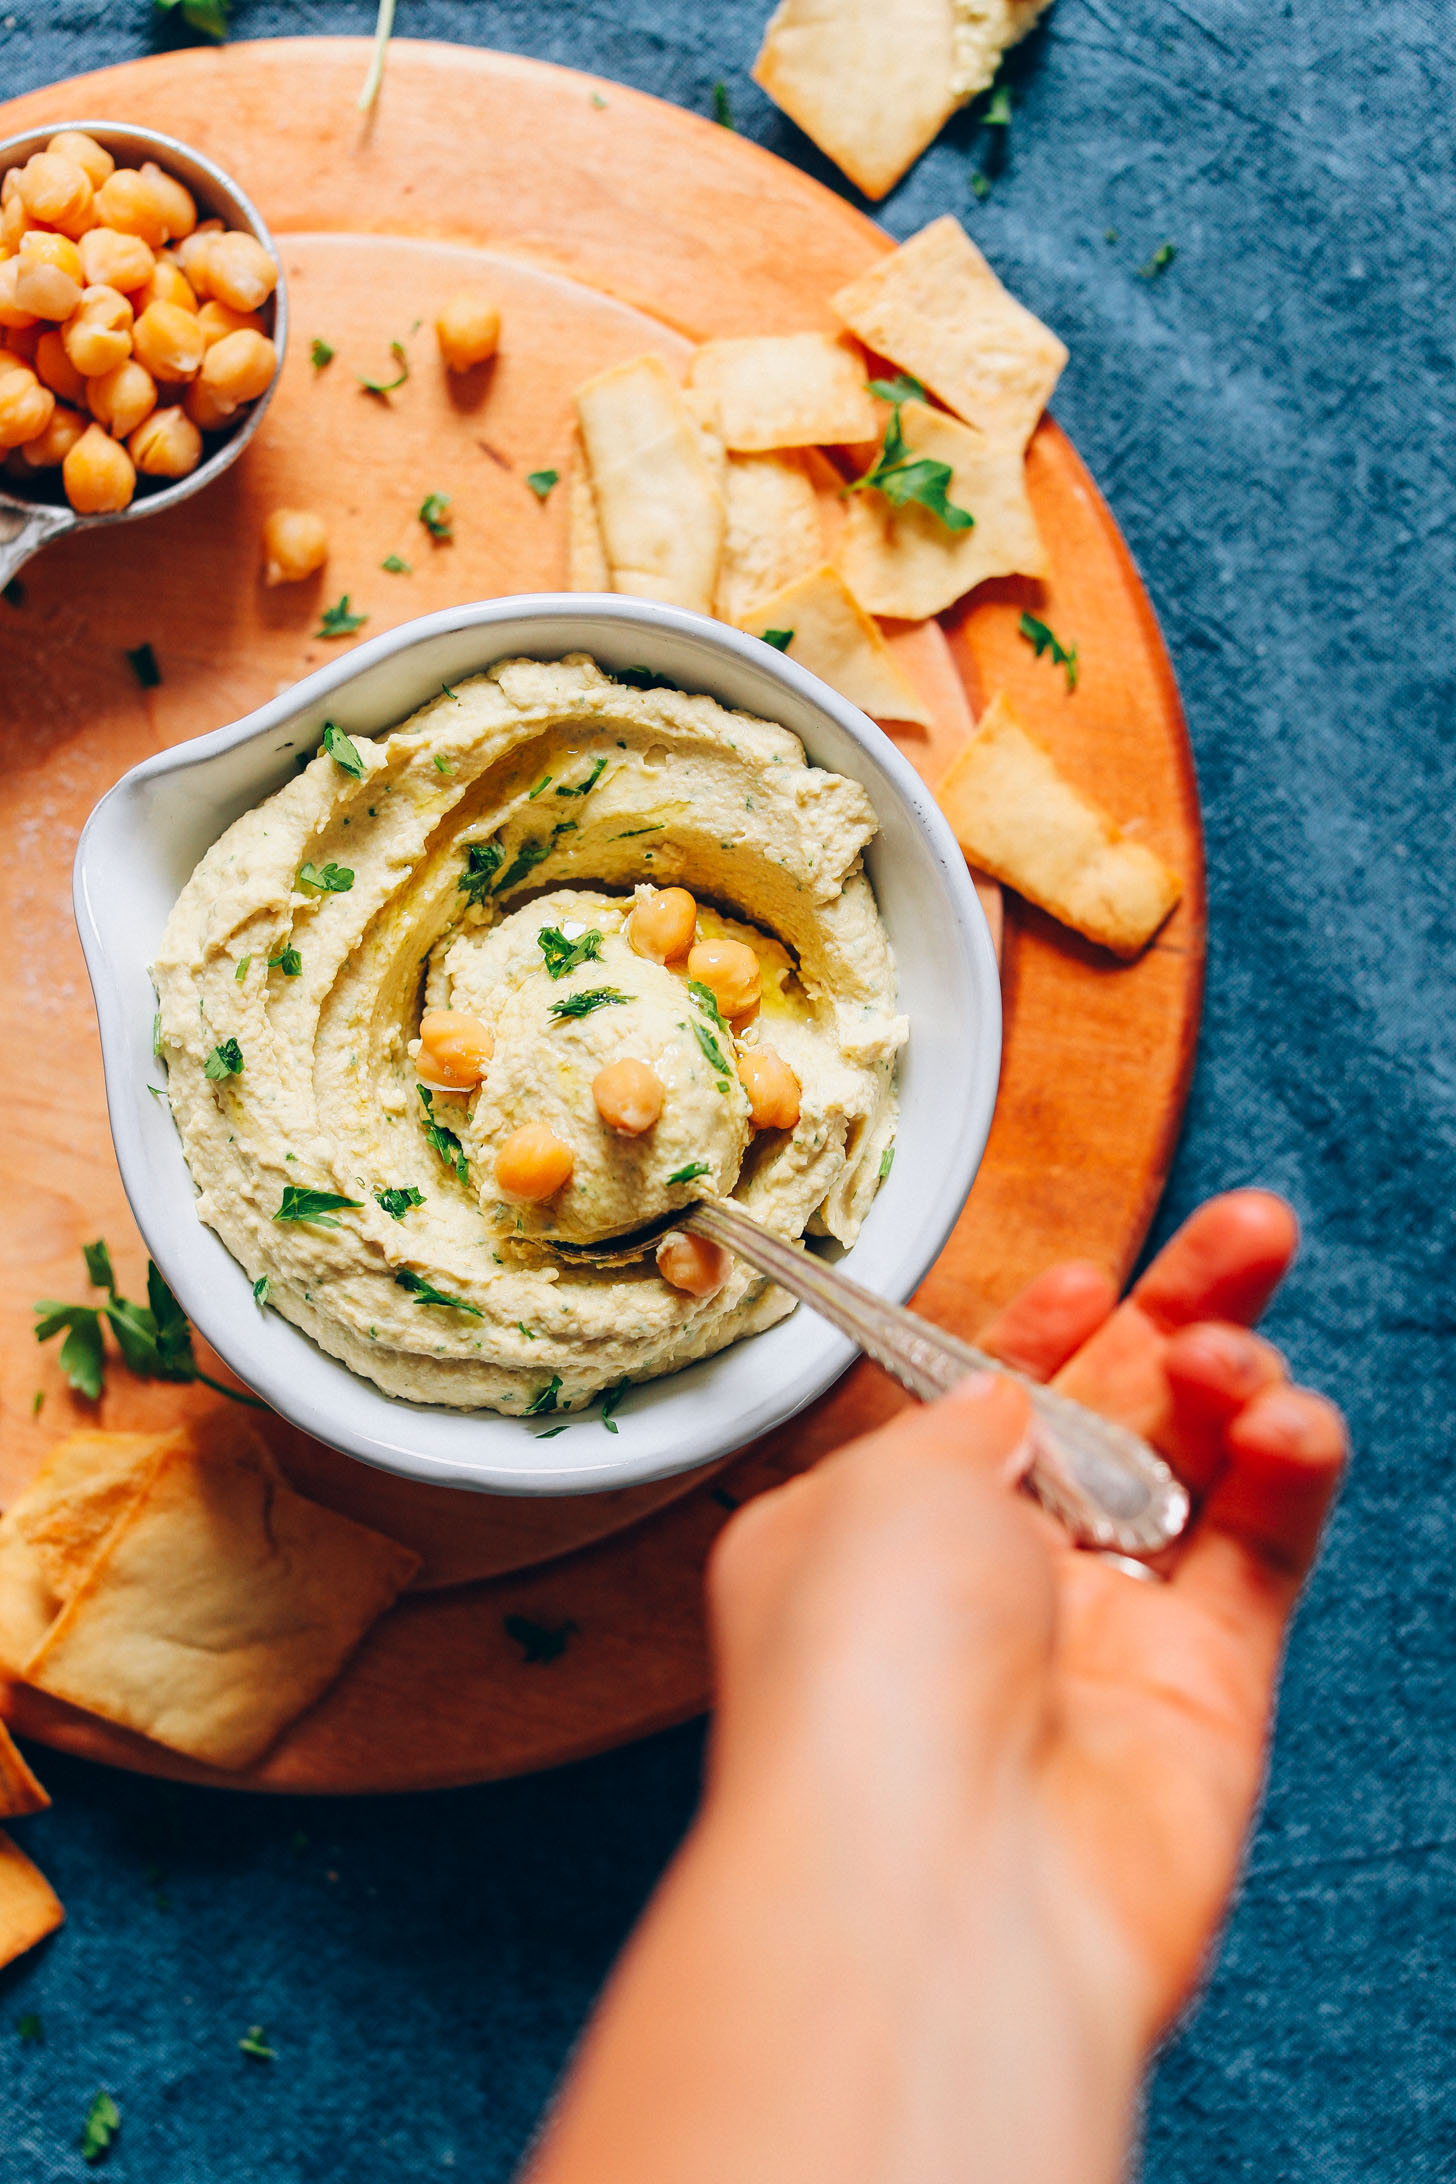
Keep this hummus on hand when you need a quick snack or spread. Our favorite way to enjoy hummus recently has been on top of gluten-free toast. Spread with hummus and then top with mashed avocado, nutritional yeast, and pepper flake! Next-level avocado toast!
If you’re into dips, be sure to check out our Mediterranean Lentil Dip, Easy Muhammara Dip, Chickpea Shawarma Dip, Cheesy Jalapeño Corn Dip, or Kale & White Bean Artichoke Dip!
If you try this recipe, let us know! Leave a comment, rate it, and don’t forget to tag a photo #minimalistbaker on Instagram. Cheers, friends!
How to Make Hummus From Scratch
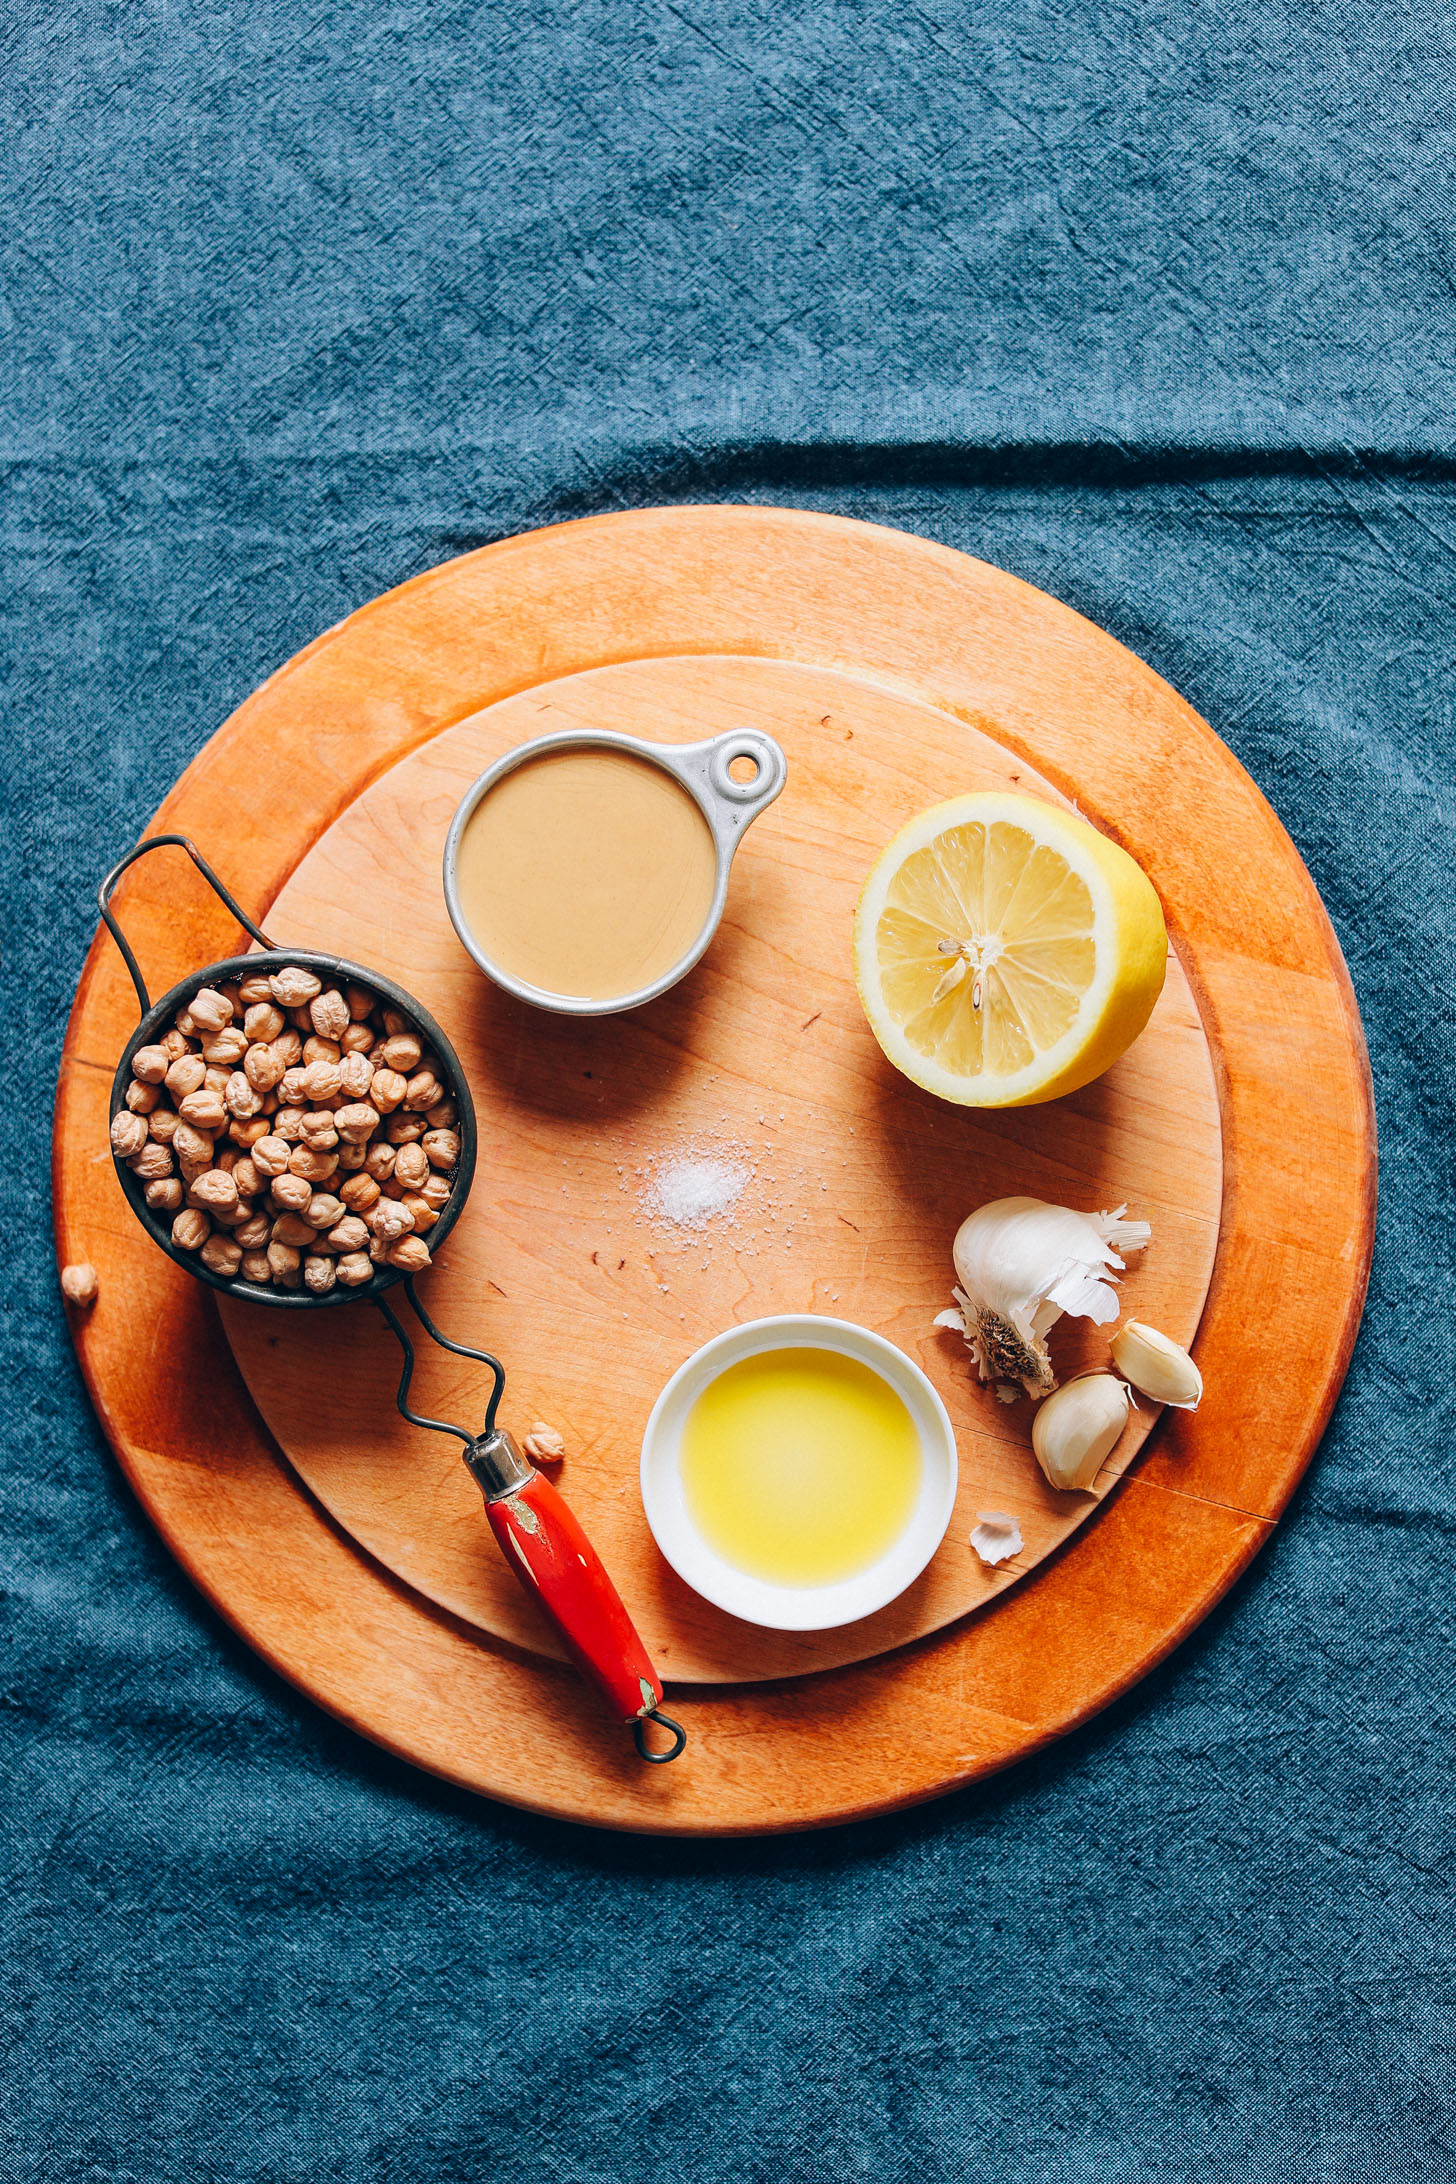
Ingredients
HUMMUS
- 1 cup chickpeas* (uncooked / dry)
- 1 strip kombu (seaweed for improved digestion // optional)
- 1/4 tsp baking soda (for creamier texture // optional)
- 3 cloves garlic (crushed + skins removed)
- 1/3 cup tahini
- 2 Tbsp lemon juice
- 3/4 tsp sea salt
- 1 Tbsp olive oil (if avoiding oil, sub water or more lemon juice)
- 1 Dash garlic powder (optional)
- 1/4 cup fresh herbs (such as cilantro, parsley, or basil // optional)
FOR SERVING optional
- Pita chips
- Cucumber
- Red bell pepper
Instructions
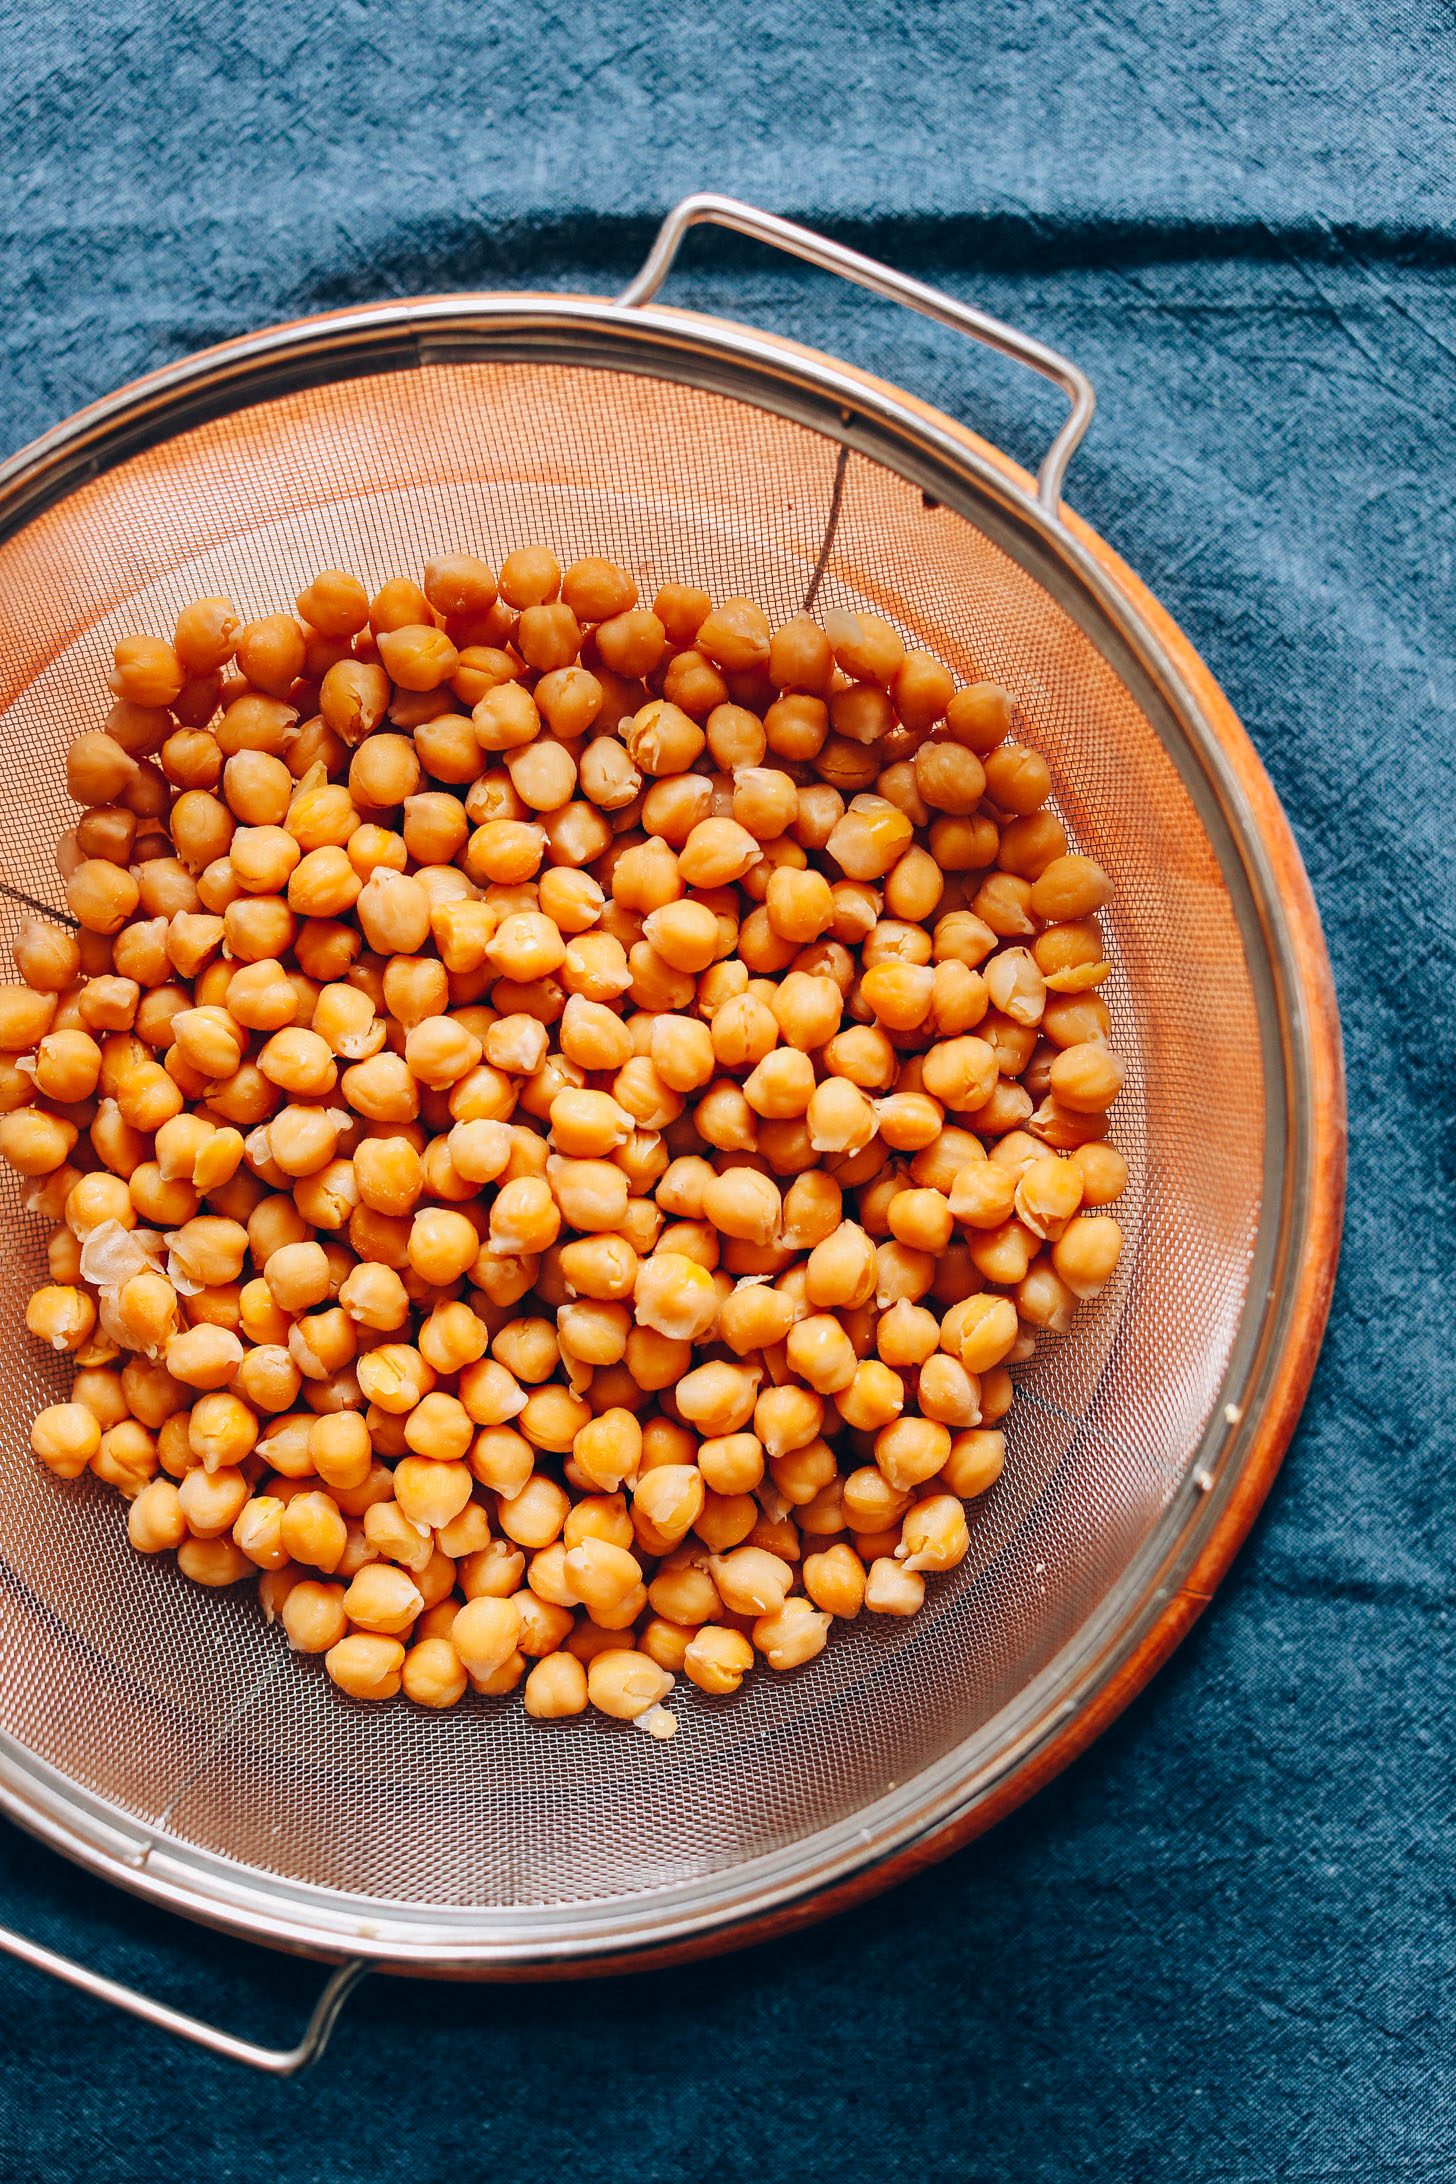
- Add (uncooked) chickpeas to a large pot and cover with 2 inches water. Bring to a boil over high heat and boil for 1 minute. Then cover, remove from heat, and let sit for 1 hour. This is a quick method. Alternatively, soak overnight or at least 6 hours in cool water.
- Drain and rinse chickpeas and add back to the pot. Cover with 2 inches water and add kombu (optional) for improved digestibility and baking soda (optional) for creamier texture (a reader tip!).
- Bring to a boil. Then reduce to a simmer and cook uncovered for 45 minutes to 1 hour or until tender (but not mushy). Remove kombu and discard. Drain. NOTE: You can optionally remove the skins from the beans at this point for creamier texture, but we don't have the patience for that.
- Add cooked chickpeas to a food processor or high-speed blender (a blender will get creamier texture!) along with garlic, tahini, lemon juice, sea salt, and olive oil (or water). Blend until creamy and smooth, scraping down sides as needed.
- At this point, you can add garlic powder and herbs (optional). Blend and taste. Adjust flavor as needed, adding more salt for saltiness, lemon juice for acidity, garlic for “zing,” tahini for nuttiness, or fresh herbs for color and herbal flavor.
- If the hummus is quite thick, add water (or additional oil) to thin until a creamy dip has formed. Enjoy as is with vegetables, pita, or crackers. Leftovers will keep stored in the refrigerator up to 1 week (not freezer friendly — best when fresh).


Göksu Bölük says
Good Morning :)
Just want to make sure that, could we use another bean (such as white, black eyed or red bean) for the substitution of chickpea?
That would work!
Janice Sands says
First of all I hope this comment comes through to you. I know sometimes these things like this can be redirected. I would like to know is it possible to use canned chickpeas?
Thank you and merry Christmas
Janice J Sands
Hi Janice, Merry Christmas to you! You can use two cups cooked chickpeas (measured after draining) and adjust (reduce) salt, as needed. Enjoy!
Suki says
Delightful! Dried chick peas are so economical, easier to control salt too.
On the kombu, might you have any info on digestion? Hard to find either sources patients like me can understand, or quality medical studies. Hope to talk to GI disorder & FODMAP diet caregivers on if it can help people like me with colitis or similar issues. Any guidance appreciated.
Hi Suki, it’s thought that kombu and other types of seaweed contain compounds that support increased diversity of the gut microbiome as well as being rich in a variety of vitamins and minerals. You can learn more here and here. Hope that helps!
Suki says
Greatly appreciated, thank you!
Emma Westcott says
This is delicious! I only had massive garlic cloves so I just used one and that’s plenty. The recipe is easy and it’s so much cheaper than buying 2nd grade hummus from the supermarket!
Lovely! Thank you for sharing, Emma! xo
Danielle Murphy says
This recipe is delicious. I made one mistake by not watching the time. After the quick soak, it said cook for 45 minutes and it turned to mush. So I remade it but check it after 12 minutes and it was good. I added some water cause it was thick. I also added some dill salt seasoning and Sriracha for some kick. Looking in the store, hummus cost $5 or more cause I try to buy local but making my own feels really good plus it’s cost effective.
Thank you for sharing your experience, Danielle! We’re so glad you enjoyed the result! xo
Renea Dodson says
Great recipe..basic ..delicious..
We’re so glad you enjoyed it, Renea! Thanks so much for sharing! xo
Carolyn says
Beautiful and easy to follow hummus recipe! If you could cook your own chickpeas, you’d be even more delighted with your hummus. TRUST ME ON THIS!
We’re so glad you enjoyed it, Carolyn. Thanks so much for the lovely review! xo
Anne says
This is an exceptional recipe. Absolute hummus. Made it plain and simple, (omitted the garlic – allergies). Used the Vitamix. Added no herbs or other optional powders (minimalist 😎). Chose to remove the skins – so easy – and found the process strangely meditative…. Thank you. Making it again today.
We’re so glad you enjoyed it, Anne. Thanks so much for the lovely review! xo
Bzb says
Easy to follow recipe and turned out great! Wasn’t too much of a hassle to remove the skins – ran under cold water spray in a colander and then just had to pick through to remove – added about 10 mins to the process. Was initially too thick and stiff for my blender so I added about 3 tbsp water altogether to address without making it watery. Then added an extra tablespoon of lemon juice and olive oil, smoked paprika and an extra half tsp of salt for flavour.
Yum! Thanks so much for the great review, Bzb!
Lily says
The hummus is greet! So happy I used this recipe. I used one 16oz can of chickpeas that were already prepared (i’m lazy) but applied the rest of these ingredients and portions and it was perfect! I did add extra olive oil and water sine mine did come out fairly thick. I also added some sun-dried tomatoes (jarred in oil) and put them, chopped, in the center of my hummus just like you see in the stores. It added an extra umph! Love.
Yay! Thanks so much for the great review and for sharing your additions, Lily!
Abi P says
This is my favourite hummus recipe! I make a batch once a week and usually have a bit each day with lunch…whatever I’m having for lunch, hummus always improves it 😍 I love a bit of recipe merging, so follow your instant pot chickpeas method to cook the chickpeas, then I drain them and set aside the cooking liquid. I then follow this recipe from step 4, and pour in some of the cooking liquid to thin it out a little. I include from the instant pot chickpeas the garlic that has been cooked, to make it a little more garlicky. And I don’t add in the fresh herbs. I also don’t peel the chickpeas, but always buy my chickpeas very fresh and soak for usually around 10 hours in advance so the skins basically melt away into nothingness! Thank you for such an easy to follow recipe. It’s the one I always recommend to fellow hummus lovers!
Whoop! We’re so glad you’re enjoying it, Abi. Thank you for sharing! xo
MJ says
SO SO GOOD! & even easier than I imagined.
We’re so glad to hear it, Mj! Thank you for the lovely review! xo
Evgeniya says
Creamy garlicky goodness!!!! It’s really really good! I didn’t use Kombu because I don’t have it, and I didn’t add fresh herbs because I’m lazy. Everything else is exactly as written. LOVE!
Woohoo! Thanks so much for the lovely review and for sharing your modifications, Evgeniya. So glad you enjoyed!
Kristen says
I have made this recipe twice now and cannot go back to store-bought again. It’s that good!
I only have a mini Kitchenaid 3.5 cup food processor, but it works just fine for me. Definitely have to add water to get it to the right consistency. I personally find the garlic to be a perfectly fine amount.
The second time I made it I added the Kombu and OMG I am never looking back. I used to get so bloated after eating too much hummus and now I’ve had this hummus with your ultimate Mediterranean bowls several days in a row with ZERO bloating. It’s magic!
I always shell the chickpeas, which does add an extra step. I just put on a fun TV show and have at it.
Thanks for a great recipe and instructions! Highly recommend.
We’re so glad you enjoy it, Kristen! Thanks so much for the lovely review! xo
Lauren says
Yummy! It started really bad though but I’m the only one to blame – I’m still laughing about it :)
I had just cooked some chickpeas so hummus sounded like a great idea. The result was very thick and garlicky (even though I used less than in the recipe as I don’t digest it well). Adding a bit more water, lemon juice and oil did not help. I couldn’t understand because all your recipes I’d tried in the past were spot on.
It’s only when going through the recipe again that it hit me: I had used only 1 cup of *cooked* chickpeas, so 1/3 of what was required! No wonder the taste of garlic was overwhelming :)
Anyway, all fixed up now and it’s just how it’s supposed to be: delicious!
Thanks again Dana!
Oh no! Glad you were able to fix it.
carla s says
I doubled the recipe and it was terrible. Too dry. Too much tahini!
Sorry you didn’t end up loving this! We really enjoy the flavor of tahini. It also makes a big difference which brand / quality you use. Mind sharing the brand? And if it was dry this can easily be remedied with more olive oil or some water.
Dimple Singhania says
I plan to use chickpeas which are soaked at home. Do I need to boil them too if I soaked them for 24 hours before blending?
Yes, they still need cooked!
IrisMPowell says
Hi! Thank you for the recipe.
I shelled my batch of chickpeas and it is smoother. I really was surprised how much I would enjoy the fresh lemon.
I also wanted more of an earthy flavor by a small amount so added 1/4 cup roasted pine nuts(not traditional maybe but still enjoyable for this batch)
Thank you for teaching me to shell the chickpeas, it made it more palatable
We’re so glad you enjoyed it! And love the pine nut addition. Thanks so much for the lovely review!
Manderz says
Have made this a few times, and have chickpeas soaking right now for another batch. Going to take the time to shell the chickpeas this time to get it extra smooth. I LOVE all your recipes!!
We’re so glad you enjoy our recipes! Thanks so much for the lovely review! xo
Zippi Bryan says
Yummm, best recipe I’ve tried yet! I made some small changes:
I didn’t add the seaweed or the garlic, and added a table spoon or 2 of water.
After it was done sprinkled on some smoked paprika and voila, delicious! 👌🤤
Whoop! Thanks so much for the lovely review, Zippi!
Donna says
I don’t recommend putting all the ingredients in your blender as instructed. It barely worked for me. I had to add a lot of liquid, and my blender made weird noises and smells, even though I tried my best to be careful and scrape it down/mix it by hand in between.
Another commenter suggested emulsifying the tahini and lemon juice in the blender first, perhaps that would have worked better. Good luck!
Donna says
For context, I was using a vitamix, canned chickpeas, olive oil, and some of the liquid from the cans (aquafaba).
Just saw this update! To confirm, you were using ~2 cups of cooked, canned chickpeas, not 1 cup? Also, depending on the model of Vitamix, that can make a difference. We prefer the 5200 model because it has a narrow base so you don’t need as much volume to get it blending.
Michelle says
This can be easily done in any Vitamix (I work for them and do it all the time) just make sure you are on the highest speed and using your tamper the whole time. You may need to add more liquid. You can always reference the Vtamix recipes for proportion and then apply that ratio to this one. I will be using mine to do this recipe!
Hi Donna, sorry to hear that was your experience! We wonder if you have a blender with a wide base? That can cause there to need more volume to blend properly. You can also reserve some of the brine the chickpeas cook in to add, as needed. Hope that helps!
Becky says
I made this in my Vitamix and it is fantastic! I used canned chickpeas and added a little aquafaba to thin. I also added a splash of tamari (so good in hummus!). The consistency is perfect and it tastes so much better than store bought.
Yum! Thanks so much for sharing, Becky! xo
Linda Dabulewicz says
IYour recipe looks great I am going to try it tomorrow! MY garden is overloaded with sweet peppers and fresh herbs . Hubby bought me a bag of dried chick peas . Will start in the morning . Oh and I need a baba ganush recipe too Too much egg plant :) I love summer
Agreed- summer is the best =) Enjoy, Linda!
Isabelle says
Awesome recipe, but a bit too much garlic. We only put in 5 small cloves, and it was still too much!
Thanks for the feedback, Isabelle!
Sofia says
I have been making hummus with canned chickpeas and was looking for a recipe that uses dried (that also has instructions on how to fast soak), so this was perfect. I kept wondering why my hummus never came close to how good the local Mediterranean Cafe’s is, so wanted to try dried. It came out so much better! I don’t think I cooked the chickpeas enough (they could have been a little softer), and I used the juice of two lemons (so probably more than twice of what the recipe says) and added some cumin and a dash of cayenne. I also fried (didn’t have the patience to roast) three very large garlic cloves (raw garlic will follow me for days) and added them with the oil into the food processor. I also had to add cold water and oil to thin it, since it was a very pasty consistency (my tahini was very thick). It was delicious! Very creamy and soft flavor. I will try adding other things next time, like roasted beets or peppers. Love all the recipes on this blog!
We’re so glad you enjoyed it! Thanks so much for sharing, Sofia!
Kristin says
I enjoyed this recipe! I used the aquafaba instead of oil, and it worked out great. Thanks!
Lovely! Thanks for sharing, Kristin!
Kait says
While I had to make some adjustments due to being out of fresh garlic and low on tahini, this hummus still tasted great and had a perfect consistency. I did, however, remove the membranes from the chickpeas because I personally can’t stand their texture. It was a tedious task but worth it in my opinion. I added a mixture of jalapeño and garlic stuffed green olives and kalamatas at the end as well as some cilantro and red chili flakes. Very delicious and I will definitely make it again. Thank you!
Thanks for sharing, Kait! We’re so glad you enjoyed it!
Ronica says
This is so easy, packed with flavour and yummy! Thank you MB for another great one! Yippee
Yvonne says
This is a REALLY YUMMY hummus!!! The first time I made it I didn’t use the optional kombu, garlic powder, and herbs because I didn’t have any of those ingredients on hand. It was still yummy. But, the second time I made it, OMG! it was even better!!! I still didn’t use the optional kombu, garlic powder, & herbs, but I roasted my garlic cloves & a red bell pepper to add a different flavor! It was TO DIE FOR!!! My husband & I loved it!! Even our daughter that’s 7yrs old approved! We tried it with crackers, cucumber, and ancient grain tortilla chips–all good with hummus!!! Thanks soo much for sharing this recipe!
We’re so glad everyone enjoyed it, Yvonne! Thanks so much for sharing!
Rachel says
It was a lot of work, but very good! The chickpeas were the perfect texture.
Thanks so much for the lovely review, Rachel. We are so glad you enjoyed it! Next time, would you mind leaving a rating with your review? It’s super helpful for us and other readers. Thanks so much! Xo
Amy Brennfoerder says
First of all, I didn’t know you could get chickpeas other than out of a can! :) I followed this recipe almost to a tee and it turned out to be the best hummus I’ve ever had. Now, granted, I’ve only ever had store-bought, but this was amazing. It was a little dry, so I added a dash more lemon juice and olive oil and then I added 4 tablespoons of water, to get the perfect consistency. Topped it off with some toasted pine nuts and it was simply delicious! No more store-bought hummus for me!
We’re so glad you enjoyed it, Amy! Thanks for sharing!
Patrick Whitelock says
It’s a very basic recipe. Way too much garlic I would add only 1 to 2 cloves as raw garlic is very pungent and overpowering for the amount of chickpeas in the recipe. Also double the lemon juice and oil and add reserved cooking liquid to loosen the mixture as you blend.
Thanks for the feedback! We appreciate it.
Kay says
Any tips on making this recipe by cooking the chickpeas in an instapot instead of on the stovetop? Many thanks!
Hi Kay, here‘s our recipe for cooking chickpeas in the Instant Pot. Hope that helps!
Natalie says
Soaked the beans overnight in water and tablespoon baking soda. Next day drained and boiled till tender. Then I followed your recipe. So easy and delicious AND fresh!
Thanks so much for sharing, Natalie. We are so glad it worked well! Next time, would you mind leaving a rating with your review? It’s super helpful for us and other readers. Thanks so much! Xo
Sandra Al-Dabit says
If you boil your chick peas in baking soda for a few minutes after cooking (or even straight out of the can), then roll them between your hands after draining them, then rinse away the shells several times it will easily take away most of the cellulose membranes. Hope this helps!
Natalia says
Hummus is supposed to be simple just as this recipe suggests. Unfortunately this time didn’t work out for me. I followed the recipe to the gramm/spoon/cup. First the mixture was way too dry and tastless so I ended up adding more oil, more lemon juice, more garlic, more tahini, I even had to add water to allow the blender to work through the ingredients as the whole mixture was too dry….after almost destroying the blender due to overheating as the poor thing had to work very hard, in the end..I guess this was edible but I can not attest that following this recipe allowed me to create an amazing hummus. Sorry :(
Hi Natalia, sorry to hear that was your experience! Is your tahini drippy in consistency? We wonder if maybe it was a drier brand and that caused the issue? It sounds like the dryness may have been hard on the blender.
david ash says
blender or food processor ?
Either can be used!
Nancy Fleming says
This is sooooo gooood!!! Thank you!!!
Thanks so much for the lovely review, Nancy. We are so glad you enjoyed it! Next time, would you mind leaving a rating with your review? It’s super helpful for us and other readers. Thanks so much! Xo
Gayle says
I am intrigued by adding khombu, which I have, but the recipe doesn’t say what to do with it after simmering it with the chickpeas. Do I remove it, or do I process it with the chickpeas & other ingredients?
Hi Gayle, Thanks for letting us know! We would recommend removing it.
Barb Chamberlain says
I keep coming back to this recipe. Confession that in place of cooking the chickpeas I use 2 cans of precooked. I drain and save the aquafaba, then use some of that to thin it a bit, which maintains the flavor intensity.
Wonderful! Thanks for sharing, Barb!!
Deborah says
Awesome recipe, as usual! I added a roasted red bell pepper and 1/4 cup of fresh parsley. Will add a touch more salt next time I make it.
Thanks so much for the lovely review, Deborah. We are so glad you enjoyed it! Next time, would you mind leaving a rating with your review? It’s super helpful for us and other readers. Thanks so much! Xo
Lynell Aber says
The recipe was great, I did not know what tahini was, so I had to google it. Turns out I have 30 lbs of roasted sunflower seeds. So I made seed butter, than added it to the chick peas with the lemon, garlic and salt, I also added a little horseradish and some sesame dressing. We all thought it was good.
Also I cooked my chick peas in a pressure cooker to save time.
Thanks so much for the lovely review, Lynell. We are so glad you enjoyed it! Next time, would you mind leaving a rating with your review? It’s super helpful for us and other readers. Thanks so much! Xo
MarinaRae says
I love this recipe and have used it before. One tip for other cooks is to let the chickpeas cool in the cooking water, then save the water after you drain the chickpeas and use that to thin it down if needed. (The first time I made hummus I poured out all cooking water and had to add quite a bit of extra oil and water to get the right consistency.)
The cooking water still has a bunch of goodness in it and can be used as aquafaba (vegan egg replacer). If you want it a bit thicker simmer it until it thickens up. This can actually be used to make vegan meringue! You can store the aquafaba in the fridge for 2-3 days or in the freezer for 2-3 months.
Linda says
Wow I just made my first ever batch of hummus and it’s sooooo yummy!!!!
I used a can of chickpeas (398ml) and didn’t change anything else except using slightly less than 1/3 cup tahini. Will make over and over again till I can’t stand hummus anymore (which will probably be never) thanks Dana! Love all your recipes, this is probably the 20th one I’ve tried, everyone has been a delicious success and adventure, even made a pan of cinnamon buns and shortbread cookies for a rescue animal bake sale and sold real quick! (Cuz c’mon, baked gold basically) you’ve made plant based eating for me and my loved ones really easy and tasty. I don’t know if I’ve left other reviews in the past but I want you to know that You da best! Would have you over for dinner any day.
Wonderful – thanks for sharing, Linda!
Lauren says
Could I use canned beans instead of dry? This recipe seems so good I can’t wait to try it!
Hi Lauren, Just use two cups cooked chickpeas (measured after draining) and adjust (reduce) salt, as needed. Let us know how it goes!
Esther says
Hi! I made this the other day and while the flavor is delicious it’s not the creamy texture I was hoping for-I suspect it’s bc I didn’t cook the chickpeas long enough and then had to process them longer in the FP. Which brings me to my actual question, does your food processor have space near the handle for food to collect? I have a Cuisinart-not the model you have- and I’ve done everything I can think to clean it but realize its time to buy a new one since this is an unfortunate food leftover situation.
I wanted to get your advice re food processor recommendation but one where the cleaning is low maintenance ie no weird compartments where food can collect. Thank you!
Mine does have a space where food can collect so I just have to be vigilant in watching for that. However, it’s dishwasher friendly so it’s easy to clean! To get your hummus super creamy you can also try blending in a high speed blender.
Esther Rowan says
Hi Dana! Thank you for replying, I have a follow-up question if you don’t mind. I normally wash it right after use and have run it thru the dishwasher but the pesky food items wont budge (I find their presence quite gross and worry there is potential for contamination.)
Since I am past the vigilant phase, do you have any other recommendations for getting the intruders out? I’ve only had my FP for a year and I am new to do’s and how-tos in regard to maintenance and use.
So strange. I’d recommend running through the dishwasher (if that’s possible) which will help decontaminate. Also, you could try getting a small wire tool with a brush on the end to get in the cracks :D
Esther Rowan says
Okay! Thanks for all the help <3
Morufat Alawiye says
Thanks for the recipe. I will use the dry chickpeas instead canned ones. The canned chickpeas was too salty for my taste. I try this recipe and hope for the best.
Evan Carroll says
Hello, I like the Seaweed Idea! FYI: If you first boil the peas with 1 teaspoon of Baking Soda, (Not Powder) it will remove the shells for you and just scoop them off then rinse :-)
Thanks for sharing, Evan! We recommend trying that as well (it’s now in the instructions as an option).
Kaimana says
followed this fairly closely. didn’t use kombu or baking soda and it turned out fine.
today i stirred some chipotle hot sauce into a small batch and it was excellent.
if you do this, make your own tahini. trust me.
valerie says
where did you get the dish with strainer looks like a great combo to have
Oh that’s just a bowl with a strainer separate. You can find those items individually in our shop.
Maddie Shaw says
mine super nutty. what should i do to calm it down? i also tripled the recipe..
cut back on tahini!
Pamela Jones says
I used can chickpeas and your ingredients..I love it..thank you
Thanks for sharing, Pamela!
Brian Nash says
Can I use my kitchen aid mixer
Are you speaking about a stand mixer? If so, I don’t think that would work…You need something with a blade, such as a blender or food processor.
Scot says
Thanks for this great recipe. I used extra lemon juice but less sea salt. The only herb I used was cilantro. I roasted the three cloves of garlic before mixing. That reduced the garlic zing factor. I will definitely use more and different flavors in my next batches.
Ruby Donlen says
I didn’t have Tahini but saw someone else used peanut butter, fine supplement, not the same flavor but still yummy, also opted for flavor free coconut oil about 1.5 teaspoons.
Jen says
Your hummus display is beautiful! Usually I cannot wait to dig into my hummus I didn’t really think about making it pretty. But when I’m hosting I will definitely borrow your ideas :)
Anastasia says
I made it this weekend and it turned out great! So much better than any store-bought hummus I’ve had. Thank you for the recipe!!
Ginny Levin says
This is delicious. My Grandparents lived in Jerusalem back in 1903! They learnt to make Hummus from their old neighbor, an old Palestinian lady. After grandma passed, I got all their original recipe cards, the only differences are, 1- They blended it by hand at that time and, 2- they did not use Kombu!
Claire Alt says
Recipe comes out at 0 flavor other than blended beans. If that’s what you want this would be great. I wanted some flavor. After spending a bunch of time adjusting and adding more and more stuff, I threw it away and bought some at the store. Then I threw the recipe away. Terrible results!!!!! 1 star lowest possible, otherwise would be 0.
Claire – we’re so sorry to hear you had trouble with this recipe. We always assume salt and garlic are to personal preference so intentionally keep them low and encourage readers to add more to taste. Sorry this one didn’t work out for you! We appreciate the feedback and will revisit the recipe for any improvements.
Bonnie says
How long will the hummus last for?
7 Days, refrigerated!
Kevin says
Hi Dana,
I tried your Apple crisp recipe with great success and love it and saved it, Thank you!!!
However I think there’s something wrong with the measurements on this recipe. I substituted water for extra oil, but had to add a lot more than 1 Tbsp and then it still turned out like Hummus concrete pretty much.
I looked online for how much one dry cup of garbanzo’s would be cooked and it was 3 cups cooked, which I used.
I don’t think 1 tablespoon of oil would have made a lot of difference.
Any suggestions would be appreciated, thanks!
Hi Kevin! Sometimes that is the case and when your hummus is too thick, we recommend adding water (or additional oil) to thin until a creamy dip has formed.
Ashley says
We don’t add oil to our hummus at all here in Israel, but we do add a ton of water. The tahini gets very thick when you mix it with a little bit of water, which means it needs an almost equal amount in order to smooth it out.
Kevin says
Thanks very much for the info Ashley, I’ll try it.
Sara says
Thick! That’s what’s great about this recipe (and others w/little water) as oppose to the store bought ones.
Mai says
So I’m giving this recipe 5 stars on the strength! I made a vegan cake which I’m positive came from this site & of the 24 cupcakes I baked to share with all my non-vegan friends….i ate 14 of them. Surprised I still see a lil tummy muscle?. But so much for trying to convince non-vegans that indulging in mouthwatering, heart warming food can happen on the other side. That said…i actually have used this recipe for years (Arab heritage) but I add a little vinegar to my blend.
You are AWESOME & your website is the Bomb! Thanks for sharing its wonder with all of us?
Georgie says
Chickpeas are fantastic. Try the chickpea soup recipe by Michael Pollan. It’s miraculous. So simple and full of flavour. I’ve just made a load of hummus this morning to go with your flatbread recipe. I followed Yotam Ottenlenghi from his book Jerusalem. In it, he doesn’t use oil and instead used 100ml of ice cold water. I always pop the garlic into freshly boiled water for a couple of minutes to take the ‘edge’ off.
If you want really silky smooth hummus, skin your chickpeas as recommended by Simon Hopkinson. I know, it sounds a bit daft but it doesn’t take too long when you sat in front of the TV. I only do this for special occasions! I have retained a spot of sanity :-)
LickBasil says
There’s this technique I found from some recipe online a while ago for making the best hummus and the writer suggested to deskin every bean that goes into the hummus. I know it sounds tedious but the end result was like no other hummus I’ve tried before. the texture was on point! I don’t know if someone shared this tip already but here it is just in case it hasn’t.
Thanks for sharing! I’ve tried that before, too. If you have the time it’s a nice spin!
Cassie Thuvan Tran says
Hummus is the BEST!!! My food science lab and I made a similar recipe and LOVED it. We’ll have to try this one out and see the results!
Danie says
Why is everything you make so yummy? lol. I’ve tried multiple hummus recipes before and they were all mediocre. This one is bomb. Even without oil!
So kind! Thanks Danie!
Lori Kalemkerian says
I am a hummus purist. None of this red pepper or curry or vegetable hummus for me. The best hummus I have ever tasted (and now make) is my Syrian Armenian grandfather’s recipe which is over 100 yrs old. Too much tahini and garlic ruins the taste. 3 Tbsp of tahini and 1 – 2 small cloves of garlic to 14 to 19 ounces of cooked beans is plenty. The raw garlic can be bitter so sometimes I roast it to smooth out the taste. I also use 1/4 cup of the best olive oil. It emulsifies and makes an unctuous paste. And the most authentic hummus is made with a lot more than 2 Tbsp of lemon juice. I put at least the juice of 1 to 1 1/2 lemons. And to finish it off it is decorated with some ground cumin, paprika and some sprigs of fresh parsley. Perfection.
Sarah says
Thanks & sounds amazing.
My next-door neighbours growing up were Armenian & made the most delicious food.
Jamilah says
Wonderful tips. Thank you all.
Natmari's Corner says
I don’t have a food processor? Can I make hummus in a blender?
Absolutely! Just add a bit more liquid if needed (either lemon or tahini or oil or water) to help encourage blending if it has trouble.
The Local Sprout says
This looks amazing! Can’t wait to try it :)
Janet M says
The Israelis I learned from drizzled olive oil and a little harissa in the center.
Kathy says
I created a hummus that is very satisfying. I use canned garbanzo beans, through in some cooked chicken, add your favorite spices, Bragg’s amino acids and some garlic of course. Whatever fresh or leftover veggies I find in the refrigerator. You can add some chicken broth or some sour cream so that it will have the sticky consistency to cling to a gluten free pretzel stick or rice cracker. Travels well and can be enjoyed by all ages.
Helen says
I read an article by Yotam Ottolenghi when asked about the best hummus and he said Al
Arz Tahini is the best. I notice you can get it on amazon. I definitely have tried a variety if tahini and some is quite bitter and just not great.
Also, peeling the chickpeas is a thing too – if you really need something to do for an hour!
Mandy f. says
Hey Dana, try making hummus with cannellini beans. The texture is amazing. One of my all time favorites.
Danielle says
I’ve used canned chickpeas and don’t notice a substantial difference when ive cooked from scratch. But I do really notice a difference when I remove the little skins! Also just a heads up using baking soda when cooking legumes can leech out the B vitamins from them so try not to do that all the time (or at least make sure you’re getting in other good sources of B vitamins) just a friendly tip from a dietitian in training :)
Thanks for sharing, Danielle :D
Beth ann says
Hello Dana!
I have not had a chance to try your quick soak method yet, always soak overnight with salt, but have found that by adding 1/4 tsp. Baking soda while cooking lends essential component to truly making the super smooth whipped dreamy hoummus you desire.
With all due respect , your photo does not depict this.
The baking soda is what helps tenderize the ‘husks’ which in the past I’d have to peel to get desired results! They’ll even naturally float away if you have the impulse to discard.
Then I can use food processor to quickly whip, no need to use blender, as all the fiber bonds have been broken down. Yes, also to emulsifying lemon and tahini first.
I love the idea of adding the aromatics , and look forward to trying that pro tip!
Thanks for all you do! Your posts are like opening a Special gift everyday ! ?
You are soooooo apppreciated!
I”d heard of this baking soda tip until you all shared. SO SMART! Doing this next time!
Jacqui says
Can I use canned chickpeas? By the way I have loved every recipe I have tried! Great job!
Yep! Just use two cups cooked chickpeas (measured after draining).
Sam says
Soaking some chickpeas now, can’t wait to eat tons of hummus for dinner… :-)
P.S. I so appreciate the serving calculator–it’s almost like you’ve thought of everything! Thanks!
Angela says
I’m so excited to try this recipe incorporating all the expert tips from posters. I while back I found a recipe on how to make your own tahini and wow what a mistake. This is just one of those things that is worth it to buy. Does anyone have any recommendations? I just buy the brand available at my local grocery store, but I have no doubt it’s not the best.
Mandy f says
You can definitely make tahini at home. But buying is so much easier. There’s no big secret to making tahini. Be sure to buy hulled sesame seeds. The skin makes specially difficult to achieve consistency and the also make the whole thing bitter. (I have bought whole sesame tahini in the past, it’s way healthier, but it lacks in taste and consistency.)
Use at least 3-4 cups os sesame seeds (depending on the size of your food processor, maybe a little more). Dry toast the seeds on a frying pan, until golden and aromatic (don’t over do it, burnt sesame seeds taste awful). Let the seeds cool a little, before throwing them in the food processor.
Then, is like any nut/seed/coconut butter. Mix, scrape, mix, scrape, repeat until smooth and creamy. It’s definately not going to be perfectly smooth, but it’s gonna be tasty.
Betty Lester says
can you make this without tahini, I find it very bitter and do not like the flavor. Thank you for your recipes.
Hi Betty, you could make this with cashew butter in place of tahini, or possibly just more oil/water/lemon juice to help it blend and get creamy.
Ana says
Hi!! I love this recipe, it’s so easy to do… I had just a couple of questions. The first being: do you need to remove the skin from the chickpeas once they’re soaked? And the second: when you add for example chipotle o jalapeño or something else doyou just throw it in the food processor and you’re good to go? Also, what kind of chipotle do you think is best?
The skins, in my experience can stay or go. If some have easily been removed, discard them, but no need to go through and peel every chickpea. And yes! The flavor add-ins are simply added into the mixing process. My favorite chipotle is chipotle in adobo. Hope that helps!
Lori Hoch Stiefel says
I make hummus all the time, and I agree that the quality of tahini is key. I don’t like to add oil in mine so instead of extra water, I add in aquafaba to make it creamy. I also use plenty of garlic and like a dash of smoked paprika in mine.
Smart tips!
miss agnes says
Thank you for this simple recipe. I really want to try it for my kids who are unfortunately allergic to sesame (big time). So is there a good substitute for tahini (no nuts, they’re allergic too) ? Or can I just use all the other ingredients and still get a decent, tasty humus ?
I’d say omit at first and see how it goes. Perhaps use more oil to achieve the creaminess?
miss agnes says
Thank you for your quick reply. I will try that.
maria rangel says
Well I always make my hummus without tahini and without lemon. And it taste great and is very smooth….and tasty!
maria rangel says
And I also put a little cayenne and cumin on top sometimes…taste great with EVOO.
Nollz says
are they allergic to all nuts and seeds? try unsweetened sunbutter!
miss agnes says
Sunflower seeds are ok, thanks a lot for the tip.
Ash says
Hi… I use coconut milk to substitute , variously , for tahini, nuts or oil
LemonPi says
Love the simplicity of this recipe! The one change I made was to first whip the lemon and tahini together; it adds a lot of air to the hummus which makes it light and dreamy. There are other tips here that I appreciate and am excited to try!
Smart!
Shlomi says
I have to concur that long soak and cook times are essential. Generally you eat in the morning the hummus that was soaking from yesterday. From the image it appears the hummus is too rough. It should be smoother. Ideal serving of humus is arguably with ful and egg. Ful requires a whole separate preparation. The whole thing is a very big to do, but there’s a big difference in the result between a two hour hummus and a 24 hour one.
I so appreciate the tips!
Celia says
Great recipe but I soak my chickpeas overnight. I find the way I like them best is to boil them for 10 minutes then change the water and cook them overnight (8 hours minimum) in my slowcooker on low. They are cooked through but aren’t mushy and still have a nice bite.
Whoop! Thanks for sharing!
Shai says
I live in Tel Aviv and one of our local jokes is that Hummus is the real religion around here. Anyway, making the perfect batch of Hummus is a national sport and unless you’ve been here it’s difficult to have a reference for what constitutes good Humus because the variety is just amazing (and painfully hard to reproduce at home). Packaged Humus is just awful everywhere by comparison.
Here are some tips I’ve collected over the years for making Hummus. Some of them I accept some of them not so much, there is a lot of trial an error involved. Hope this is interesting:
– You need to use the small chickpeas (Bulgarian chickpeas are often referenced as the best)
– The quality of the Tahini is key the variety of quality with these brands is pretty big
– I like garlic but a lot of people claim that it isn’t used in the best recipies
– 24 hour soak time is a minimum
– Adding an onion/carrot to the cooking water for flavor is considered one of the secret ingredients – it isn’t used later just as an aromatic (I like the combo idea and used similar methods in the past but I can guarantee it’s inauthentic)
– Baking soda in the water is a huge controversy – some claim it’s essential where others claim it destroys the flavor I guess it depends on the water acidity
– I like pressure cookers but as far as I can tell the traditional restaurants don’t use them
– Some use the cooking water instead of filtered water when grinding the Humus. Some claim you mustn’t but one thing is sure, you must let everything cool a bit before adding the Tahini as it’s very temperature sensitive
– It’s common to sprinkle paprika and maybe some eastern cumin on top (notice that this isn’t Indian Cumin which is different), I used to spice my Humus when I ground it up but now I think that was a mistake
Shai, I so appreciate the tips and wisdom! Thanks for sharing!
Nadav says
Also from Tel-Aviv here. Agree with everything shai said, those are some very good tips!
Personally, I’m on team baking soda simply because without it you have to cook the chickpeas for over 4 hours in order for it to become very tender and the hummus fluffy. I also like to use onions, garlic, carrot and sweet potato as aromatics.
Alyssa says
Awesome tips! #hummusatawholenewlevel
Paul Solt says
Thanks! These tips are great, I’ve been making hummus for a long time, but I’m always looking for ways to improve the flavor.
I’ll try the carrot/onion/garlic/sweet potato aromatics the next time I cook chickpeas.
We’ve got an awesome local farmer in Rochester, NJ that has the tiny chickpeas, which have been the best chickpeas I’ve been able to find. I like them more than Wegman’s brand.
Andrea says
I also leave in Rochester. Please share the name of the local farmer where I can buy the small chickpeas.
Thanks for all the tips from Tel Aviv.
Paul Solt says
JonesBrooks Produce from Farmington, NY has a stand at the Rochester Public Market and sells 2lb bags.
You can’t miss them, as they’ll have tables filled with beans that they grow locally.
I love their chickpeas, and so far all the other beans have been stellar too!
Finding good chickpeas has been hard, I’ve tried a ton of other sources, but none have been as high quality as JonesBrookes in the Rochester area. Super clean, almost no imperfections.
Merav says
Another Tel Avivian weighing in here!
The key to real hummus is LOTS of tahini. For ~2 cups cooked chickpeas, I use 1/2 cup tahini! In the US you can order Al Arz or Soom tahini online. Both are really good! Don’t use Joyva!
The other key is serving it warm/warmish. It should never be cold!
I’m also on team baking soda (just a pinch) because it makes the skins soft. I never put garlic in my hummus (it gets too pungent!), and I save the chickpea cooking water and use it to thin the hummus when processing.
Enjoy!
Amelie says
I totally agree with the baking soda tip. If you can’t get your hands on dried chickpeas or are on the lazy side (like me!) you can use canned chickpeas. Cook them for 20 minutes in boiling water with a little baking soda and boom! mushy chickpeas! They make the creamiest hummus. If you find the garlic too pungent I recommend letting it sit in the lemon juice for a few minutes. The kombu idea sounds delicious too! Cookie and Kate has some more tips, but I think I will now be combining elements of your recipe with that one.
You’re all so kind to share your tips and wisdom! Thanks you so much!
Justin Case says
We only have Joyva available in my area in Florida, and I’ve learned to not put too much in, because it doesn’t taste that great. I’ve been thinking of toasting and grinding my own sesame seeds, and I think I will have to do that now. I also found that even a single clove of garlic in a kilo batch gives too much of an acrid raw garlic kick, but if you roast the garlic first (just cut the top of the garlic off, toss in olive oil, and bake for 20-30 mins), you get a nice subtle garlic flavor without any of the sting. The absolute best results come from using lots of olive oil, but you can also get a really good creamy result from mixing in a little vegetable, like roasted eggplant or red bell pepper. Not quite as good, but half the calories.
Shai says
Thanks ;-)
FYI I neglected to mention skin skimming.
The chickpeas are usually cooked with an open pot and as they cook the skins should float to the top and should be skimmed together with the water “scum”. Some go so far as to rub the finished chickpeas to remove the skins that are still stuck but I doubt that’s effective.
Some people asked about picking the right Tahini. The problem is our brands would probably be unavailable to you guys. Here is a (sorry Hebrew) survey a national paper did of the best Tahini’s: https://www.ynet.co.il/articles/0,7340,L-3001349,00.html
You can see the packages and might spot something in a local store but I highly doubt it as those are very local products most of which are hard to find even here!
Some rules of thumb:
– The Tahini should be light in color
– It should taste good in its raw form out of the box
– The aftertaste is the most important part, it shouldn’t be too bitter as it will impact the whole dish
We often buy whole grain Ethiopian Tahini which isn’t light in color. It’s great on its own but it might make a Humus that’s a bit too dark and it might have the wrong texture.
Lisa says
Fantastic tips. Thankyou
Lori Capps says
What brand of tahini do you find best? I attempted hummus once and it was a huge fail because the tahini was so dry and overpowered everything else I added.
My favorite is Alexis.
Lori Capps says
Thank you! I’ll try it out :)
Angela says
Shai Do you have any recommendations for Tahini? Would love to hear!
Kerstin says
Great tips, Shai! I’ve never used onion or carrot in the cooking water, will definitely try to do so. One thing I always do though is to peel the chickpeas once they are cooked. I believe that this is very important. Israeli tahini is definitely the best for me so I always try to get my hands on some. I live in France and our water has an obscene amout of scale in it so I always use bottled water to cook the chick peas.
edlyn says
My daughter is highly allergic to sesame seeds so tahini isn’t an option for us. Do you have any recommendations for alternatives or can that be omitted from the recipe entirely?
Shai says
I don’t think you can make the same flavor or texture without Tahini. I know people use Olive Oil for cases of sesame allergies but I couldn’t find much about this when googling in Hebrew.
Edlyn says
I didn’t think so. I’ve tried a few recipes that don’t call for tahini but the flavor isn’t the same without it. Thanks!
Havik says
Maybe sunflower seed butter? We have some that we bought at Whole Foods, but it has sugar added (probably because its bitter, like tahini), so if you choose to use it be sure to check the ingredients list first! If you do use it, please let me know how it tastes!
Suu says
Great tips! How do you get rid of the chickpea skins?
Shai says
As others said it’s possible once the chickpeas are REALLY soft which is why people use baking soda. Acids stop the cooking of legumes. I would also recommend soaking in saltwater and cooking in saltwater. Both are big no no’s for regular legume cooking since they make the legumes too soft but in this case we want the softness.
This also varies due to the brand of chickpeas used, if you use a Bulgarian they should come off easily if the PH of the water is good and you have enough cooking time. Notice you can add baking soda later in the cooking if the skins prove stubborn. One of the tips I heard was to pull them out of the cooking water, wash in cold water then rub them between your hands a bit to loosen the skins and then throw them back into the boiling water for an hour. Skins should separate and allow you to skim.
I know some people use paper towels after cooking and rub off the skins but that sounds like hard work.
suu says
thank you.
Natasha says
Shai, is there a brand of tahini that you particularly like?
Randy says
What about using any of the pre-cooked, canned organic chickpeas? Do they still need to be boiled before using? (trying to think of a way to do this quickly after a long day at work)
Ashley says
Yes! Or, what we do (also in Tel Aviv), we cook a large batch of chickpeas on the weekend until they’re very soft and the liquid is thick, then we portion it into batches and freeze. This way we can pull out enough chickpeas for one batch from the freezer. The trick to good hummus is really adding more water than you think! That’s what creates a really smooth paste.