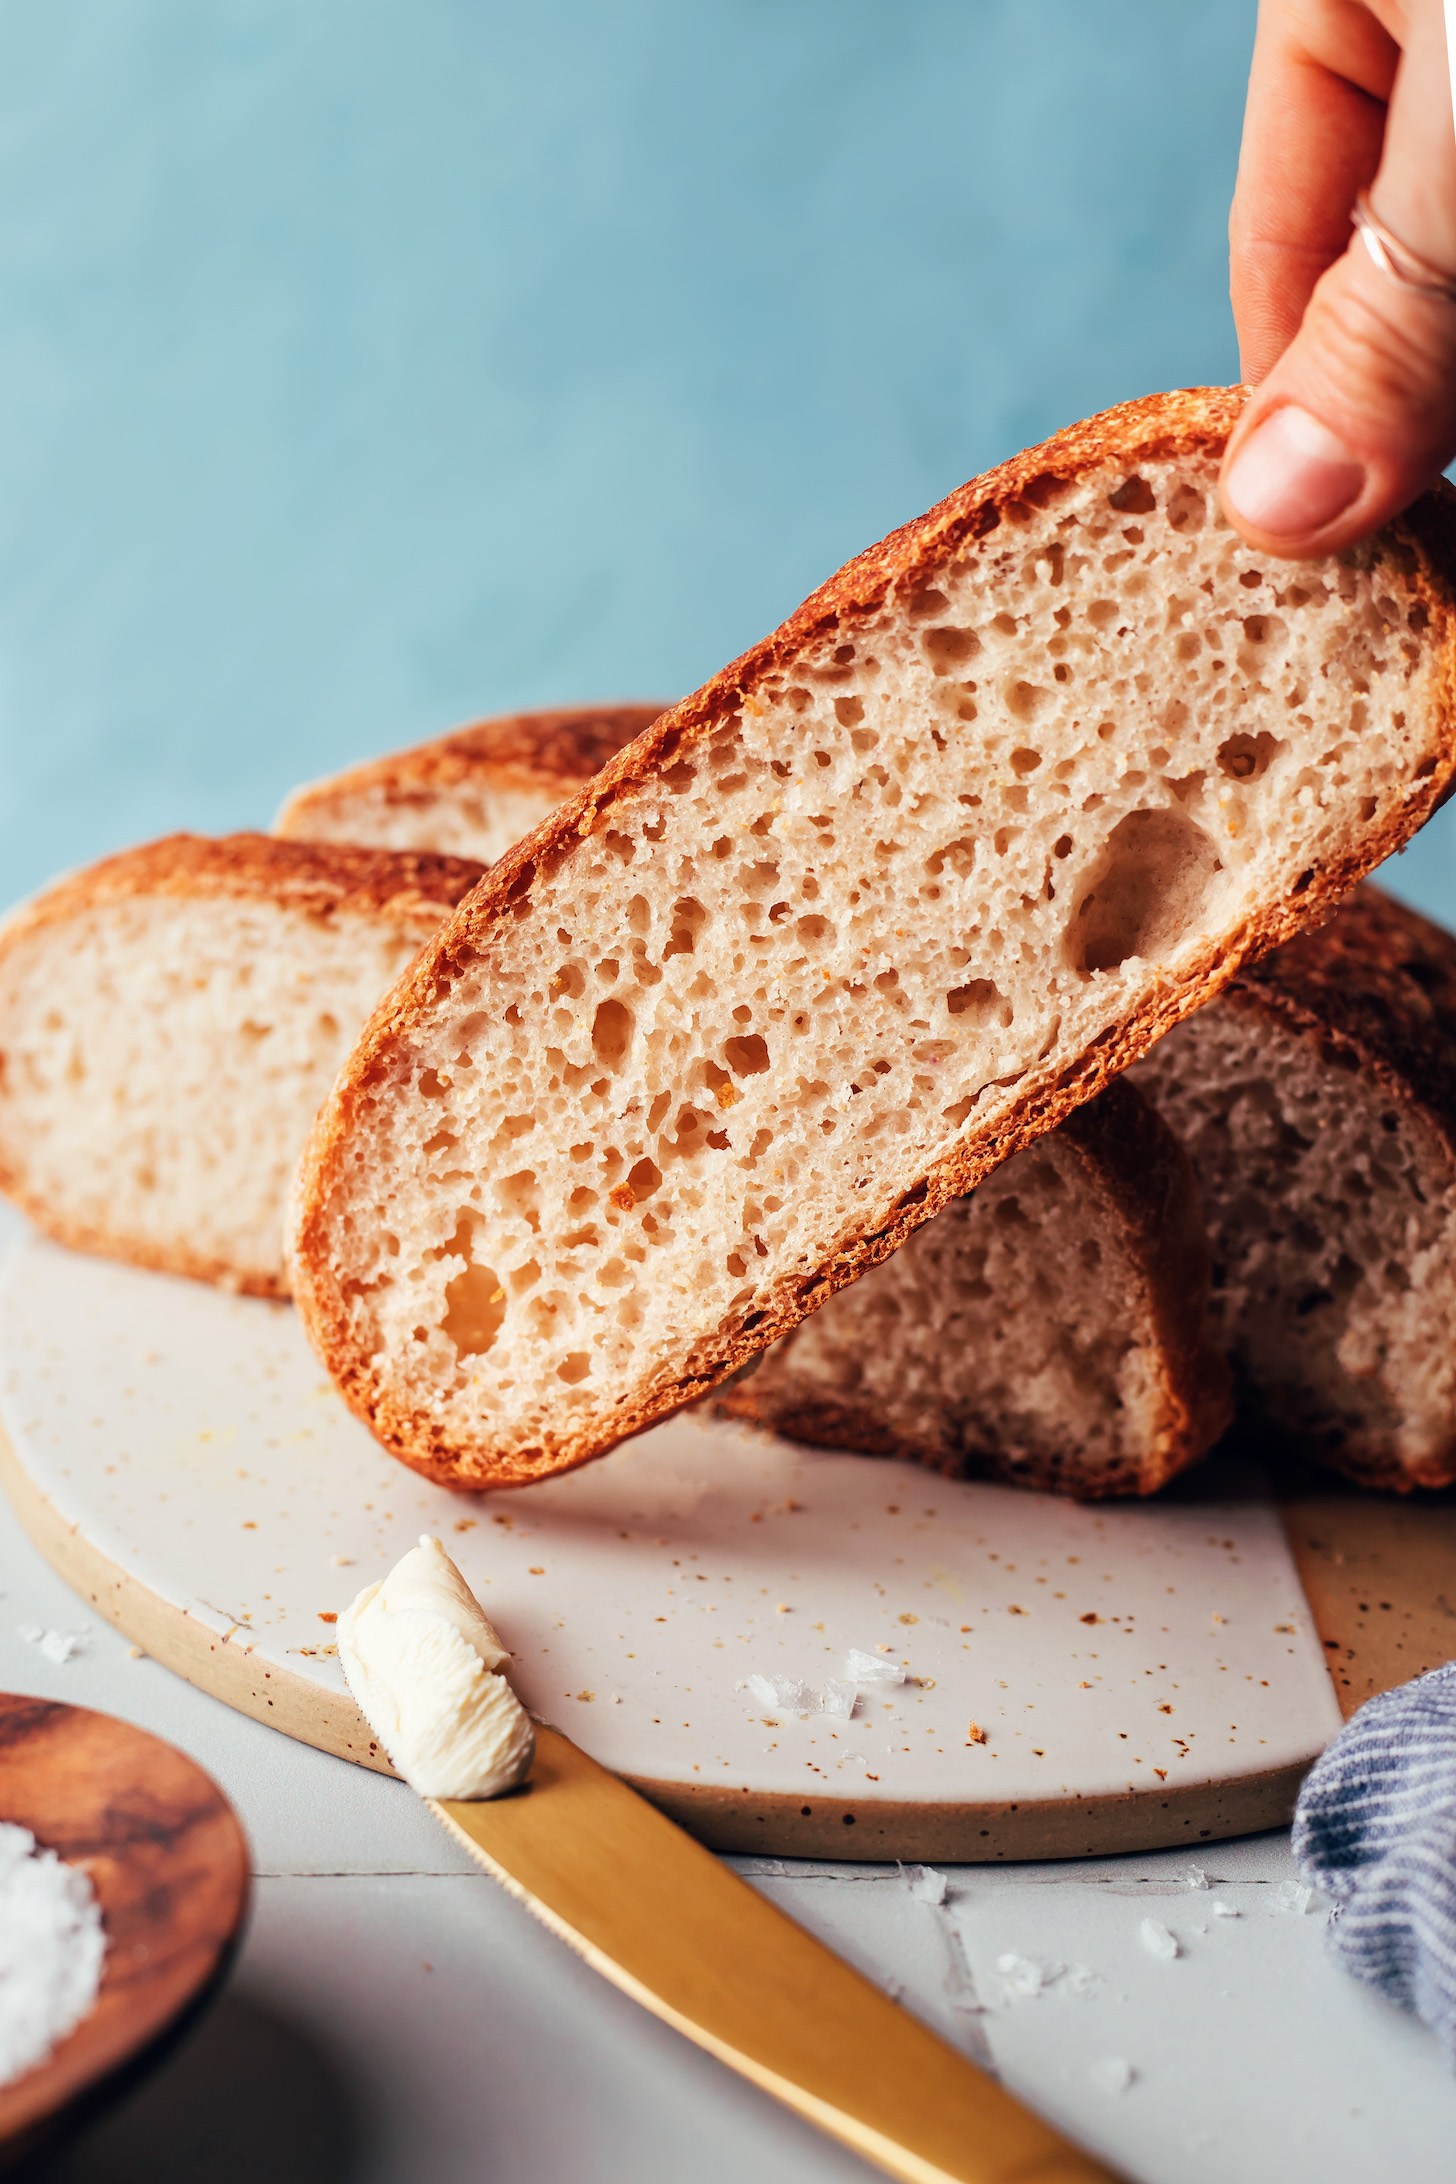
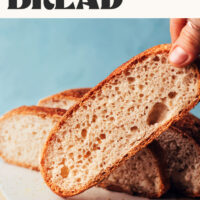
Hold the phone. We’ve dreamed of this bread all of our gluten-free days and it has finally arrived. Introducing the most fluffy, chewy, perfectly textured, crusty, artisan-style gluten-free bread you could ever imagine. We’re in LOVE! Simple flours, minimal active prep, truly life-changing.
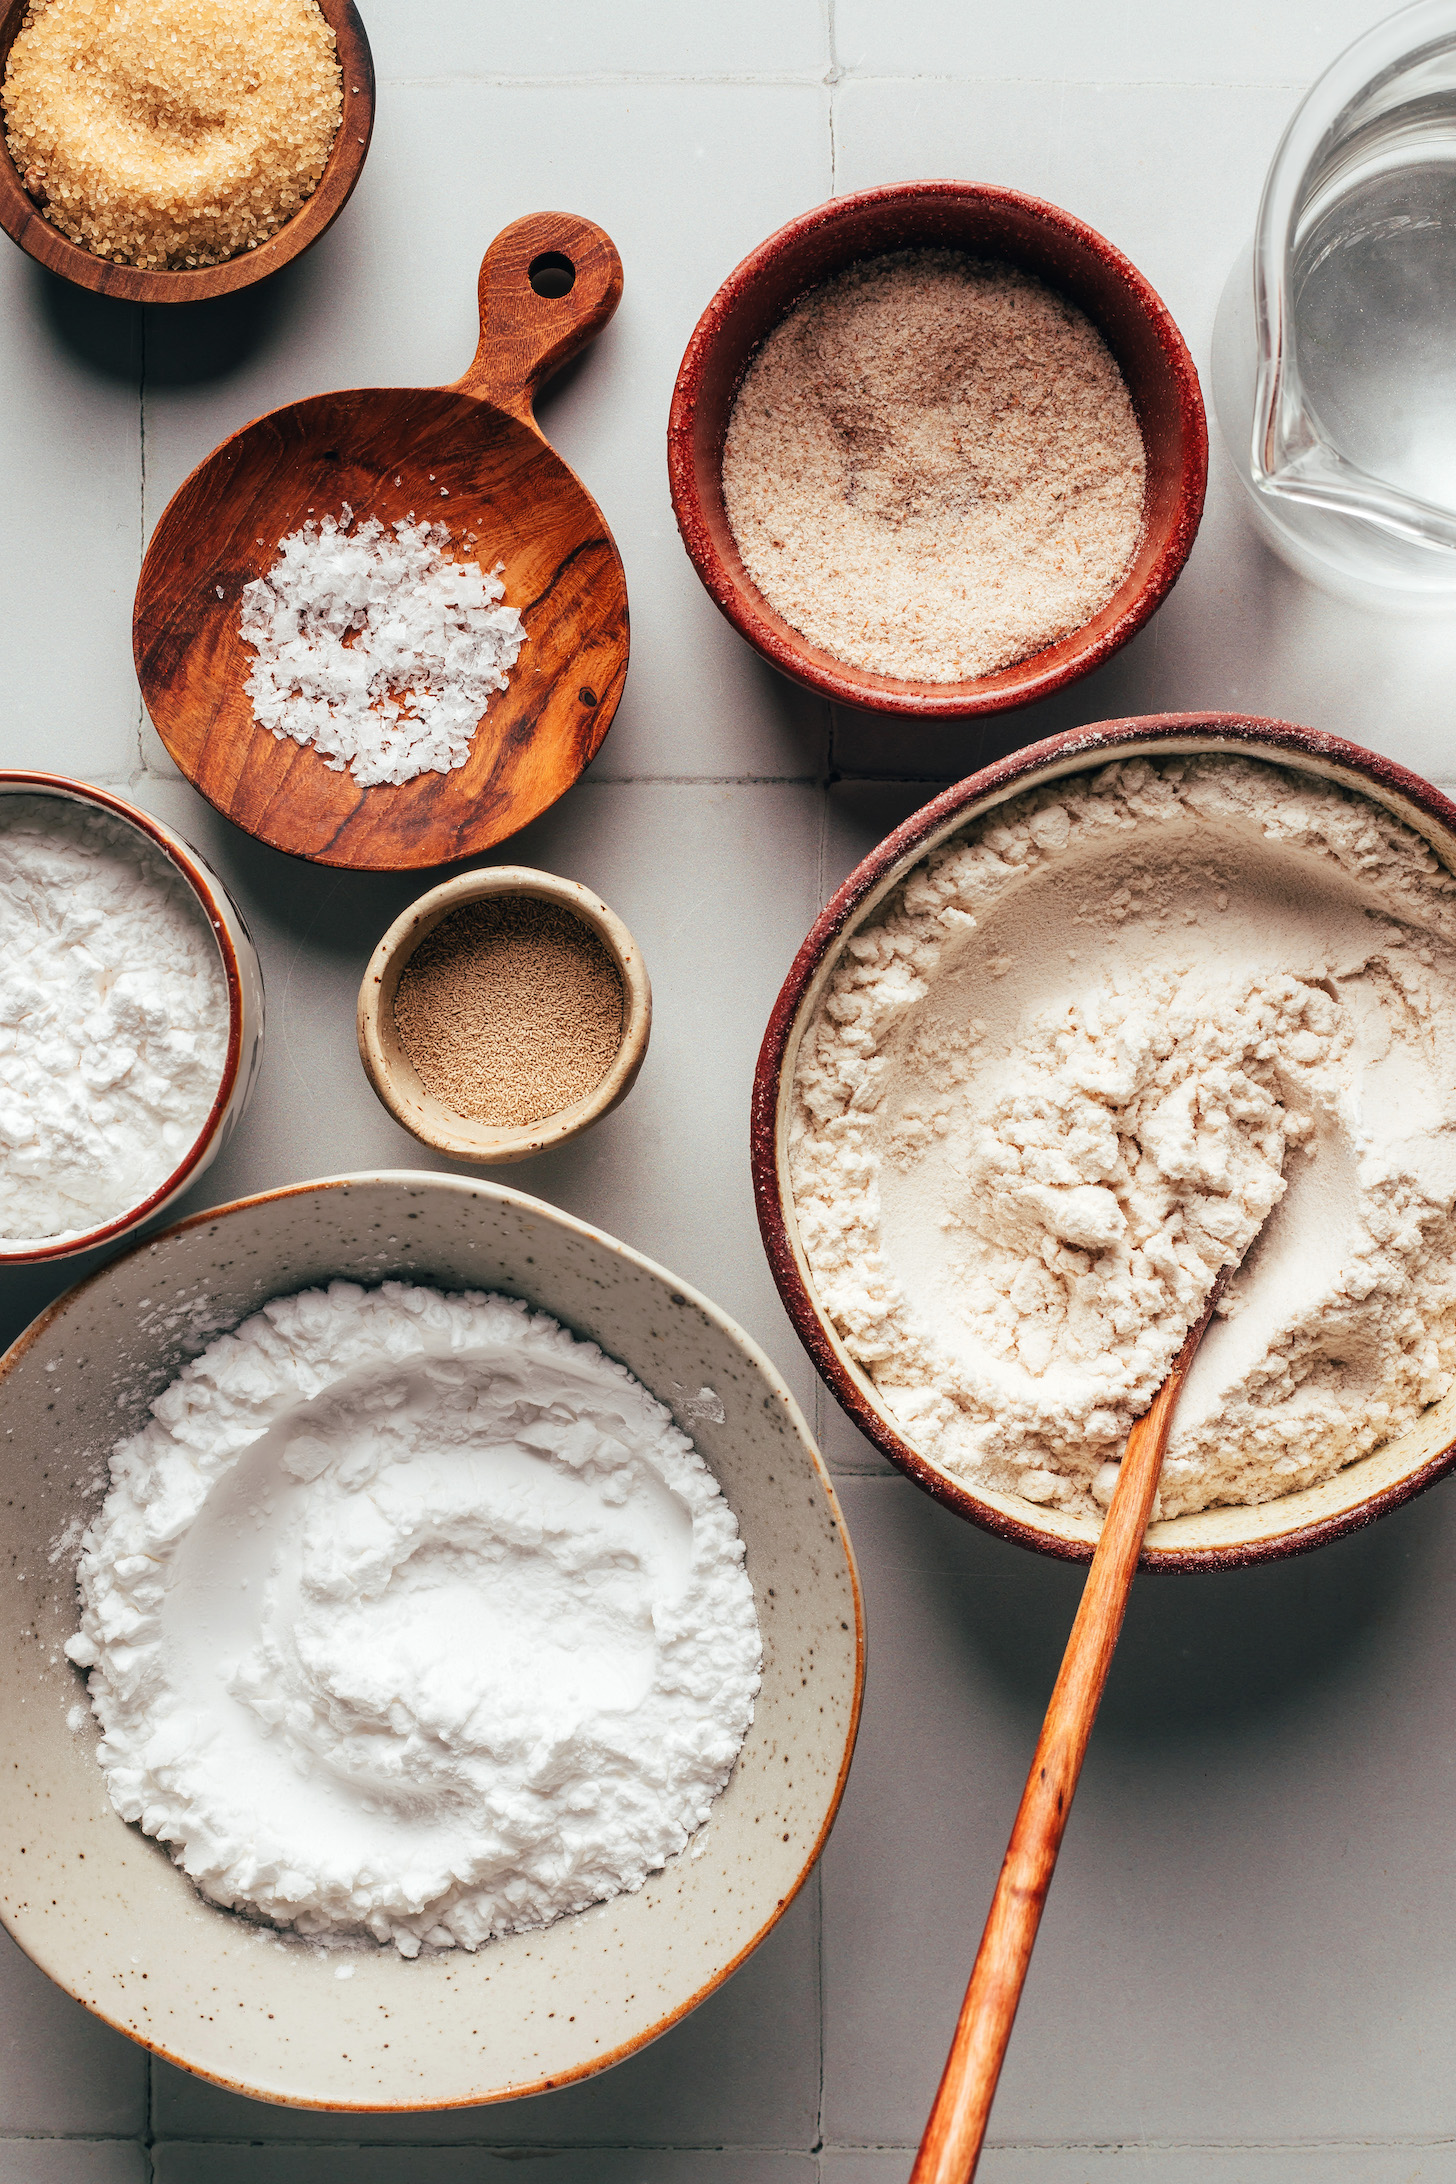
All that stands between you and this vegan + gluten-free loaf are 7 ingredients and a little bit of time. It’s the perfect weekend activity, and there’s nothing better than starting the work week with a fresh loaf of bread! Let’s bake!
How to Make Artisan-Style Gluten-Free Bread
This gluten-free artisan-style bread begins like a traditional bread recipe: with activating the yeast in warm sugar water, giving it a classic taste and beautiful rise.
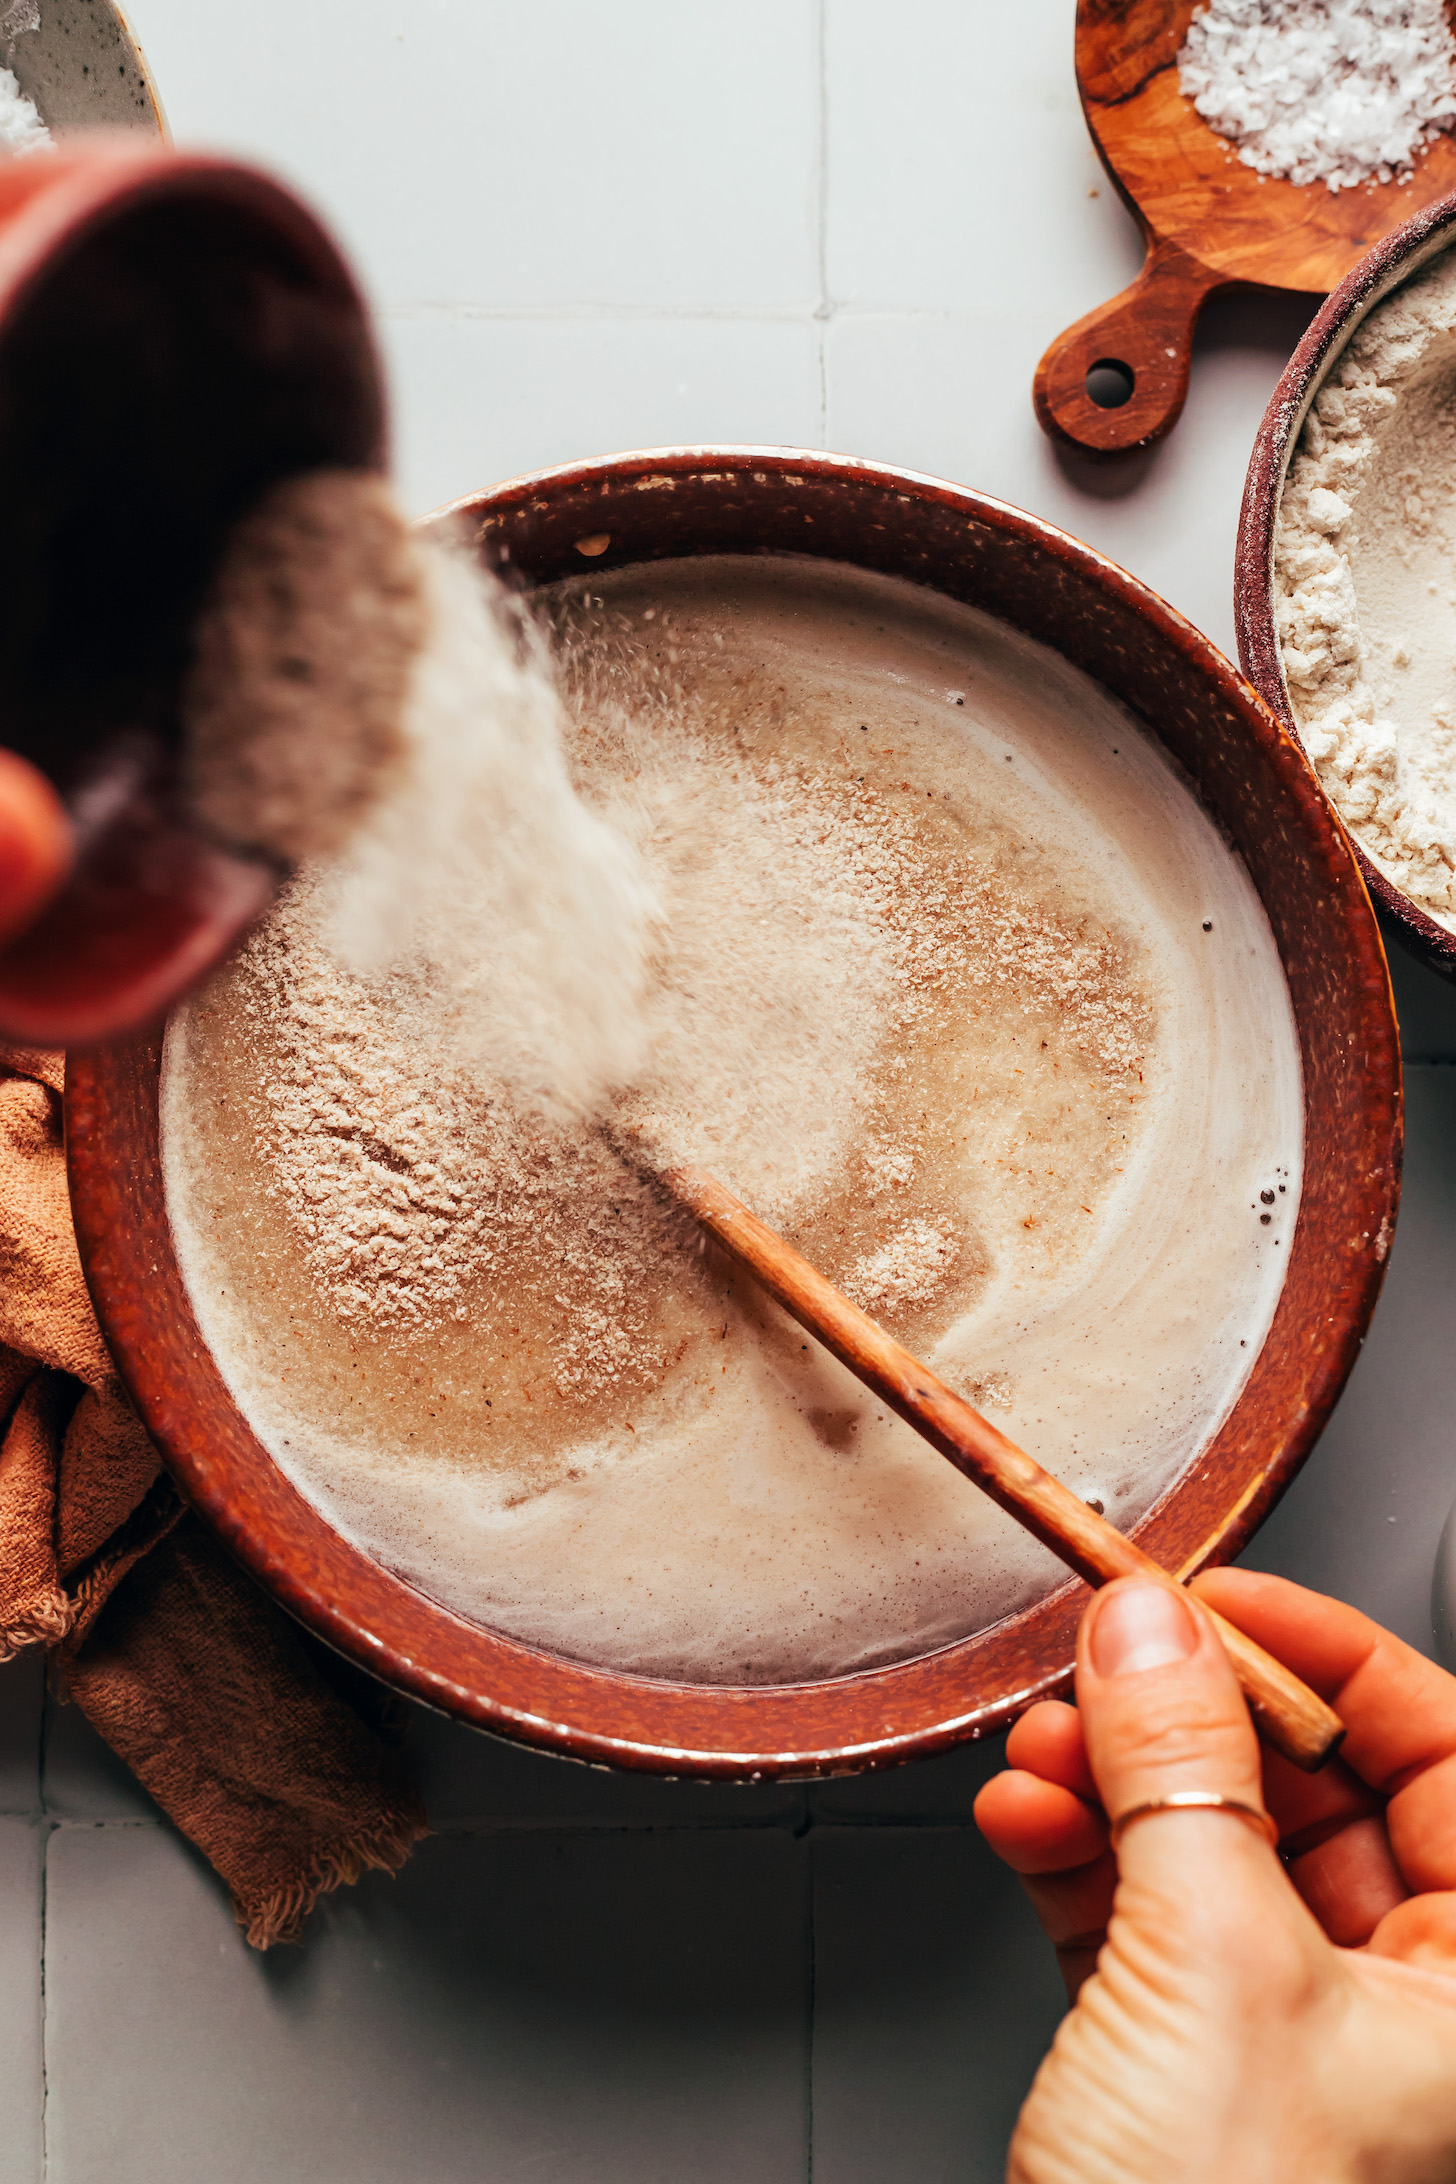
After that, things get a little different! To mimic the chewy, flexible, sticky texture of gluten, this loaf relies on a special ingredient that’s well worth adding to your gluten-free pantry: psyllium husk powder!
Psyllium is KEY to the undetectably gluten-free texture of this bread, and there’s just nothing quite like it. Bonus? It’s a fiber-rich ingredient with some pretty impressive digestive health benefits.
Now that we’ve gotten that essential ingredient out of the way, let’s talk about our trio of gluten-free flours, which is also important for the right texture!
Brown rice flour is the primary ingredient, giving the bread structure and a wholesome, neutral flavor. The other two are potato starch to keep it light and fluffy and tapioca flour to give the dough a little stretch. The final ingredient is salt for flavor!
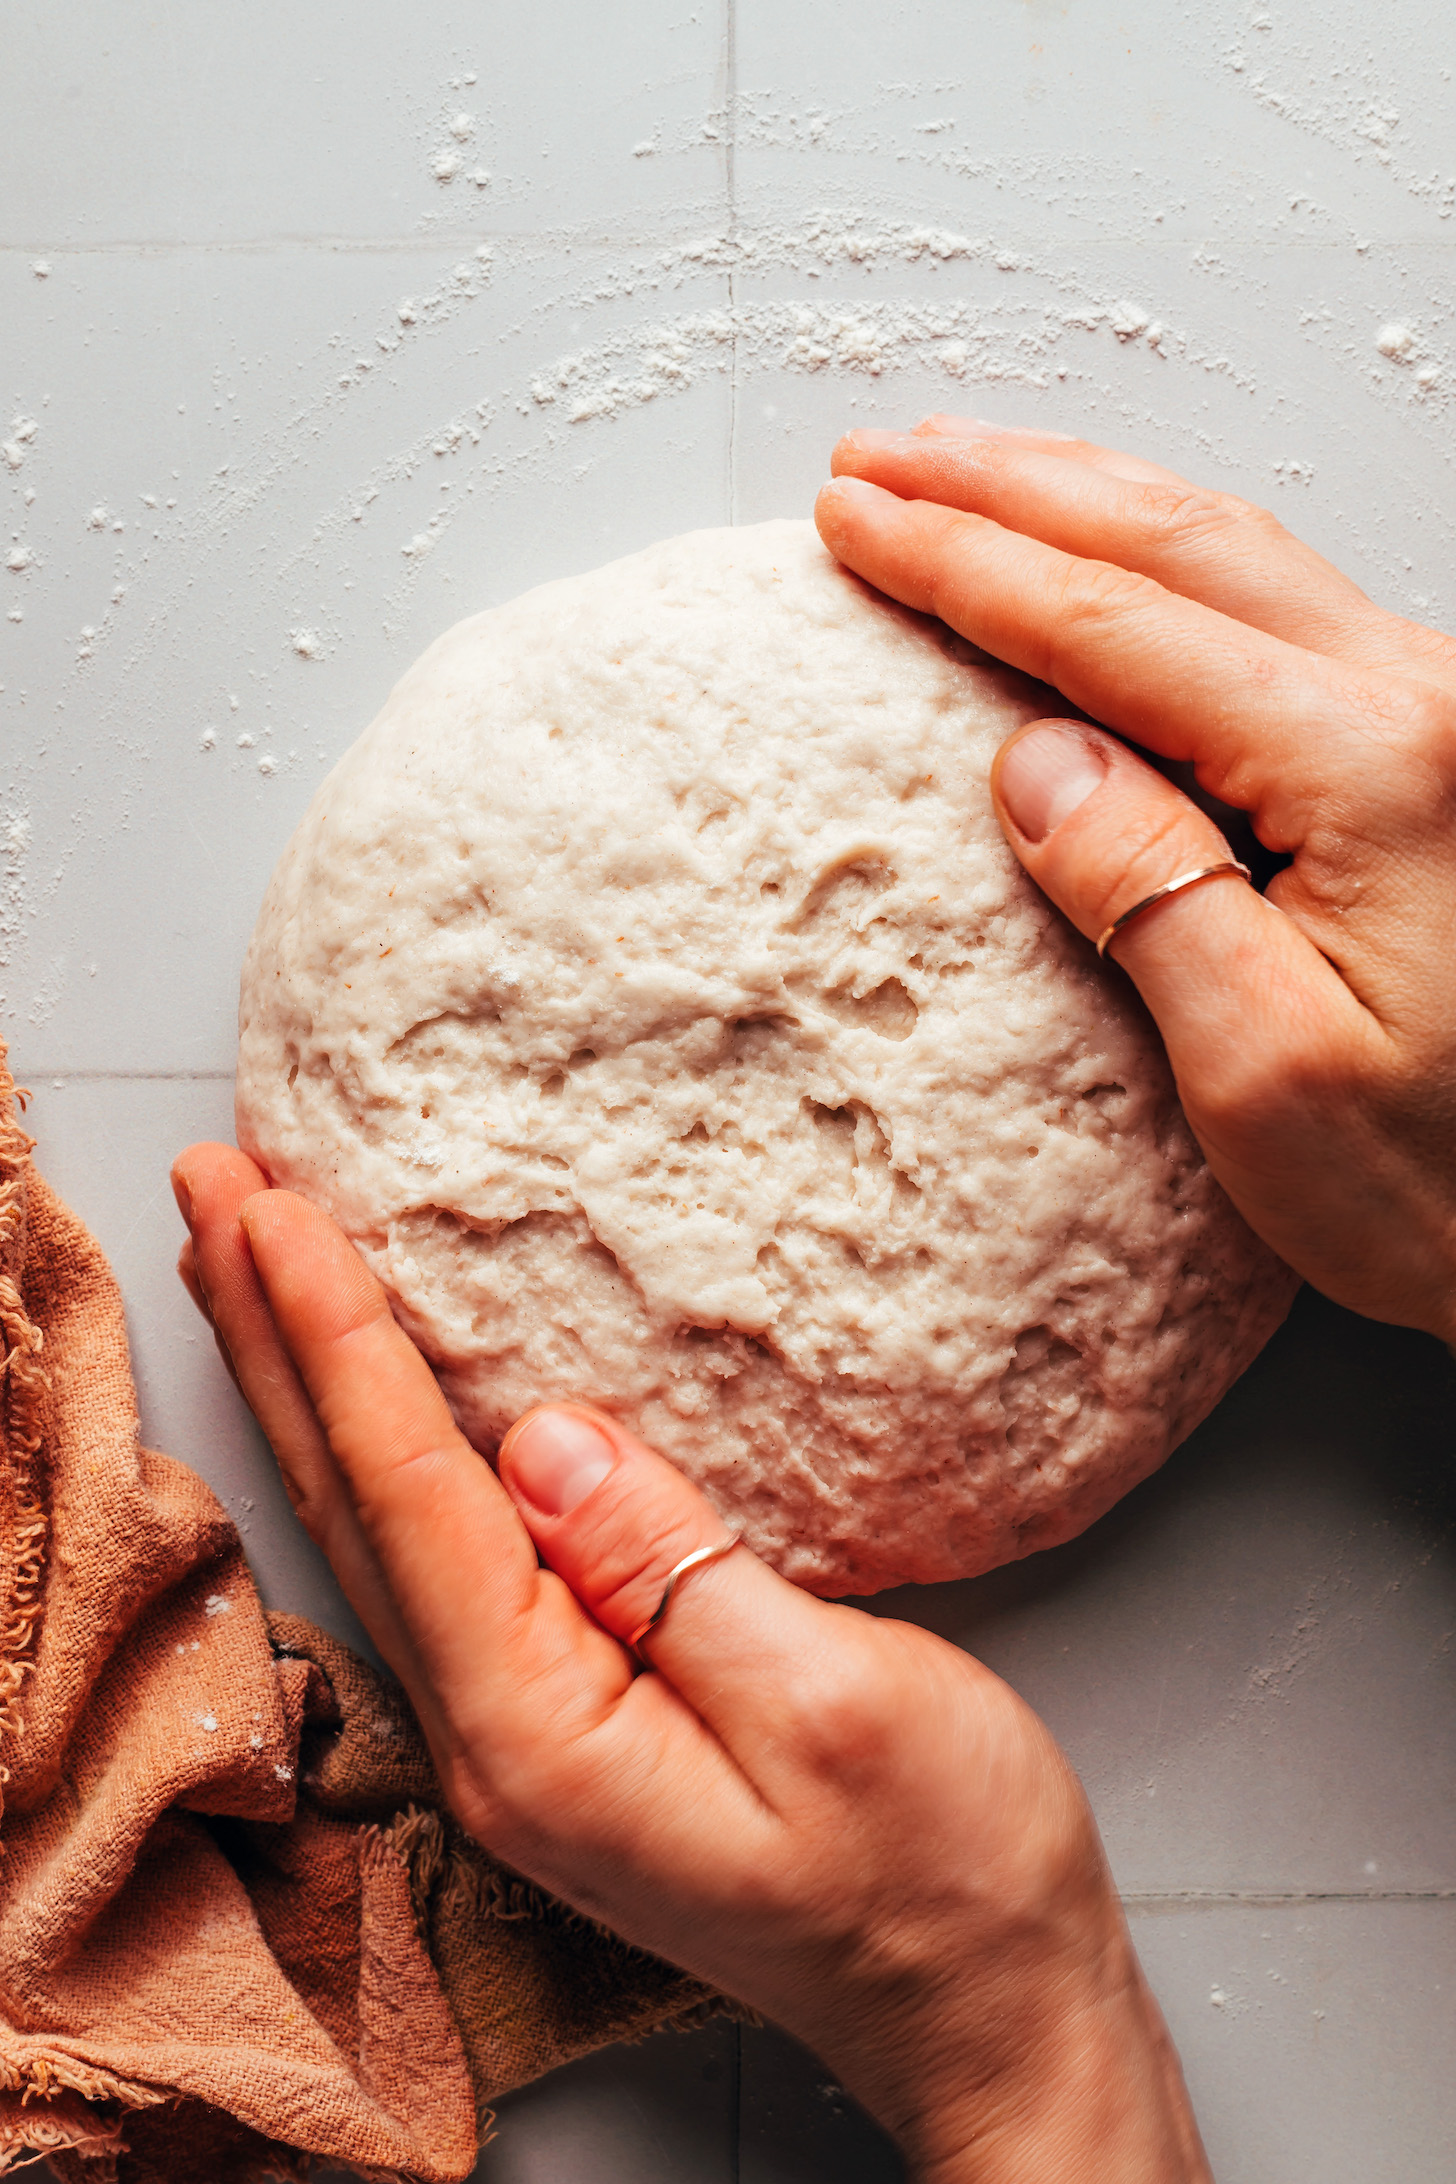
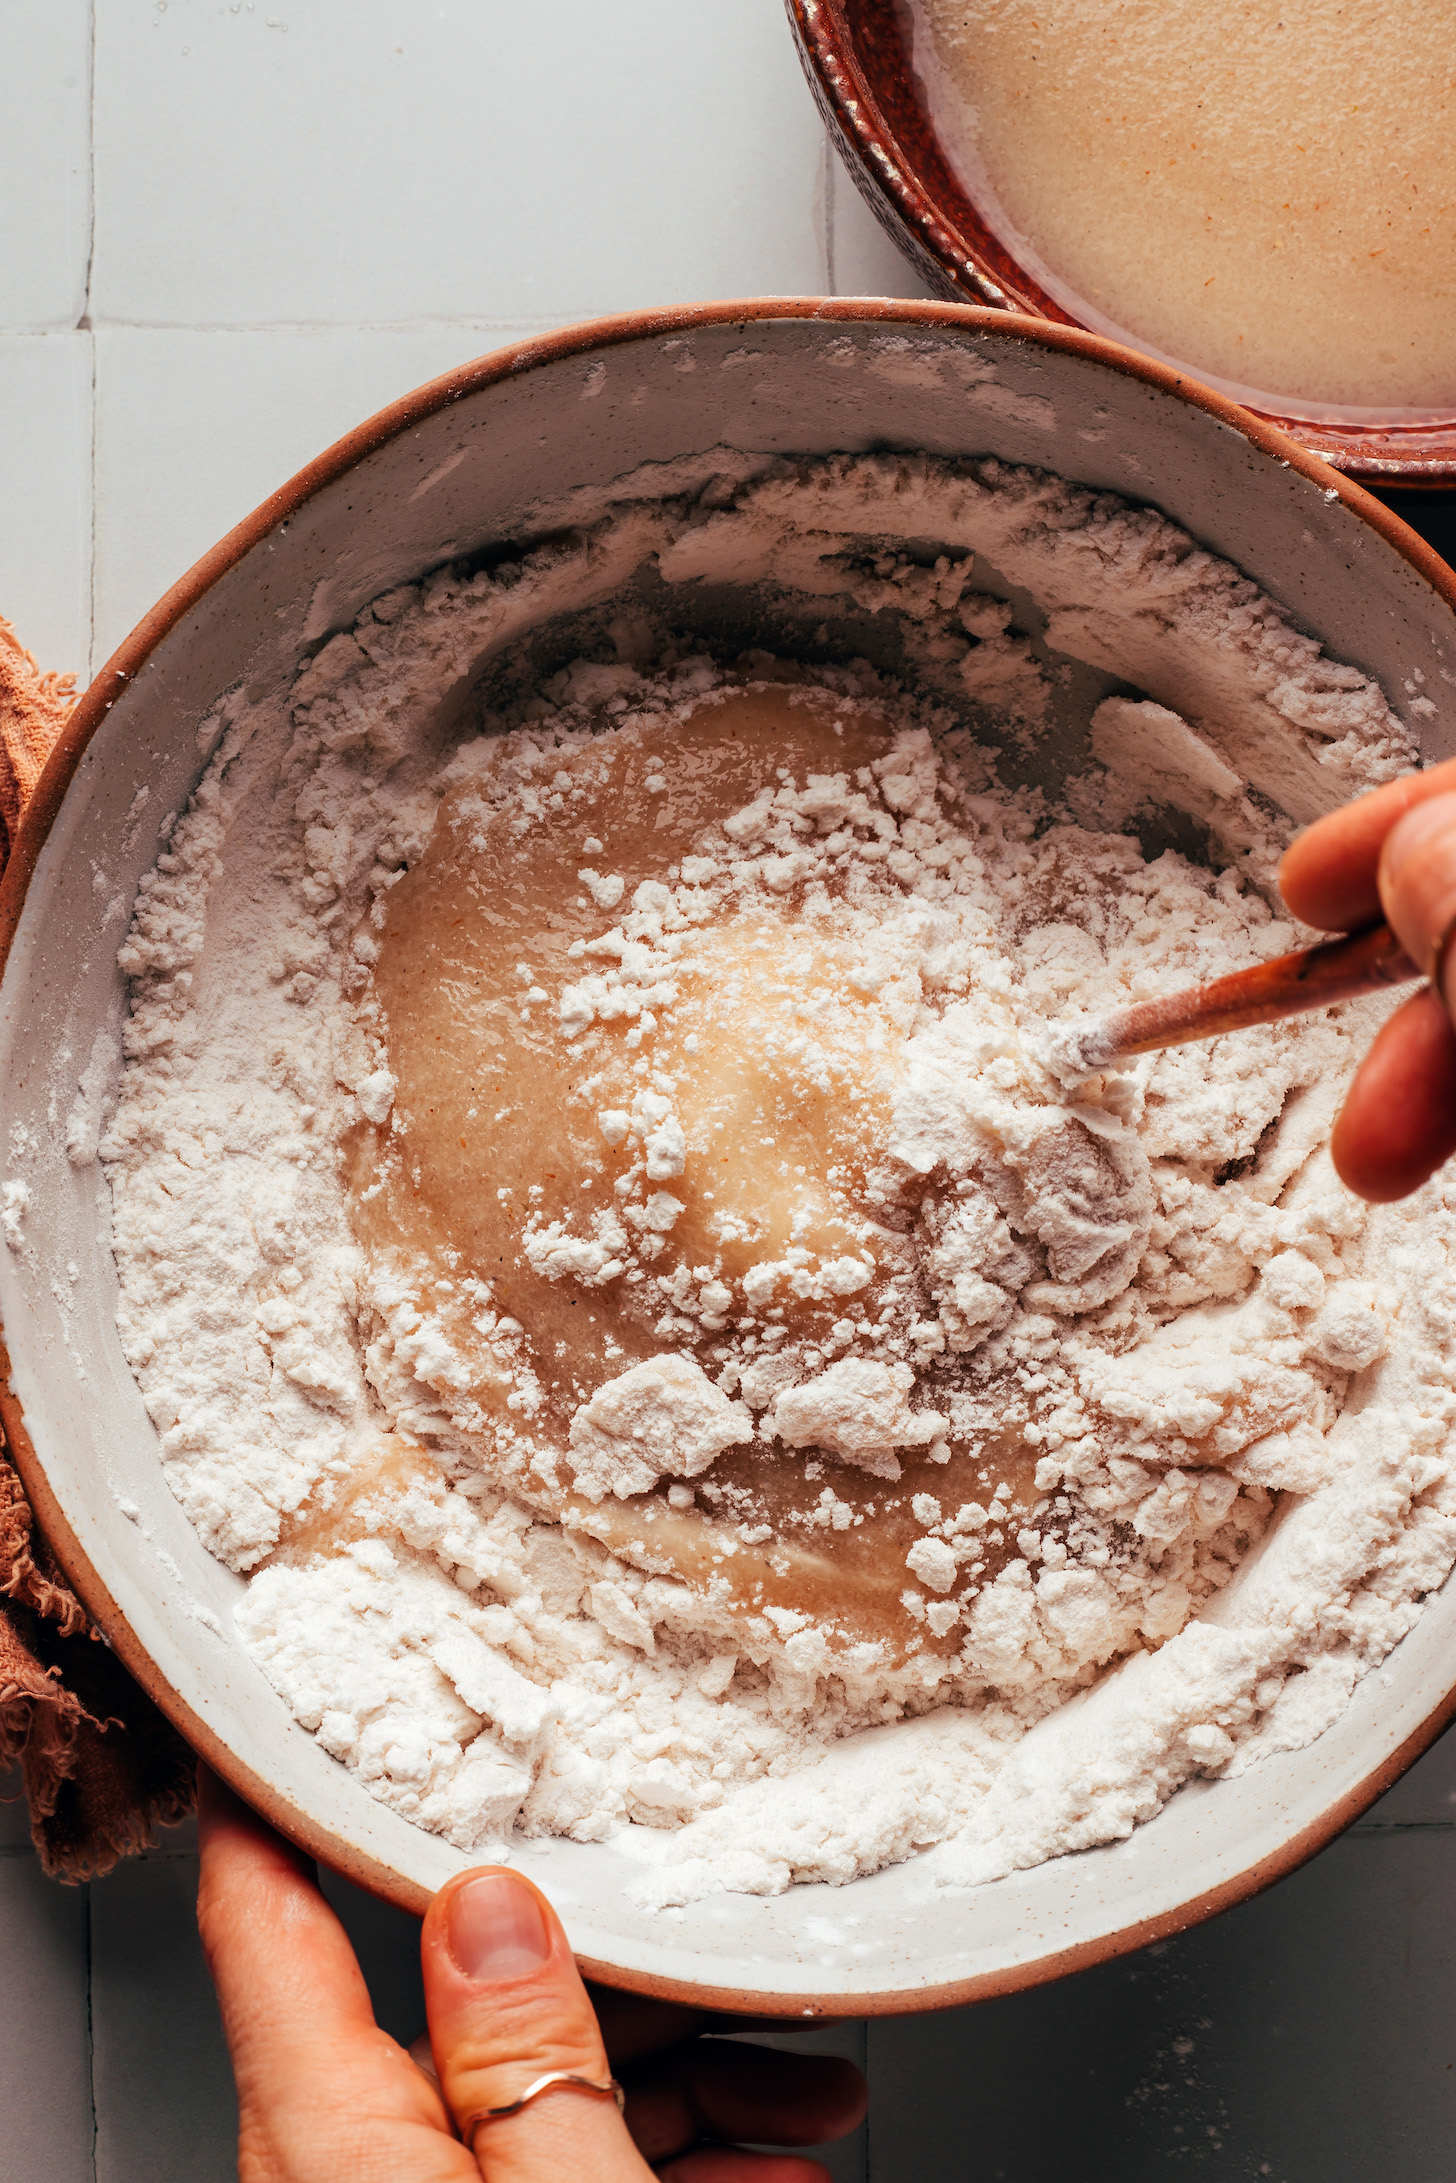
After adding the flours, you’ll be jumping into a little finger workout (unless you have a mixer with a dough hook). Vigorously kneading the dough helps to hydrate the flours and evenly distribute the psyllium, ensuring the best texture.
Then we shape it, let it rise, and it’s time to bake. Our preferred method is in a Dutch oven because it easily captures steam, making the outside of the bread shiny, stretchy and pliable. But if you only have a baking sheet or loaf pan, we think you’ll still be impressed with the result!
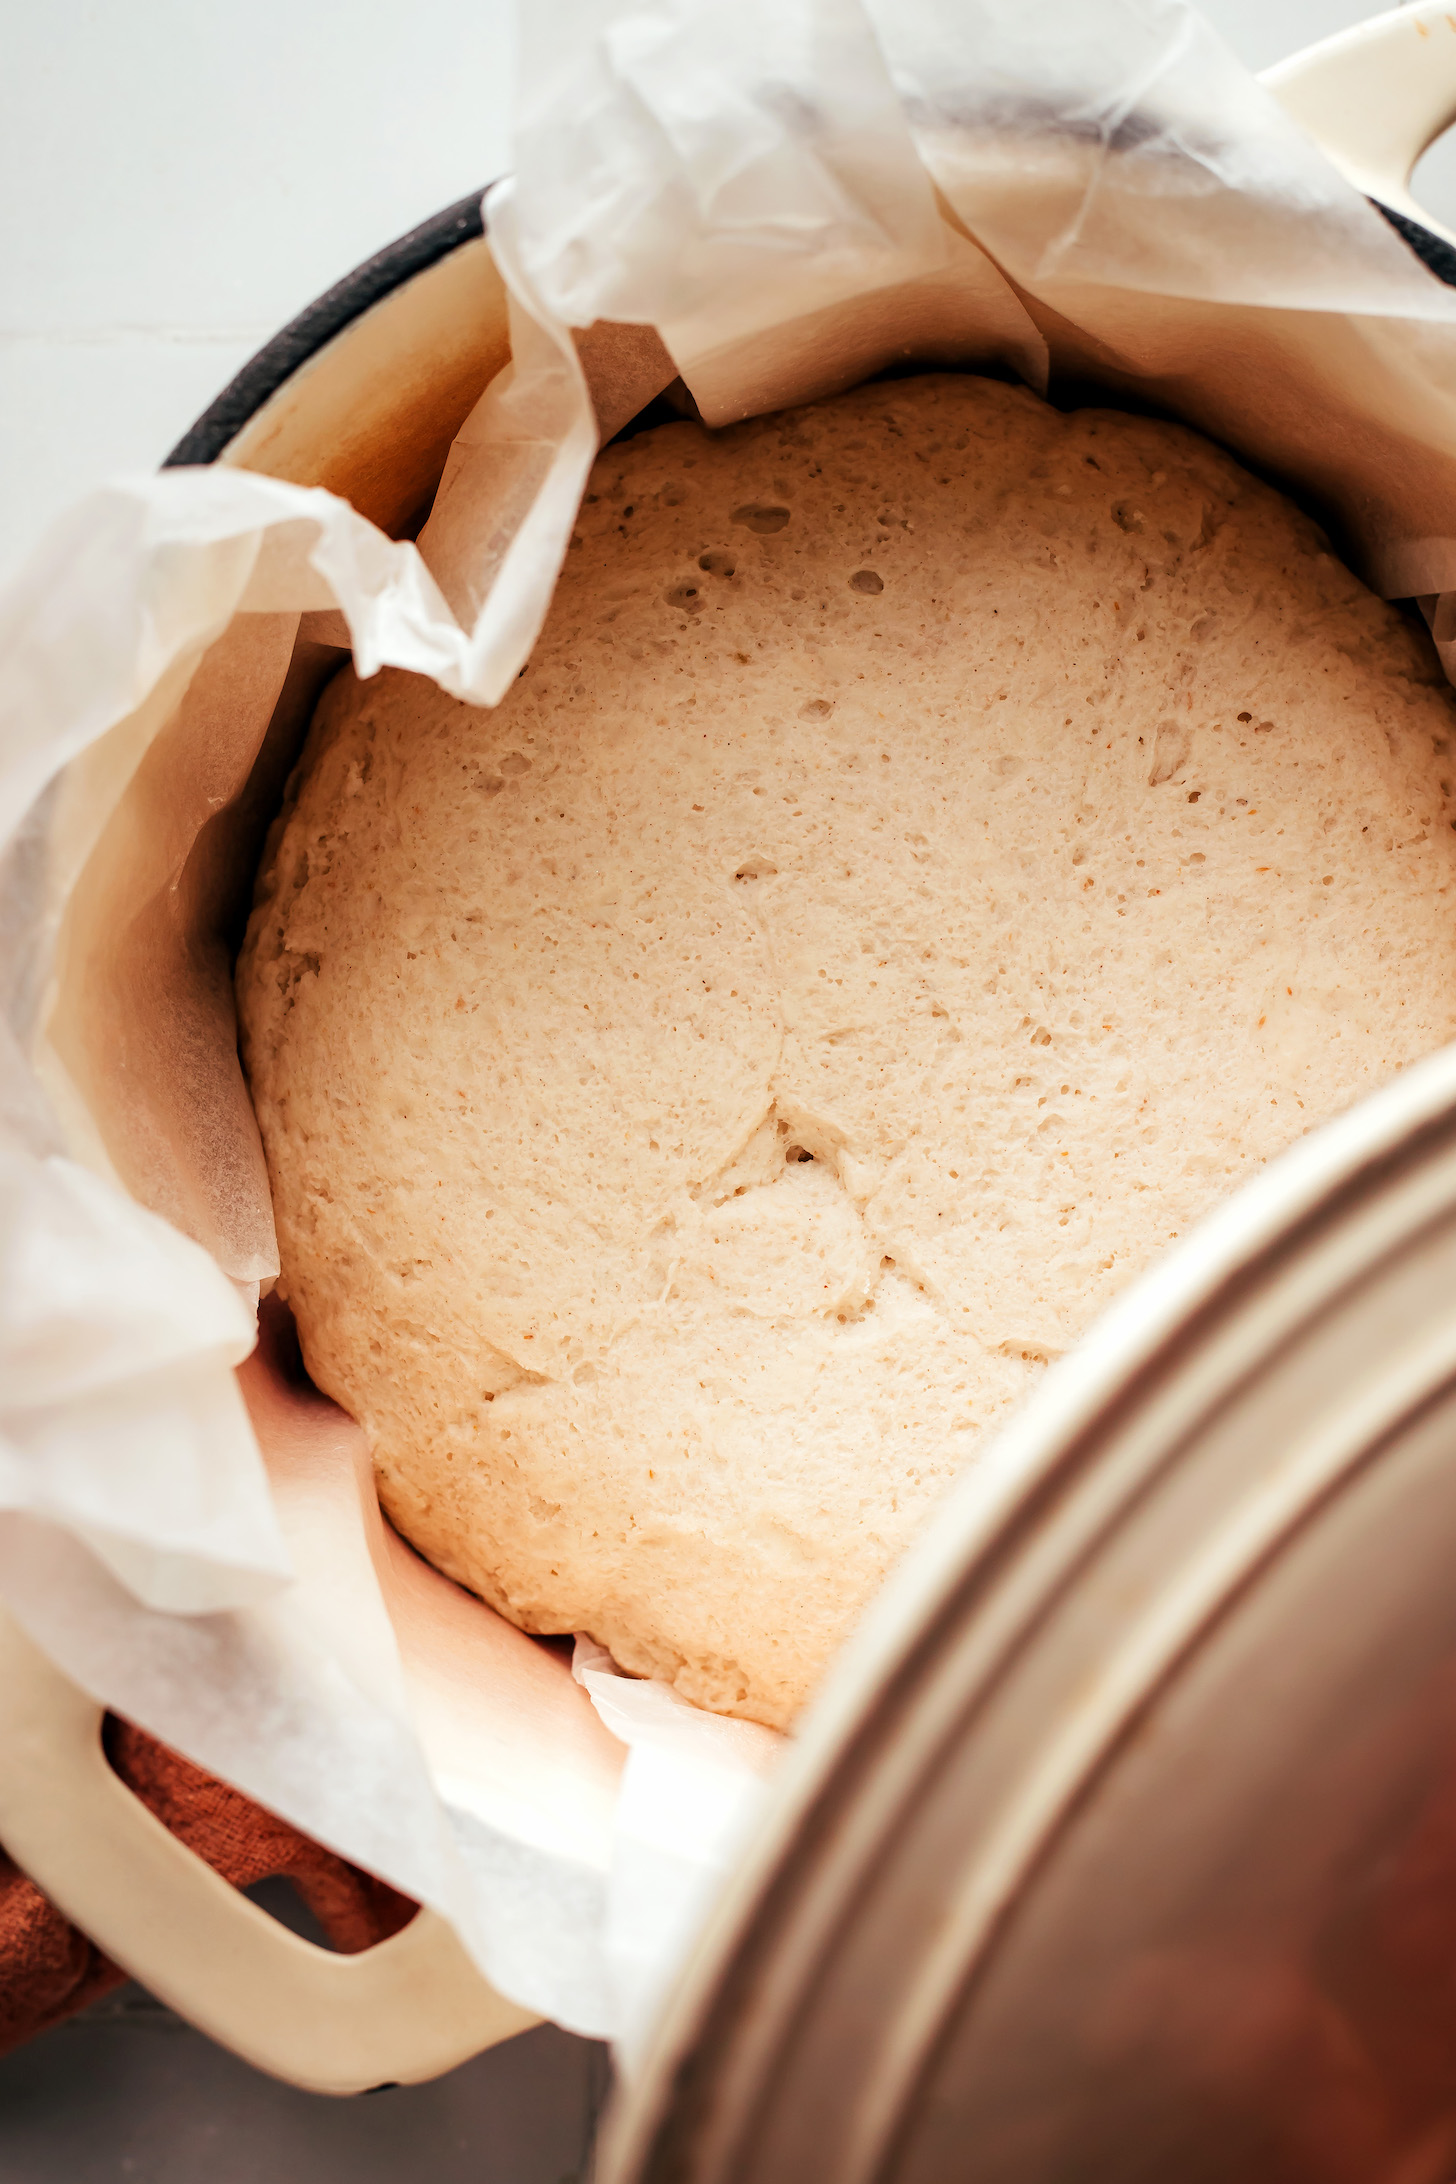
Check out that bubbly beauty!
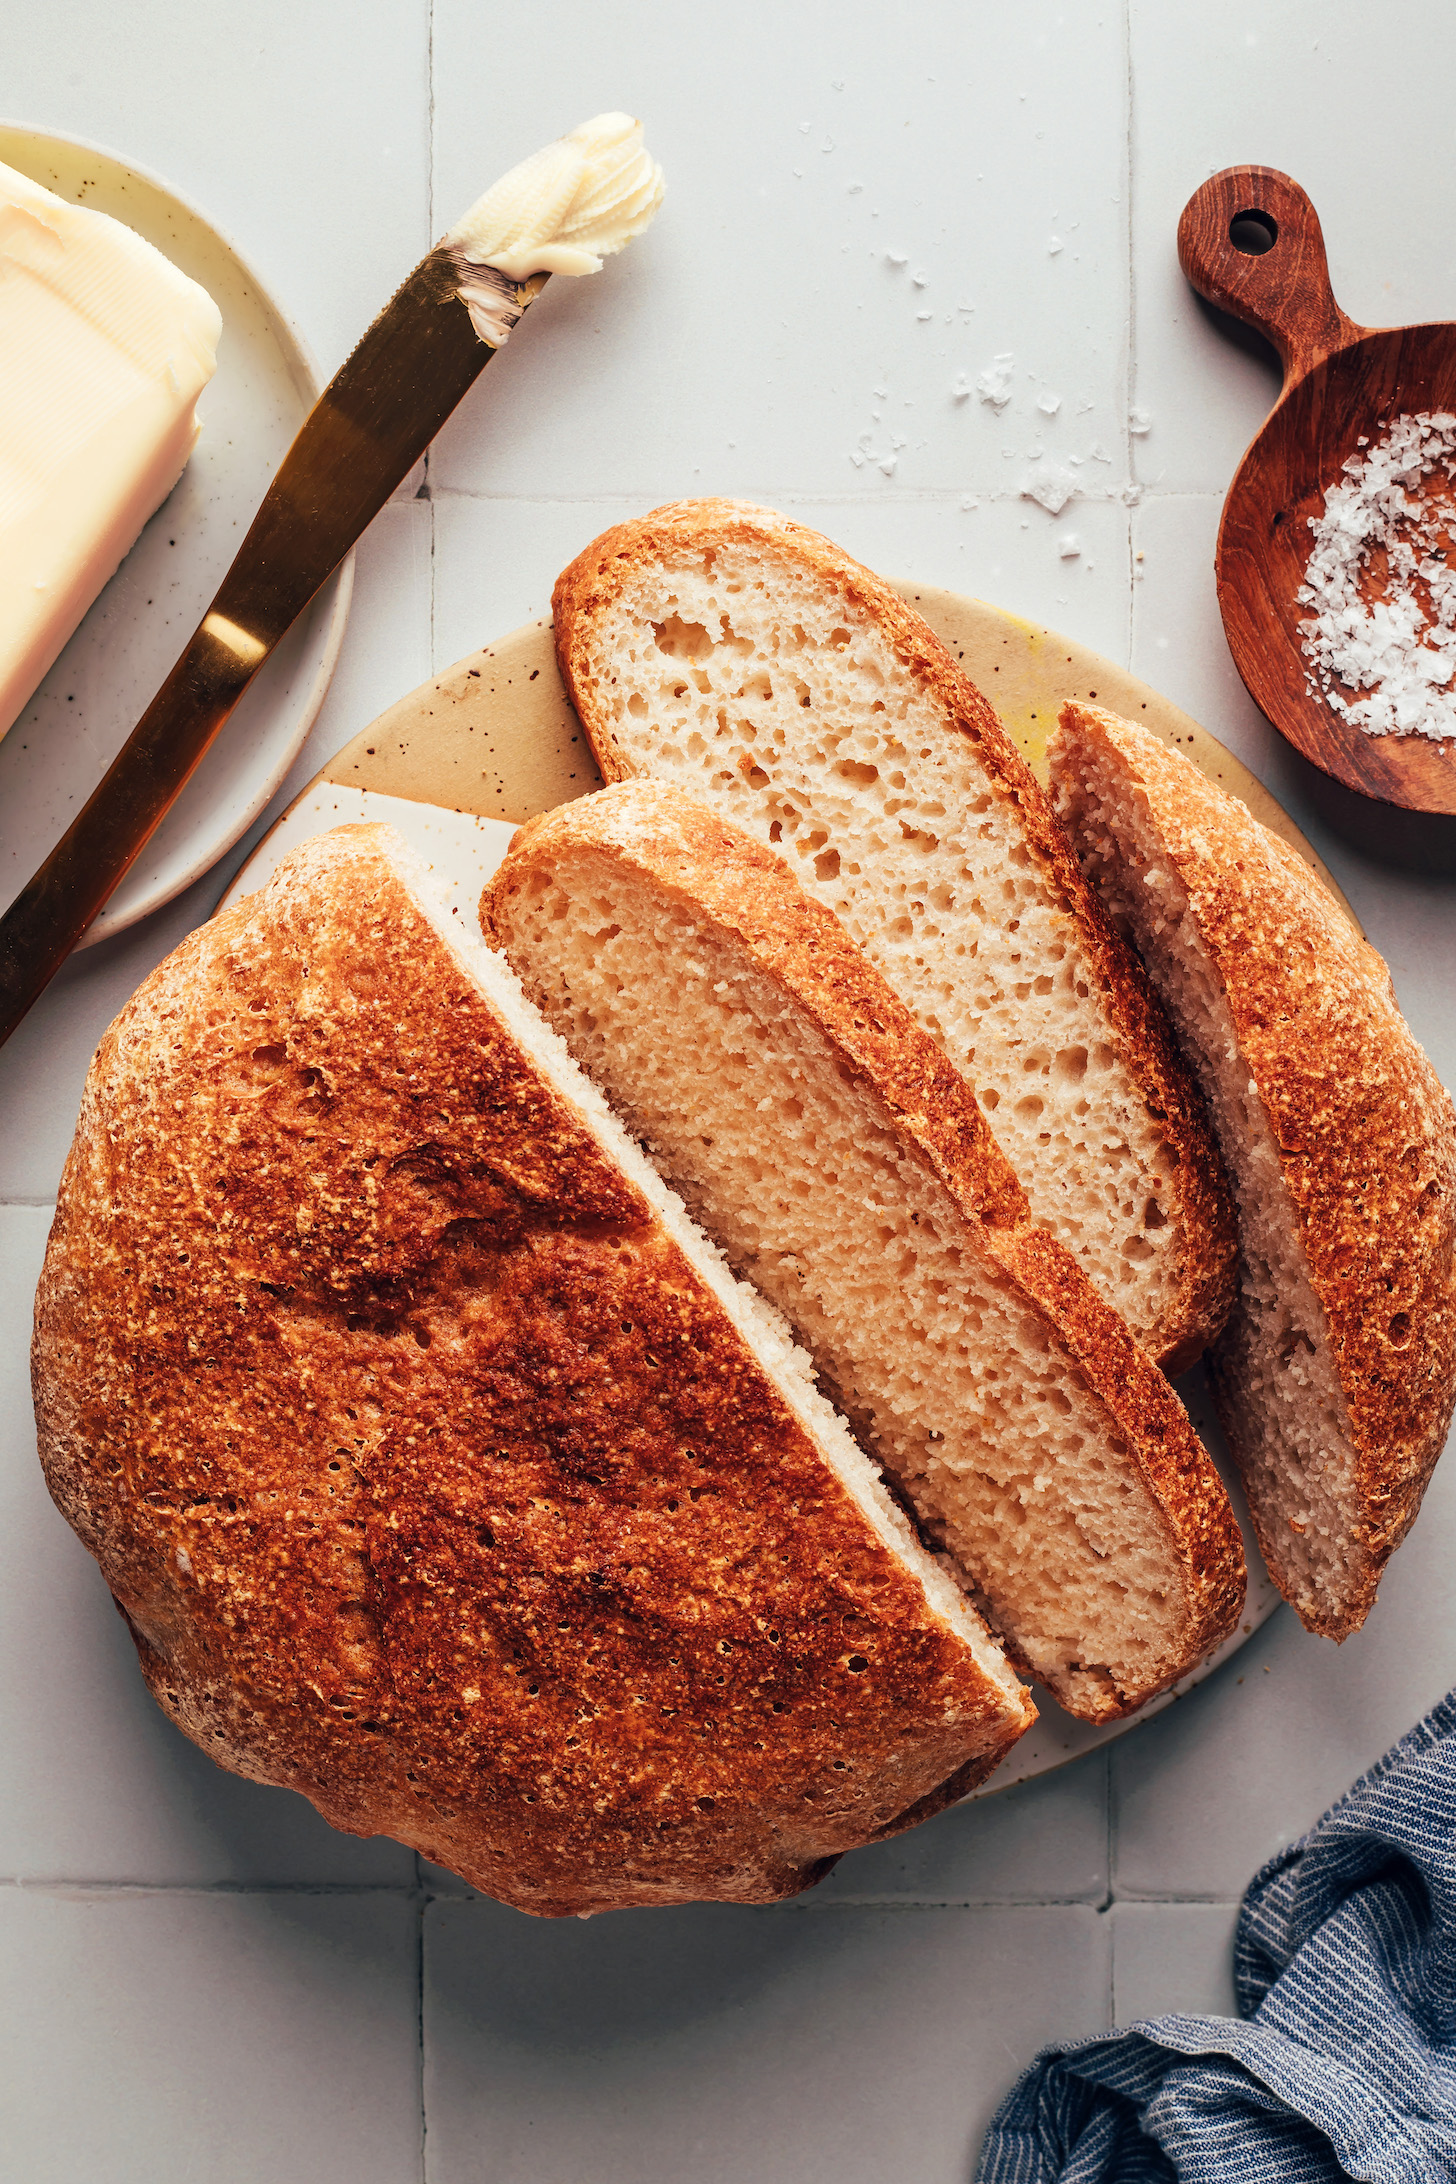
We can’t wait for you to try this bread! It’s:
Chewy
Fluffy
Beautiful
Crusty on the outside
Soft on the inside
& SO delicious!
It reminds us of bread that’s often served as a starter at fancy restaurants with soft, spreadable butter or an herby olive oil + balsamic dipping sauce.
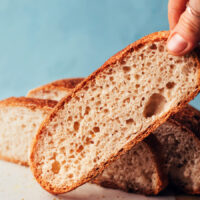
But the serving options know no limits! Enjoy it with nut butter, alongside soups, and for making bruschetta, grilled “cheese” sandwiches, and more.
More Gluten-Free Bread Recipes
- Fluffy Gluten-Free Naan (Yeast-Free, 20 Minutes!)
- The BEST Gluten-Free Bread (No-Knead!)
- Gluten-Free Flatbread (1 Bowl, 20 Minutes!)
- The Ultimate Gluten-Free Banana Bread (Bakery-Worthy!)
If you try this recipe, let us know! Leave a comment, rate it, and don’t forget to tag a photo @minimalistbaker on Instagram. Cheers, friends!

Crusty Gluten-Free Artisan Bread
Ingredients
- 1 ⅓ cup warm water
- 2 Tbsp cane sugar (or sub maple syrup)
- 2 ¼ tsp active dry yeast (1 packet yields 2 ¼ tsp or 7 g)
- 1 ½ Tbsp psyllium husk powder* (not whole // we like Anthony’s Goods)
- 1 cup brown rice flour
- 3/4 cup potato starch (NOT potato flour)
- 1/2 cup tapioca flour (also called tapioca starch)
- 1 tsp sea salt
Instructions
INSTRUCTIONS FOR A DUTCH OVEN OR LOAF PAN
- Dust a proofing basket with brown rice flour -OR- lightly coat a small mixing bowl with water (so the flour sticks) and then dust with flour. Set aside. If using a loaf pan, just oil the loaf pan and dust it with brown rice flour. See notes for additional instructions for using a loaf pan.
- In a small mixing bowl or liquid measuring cup, whisk together the warm water (100-110 degrees F / 38-43 C) and sugar until the sugar is dissolved. Whisk in the yeast and let it bloom on the counter for about 10-15 minutes until frothy. If it doesn’t foam, start over — your water may have been too hot or the yeast was expired.
- Once the yeast has bloomed, whisk in the psyllium husk powder and let the mixture gel for about 10 minutes.
- Meanwhile, to a medium mixing bowl, add brown rice flour, potato starch, tapioca flour, and salt. Whisk well to combine. Once the yeast mixture has rested, add it to the dry ingredients. Use a wooden spoon or spatula to mix thoroughly. The dough should look shaggy to start. Once it becomes difficult to stir, use your hands to vigorously knead into a cohesive yet still very sticky ball. It should take at least 3 minutes* to fully break the flour down into the liquid. Feel free to squeeze the dough between your fingers to fully incorporate it (our preferred method). Your hands will get sticky and be covered with dough — this is normal and encouraged!
- Scrape the excess dough from your hands and place it back into the bowl. Wash and dry your hands well. The dough should be tacky but combined enough that you are able to handle it. If it’s still too sticky, spend additional time kneading the dough together.
- Turn the dough out onto your work surface. You shouldn’t need flour to shape it, but if you do, use very little! Use your hands to shape the dough into a ball and place it into your prepared proofing basket, flour-dusted bowl, or flour-dusted loaf pan. If you find your hands are sticking to the dough, feel free to moisten them slightly with water. If using a loaf pan, spread the dough so it's close to the corners of the pan – it will spread further as it rises. Cover your dough ball with a towel and let rise in a warm place for 30 minutes until it has almost doubled in size.
- After the 30 minutes is up, place a Dutch oven (with the lid on) into the oven and preheat it to 450 degrees F (232 C). If using a loaf pan, reference the timing in the notes section instead of the next two instructions.
- Once the oven is preheated and your Dutch oven is hot, place a piece of parchment paper onto your work surface and gently flip the dough out onto it, using your hand at the bottom of the dough to guide it. Use oven mitts to carefully remove your Dutch oven from the oven, place it onto a heatproof surface, and take the lid off of it. Lift the edges of the parchment paper to place your dough (and the parchment paper) into the Dutch oven. Place 3-4 ice cubes on the outside of the parchment paper so they are not touching the dough. Put your oven mitts back on and place the lid back onto the Dutch oven. Place the Dutch oven back into the oven on the center rack and bake for 35 minutes.
- Once the 35 minutes have passed, lower the oven temperature to 425 degrees F (218 C) and put your oven mitts back on to carefully remove the lid from the Dutch oven and place it onto a heatproof surface. Close your oven and bake for another 30-35 minutes without the lid. The crust should be dark and the bread should sound hollow when you tap it with a spoon or knife.
- Once baked, use oven mitts to remove the Dutch oven from the oven. Use the parchment to carefully lift the bread from the pan and place on a cooling rack to fully cool (~2-3 hours). You want the bread to be fully cooled before cutting to avoid a gummy texture. Store the bread in a bread wrap or bag at room temperature for up to 2-3 days, though best within the first 24 hours. You can also store the bread in the refrigerator for up to 5 days or freeze sliced bread for 1 month (or longer). After refrigerating/freezing, toast the bread before enjoying!
INSTRUCTIONS FOR A BAKING SHEET
- Dust a proofing basket with brown rice flour -OR- lightly coat a small mixing bowl with water (so the flour sticks) and then dust with flour. Set aside.
- In a small mixing bowl or liquid measuring cup, whisk together the warm water (100-110 degrees F / 38-43 C) and sugar until the sugar is dissolved. Whisk in the yeast and let it bloom on the counter for about 10-15 minutes until frothy. If it doesn’t foam, start over — your water may have been too hot or the yeast was expired.
- Once the yeast has bloomed, whisk in the psyllium husk powder and let the mixture gel for about 10 minutes.
- Meanwhile, to a medium mixing bowl, add brown rice flour, potato starch, tapioca flour, and salt. Whisk well to combine. Once the yeast mixture has rested, add it to the dry ingredients. Use a wooden spoon or spatula to mix thoroughly. The dough should look shaggy to start. Once it becomes difficult to stir, use your hands to vigorously knead into a cohesive yet still very sticky ball. It should take at least 3 minutes* to fully break the flour down into the liquid. Feel free to squeeze the dough between your fingers to fully incorporate it (our preferred method). Your hands will get sticky and be covered with dough — this is normal and encouraged!
- Scrape the excess dough from your hands and place it back into the bowl. Wash and dry your hands well. The dough should be tacky but combined enough that you are able to handle it. If it’s still too sticky, spend additional time kneading the dough together.
- Turn the dough out onto your work surface. You shouldn’t need flour to shape it, but if you do, use very little! Use your hands to shape the dough into a ball and place it into your prepared proofing basket or flour-dusted bowl. If you find your hands are sticking to the dough, feel free to moisten them slightly with water. Cover your dough ball with a towel and let rise in a warm place for 30 minutes until it has almost doubled in size.
- After the 30 minutes is up, boil 1 cup (240 ml) of water. Preheat your oven to 450 degrees F (232 C), place an oven rack in the middle of your oven and a rack below that one, find two baking sheets, and set aside.
- Once the oven is preheated, place one of the baking sheets on the lower oven rack and carefully fill with the boiling water. Gently flip the dough out onto the other baking sheet, using your hand at the bottom of the dough to guide it. Place the baking sheet with the dough into the oven on the higher baking rack and bake at 450 degrees F (232 C) for 30 minutes. Lower the temp to 425 degrees F (218 C) and bake for another 25-30 minutes. The crust should be dark and the bread should sound hollow when you tap it with a spoon or knife.
- Once baked, use oven mitts to remove the pan from the oven then carefully lift the bread from the pan and place on a cooling rack to fully cool (~2-3 hours). You want the bread to be fully cooled before cutting to avoid a gummy texture. Store the bread in a bread wrap or bag at room temperature for up to 2-3 days, though best within the first 24 hours. You can also store the bread in the refrigerator for up to 5 days or freeze sliced bread for 1 month (or longer). After refrigerating/freezing, toast the bread before enjoying!
Video
Notes
*If you have a stand mixer with a dough hook, you can use that to mix in step 4.
*If you want to prepare the dough the night before baking, skip the rise at room temperature and put the dough directly in the fridge (covered) after shaping. When ready to bake, let rise on top of the oven (or in a warm spot) for 20-30 minutes while the oven preheats. Then bake as instructed.
*Psyllium husk powder is an essential ingredient in this recipe and we don’t recommend substituting anything else. If you have whole psyllium husk (not powder), you might be able to grind it in a spice grinder and add more of it until the texture resembles the photos, but we can’t guarantee the result.
*Psyllium SEED powder and psyllium HUSK powder are not the same thing. You’ll need psyllium HUSK powder for this recipe.
*Herby oil + vinegar dipping sauce: Mix equal parts high-quality extra virgin olive oil and balsamic vinegar with a pinch each of flaky sea salt, crushed red pepper flakes, and dried oregano or Italian herb blend; add more of any component to taste.
*Nutrition information is a rough estimate calculated without optional ingredients.


Jenny says
Great recipe! I am sure I’ll make this again!
Yay! We’re so happy to hear you enjoyed this recipe and will be making it again. Thank you for the lovely review, Jenny! xo
dianne hammer says
I’m wondering if sprouted brown rice flour would work for this recipe?
thanks!
Hi Dianne, we haven’t tested with sprouted brown rice flour, but we think it would be similar. It may require slightly less or more hydration, so you may need to play around with adding more water/flour depending on how the dough looks/feels and how the bread turns out. Let us know if you try it out!
Sharon B says
This recipe is easy and delightfully yummy. I make almost every week! I highly recommend!!! I tired of paying very high prices for bread at my local gf bakery. This loaf is much much better!
We’re so glad you enjoy this recipe, Sharon! Thank you for the wonderful review! xo
hitosan says
I am not sure what I am doing wrong. I made another 2 loaves and the inside is dense not like your image. I changed everything to grams and checked what each flour is in grams as they vary
315g water @ 109F
25g organic cane sugar
7g active dry yeast ( Bobs Red Mill)
13.5g Psyllium hush powder
160g brown rice flower ( Bobs red mill)
60g Tapioca flour ( bobs Red mill )
6g Himalayan Sea Salt
Dutch Oven 450F for 35min then lid off @425F for 30min
Any advice would be gratefully accepted as both my daughter and wife are both glutten free and they love the bread but I would like to make it perfect…thank you
Hi Hitosan, the amount of psyllium husk powder does not look like it’s enough. We would suggest clicking the “metric” button beneath the ingredients header to see our conversions to grams/ml. Additionally, we don’t see potato starch in your comment – have you been adding it? That is definitely a key ingredient here. Keep us posted!
hitosan says
I am not quite sure what I am doing wrong but have tried 3x and my loaves have come out flat and the inside gooey. Any advice gratefully taken
Oh no! We’re so sorry that’s been happening. What type of yeast are you using and what temperature is the water when you’re adding the yeast? Is the yeast getting foamy in step 2? Is it possible you’re using whole psyllium husk instead of powder? Those would be our top ideas!
hitosan says
Thank you for your reply. Am using Bob’s red mill active dry yeast adding the cane sugar at 100F and then adding the yeast. It does get foamy with bubbles and am using finely milled psyllium husk powder and it gets gooey and I wisk to the recommended times.
thank you..my family all love the bread but would be nicer to have it less dense and more airy and not so flat
Thank you for this additional information! Hmm, we’re a little stumped as this all sounds correct to us. For some reason it sounds like there isn’t enough psyllium husk powder. You could experiment with adding more!
Phaedra says
Pretty mind blown at how good this turned out, especially for the first time making it. The middle was a little more “wet/gummy” then I would have liked but I just toasted individual slices and it was perfect. I did wait 2-3 hours for it to cool before slicing. I will try a slightly longer bake time.
Yay! We’re so glad you had success on the first go :) Thank you for sharing, Phaedra! Another idea would be to add a bit more psyllium or flours to soak up some of the moisture on the inside without the bread getting too crispy on the outside with additional baking. Hope that helps!
Pearly says
I used an oval shaped bannetone to let the bread rise. Any tips on how to prevent the dough from sticking to it? I did dust it with the brown rice flour but it didn’t work. Otherwise the bread tastes great! Thank you for another great recipe.
Hey Pearly! We’re so glad you enjoyed it, thanks so much for sharing. We’ve learned that sometimes if you lightly spray the banneton with water and then dust it generously with flour it helps to keep the dough from sticking. Hope this helps! xo
Pamm says
Can this bread be made in a bread machine?
Hi Pamm, We haven’t used a bread machine so we’re not sure, but this recipe really benefits from kneading vigorously to incorporate the flours with the psyllium (not sure how well a bread machine does that!). Let us know how it goes!
Diane says
I was just wondering if anyone has tried this without the tapioca. I can’t have tapioca so I was wondering if there is any other flour I could use that would make the bread come out just the same. I looked at many comments but never saw any mention of substitutes for Tapioca.
Thanks
Hi Diane, we think arrowroot starch might work! It often subs well for tapioca starch. Let us know if you try it out!
Jennifer says
I have made this multiple times and love it! It is my go-to gluten free bread recipe.
Each time I’ve made it lately it’s dense, not airy with holes as in the picture. What do I need to change? I follow the recipe exactly.
I live at a higher altitude and am wondering if this is it?
Thank you so much!
We’re so glad you enjoy this recipe, Jennifer. Thank you for sharing your experience! Were you living at altitude before as well or you switched to living at altitude? We wonder if it could also be room temperature or the yeast expiring?
Jennifer says
I have always made it at altitude. My yeast isn’t expired and it blooms well. I’m not sure about the room temp, I did let it rise on the stovetop with the surface light on this last time and it helped the dough expand. When I baked it it still came out dense! I’m not sure what else to change?
Hmm! Maybe try increasing the oven temperature by 25 degrees?
Jennifer says
I will try that and thank you!
Always happy to try to help troubleshoot :) Let us know how it goes!
Jen says
I’ve made this a few times for my GF husband who LOVES it!! Thank you!! :) I’m considering trying a loaf 1/2 times larger and am wondering if you have advice on temp/time for the two baking stages if I increased the ingredients by half? And would you increase all the ingredients by half? (I do the dutch oven version!)
Hey Jen! We’re so glad you and your husband enjoy it. The temperature should be the same for the loaf if its a bit bigger. We would suggest keeping the time the same when baking at 450 and increasing the bake time about 10-15 minutes when the oven is at 425. It might need a bit longer than that, but you are looking for a hollow sound when tapping the bread. Hope this helps! xo
Jen says
Thank you so much–that’s very helpful! I’ll report back how it goes! :)
Sue says
This is so delicious and pretty easy! First GF bread I’ve ever made. I had to modify for the brown rice flour, since I had none. I used 1/2 c oat flour, 1/4 c white rice flour, & 1/4 c tapioca flour instead of the 1 c of brown rice flour. My bread didn’t rise quite as much as Dana’s, but it did rise and made a beautiful loaf considering the substitutes I made! I had to reduce cooking time by about 10 mins. Not sure if this was because of the difference in flours or just my oven. All in all, so yummy & makes great toast! Thank you, Dana for all of the detail about the ingredients you use. Will def. make again and try with brown rice flour.
Thanks so much for your sweet words and for sharing your experience, Sue! We’re so glad it turned out well overall! Another idea to replace the brown rice flour would be 1/2 cup oat flour and 1/2 cup sorghum flour (or another whole grain flour because they typically provide more structure than starches). We hope that helps it rise even better next time! xoxo
Sue says
Thank you for the substitute recommendations. So good to know. I’ve noted this for the next time I may need to sub flours. :)
Julia says
Finally a gluten free / vegan bread that tastes good. I like making it in a large round can. It results in slices big enough for a sandwich. And it’s so easy! Thank you!
Amazing! We’re so glad you enjoy this recipe, Julia. Thank you for the lovely review and for sharing your creative method! xo
Michele Ross says
I made this but it came out rock hard. Not sure what happened. So disappointed. Please refer to section number 4 and note that there is no mention of adding pysillium husk with the dry ingredients. I added it anyway but it could catch somebody out. Thanks
Hi Michele, we’re sorry to hear this one didn’t work out for you! The psyllium gets added in step 3, not step 4. So perhaps adding it with the dry ingredients could be the issue? Did your yeast get nice and foamy? If not, that would be our other guess as to why it would come out rock hard!
Michèle Ross says
Oh no! I don’t know how I managed not to see that! Thank you so much. The yeast did in fact foam very well so I must have done something right there lol.
Whilst my loaf is dense, it is very tasty, so I haven’t wasted it. I shall bake another tomorrow and make sure that I follow the recipe precisely this time. Thanks again.
Keep us posted on how it goes tomorrow! 💛
Jennifer says
I have made this twice, the first time I subbed flax for the psyllium and it turned out really runny, so I baked it in a loaf pan. The flavor was there, so I tried it again with psyllium. What a difference! It baked as a loaf and I used the Dutch oven. It is super crispy on the outside and is a great loaf to have on hand for toast! I will make it again for sure!
We’re so glad you gave it another shot with pysllium and enjoyed the result. Thank you for sharing your experience, Jennifer! xo
Ann Miller says
I’ve tried to make this bread several times. The yeast/sugar/psyllium mixture works great…I have the correct flours/starches…I mixed the yeast mixture with the dry ingredients using my stand mixture….it never seems sticky enough….it rises some but not as much as I believe it should….I baked it the 35 minutes at 450 degrees removed the lid and baked it at 425 degrees for another 30-35 minutes….it didn’t rise any more at all…..after it cooled for probably 5 hours I tried to cut it….it had some smaller holes but the inside was kind of gummy…what did I do wrong?
We’re sorry this one has given you some trouble, Ann! To confirm, you’re letting it cool fully before slicing? We haven’t made this recipe in a stand mixer and don’t think it would be an issue, but it’s possible it’s not incorporating the ingredients as well. Another idea would be if the brands of flours or psyllium you’re using are perhaps more absorbent than ours or you’re in a drier climate? You can try using less of the flours to get it to be more sticky. We hope one of those suggestions helps!
Ann Miller says
I’ll give your suggestions a try! Thanks for responding! I think my ingredients are good quality so I’ll play with the flour amount
Always happy to help troubleshoot! Keep us posted :)
Ann Miller says
SUCCESS!! Added 1 1/2 cups warm water instead of 1 1/3….its perfect!!
YAY! Thank you for the update, Ann!
Andie says
Hi! Would this work with white rice flour instead of brown rice flour? I have a sensitivity to brown rice. Thanks!
Hi Andie, unfortunately it won’t! Brown rice flour has a lot more structure, while white rice flour would lead to a crumbly bread. You could play around with a mix of sorghum, buckwheat, quinoa, and oat flours, perhaps?
Anna says
Hi, can I substitute active dry yeast for instant yeast?
Hi Anna, We haven’t tried it, but that should work. You won’t have to bloom the yeast in warm water, you can just add it to the dry ingredients. We would suggest still making the psyllium husk gel with the water and sugar. Let us know how it goes!
Lisa says
Hi there,
Thanks very much for the recipe.
I am finding that the dough spreads out in the dutch oven. Am I over-proofing it? Should I, perhaps, try proofing it for just 20 minutes? Any tips of what I am looking for as far as when the dough is correctly proofed?
Hi Lisa, is it spreading horizontally or vertically? If horizontally, it sounds like it needs more psyllium or flours. What brand of psyllium are you using? It is a powder or whole husks?
Lisa says
Thanks very much for getting back to me. My dough spread horizontally. I am using psyllium powder but I am not sure which brand, I may have gotten it in bulk. It’s in my own jar.
Perhaps I will try a little bit more psyllium and flour. You do not think it is from over-proofing?
Thanks again!
Always happy to help :) We don’t think it’s from over-proofing, but it’s possible!
Katie says
Hi there, is it possible to make this recipe in a bread maker please?
Hi Katie, we haven’t tested that, but it might work!
Becky says
I am baffled. I followed the recipe exactly (my yeast foamed beautifully and I set a timer for the psyllium husk to gel) and the mixture was so runny once it was all mixed up I was convinced I must have measured something wrong. So I mixed everything up again, only for the dough to still be super runny and looked nothing like the pictures in the post. I added more flour and continued on anyways hoping somehow it would work out ok, but no luck. I realize adding more flour wasn’t right but when there is no mention of the dough being runny in the post and you show a picture of a very normal looking ball of dough, it’s hard not to feel like it needs something else somehow and also like the recipe is already not working so what do I have to lose? I hate to leave a bad review but I spent a lot buying all of these flours so I’m pretty disappointed.
Oh no! We’re so sorry you had a negative experience with the recipe, Becky. We know how frustrating it is to spend the time/money and not have a recipe work out. Is it possible you’re using whole psyllium husk instead of psyllium husk powder? We recommend psyllium husk powder in this recipe because it’s more absorbent and produces a better bread.
Paty Shaulis says
Hello! I was wondering what size of Dutch oven you use. I assume size matters? I have two but if too big, would the bread spread rather than rise? I tried to follow the link to the Dutch oven you use but it is no longer working. Thank you for all you do! I used a bread pan and it came out delicious but I am very curious as to how it would come out in the proper Dutch overnight.
Hi Paty, Thank you for your kind words! The size of the Dutch oven shouldn’t matter too much (as long as it’s large enough) because the dough holds its shape well. We’ve used as small as 7 inches in diameter (it’s a tight squeeze!) to as large as 10 inches. Hope that helps!
Paty Shaulis says
That is so good to know! I will try it with my Dutch oven to compare. Thank you!
Devorah says
This bread is amazing! I’ve tried both the cast iron and a loaf pan! I think I like the cast iron outcome the best. But either way it is a real treat without side affects! Fresh or toasted, with oil/balsamic vinegar, butter, honey, and the awesome ability to have a real sandwich when first baked. And also enjoy toast, french toast or crisps under the broiler. Thank You for this recipe and all the work I know it must take to perfect the outcomes!
Much Appreciated!
Thank you so much for your kind words and lovely review, Devorah! We’re so happy to hear you love this bread! xo
Melissa says
I would like to use a cast iron dutch oven. Do I need to use a proofing basket? I’ve never tried to make bread before.
Hi Melissa! A cast iron dutch oven will work! We suggest still using a proofing basket or bowl to help the bread rise into the correct shape! We hope you enjoy! It can be quite fun. xo
Ezgi Kiris says
This was my first ever try to make any type of bread and it’s a great recipe! I messed up the oven temperatures slightly and I think that’s why it didn’t get fluffy enough. But, ıt tastes amazing especially when toasted and I’ll definitely give it another try!
We’re so glad you enjoyed it, Ezgi! Thanks so much for sharing.
CBS says
I’ve made this several times now (and love it). Each time the dough is runny like a blob and not a dough ball. The bread comes out tasty, but I’d like to perfect it. Perhaps it’s the flour brands- what brands do you use?
We’re so glad you enjoy it! The dough is a lot more slack than a normal bread dough, so you’re not far off! We use Bob’s Red Mill for the flours! Hope this helps. xo
Mari says
I have made this delicious bread every Friday for the past three weeks. I’ve been slowly replacing the rice flour with sorghum and millet. I’m up up using 1/4C millet flour, 1/4C sorghum flour, and a 1/2C rice flour with success. Thanks for the delicious recipe!
AMAZING! Love your experimentation with other flours, Mari. Thank you for sharing your experience! xo
Liz Rae says
I’m still waiting on my first loaf of this in the oven, but I’m fairly sure it didn’t really rise. I’m really not a baker—when it says you let it sit in a warm place to rise, do you mean like the oven on warm or just out on the counter, etc? I’m wondering if my environment wasn’t warm enough, because my yeast was really nice and bubbly in the beginning! Thank you!!
Hi Liz! It will still probably bake up beautifully! Gluten-free bread doesn’t rise very much. We let ours rise on the counter, but if it’s particularly cold in your house you can let it rise in the oven with the oven light on! Hope this helps. xo
Kirsti says
Can I use instant yeast for this recipe?
Hi Kristi! We haven’t tried it, but that should work. You won’t have to bloom the yeast in warm water, you can just add it to the dry ingredients. We would suggest still making the psyllium husk gel with the water and sugar. Let us know how it goes!
Karen Brooks says
Hello I made this into a batard and used my banetton to hold it whilst rising.
I was wondering if you ever score these loaves? I had the feeling it may have risen more if I’d scored a simple straight line down the middle.
I think the recipe is great, it smells delicious, sounds hollow, but I haven’t cut it yet. I’ll report back!
Lovely! Thank you for sharing, Karen! We tried scoring it and because the bread/dough is so soft it makes the bread spread too much.
Karen Brooks says
thanks that makes sense. I’ve since made it many times and in fact sell it too – my customers love it. I have to warn them though that it doesn’t last much beyond day 2.
Amazing!! We’re so glad your customers love it :)
Chris says
Excellent recipe! I’ve made it numerous times. The only very minor adjustment I make is dropping the sugar to 1 tablespoon. Oh, and I rise it in a bowl lined with greased parchment paper and slide it onto a bakers stone when it’s ready to be baked. Thank you.
Amazing! Thank you for sharing, Chris!
Cat says
You are a genius!! No lies were told in your description, this is the best gluten free bread I’ve made, thank you!!! And I made it Yeast free. I’ve made quite a few recipes and always start with half a recipe and no yeast to test it out. I’ve learned
when subbing baking powder, you need acid, some baking soda and seltzer water to get a similar rise to yeast. But I believe your recipe more than doubled in size! So I halved your recipe, used 1 tsp of baking powder (otto’s brand), 1/4 tsp of baking soda, 2 tsp of lemon juice, 4g of psyllium husk which I grinded first in my vitamix mini cup and then in my mortar and pestle, I subbed room temperature seltzer for the water and decreased it by 7ml, and I subbed 1tsp of coconut sugar for sugar, I added the lemon juice to the seltzer and then the psyllium husk and waited until it really thickened up, kneaded by hand, used a bit of cassava flour just to shape, I heated a small sheet pan at 450F in my toaster oven, popped the dough in and scored it, baked for 10 mins then reduced the heat to 425F and baked for 20 mins more, I do believe my air fryer toaster oven runs hot. I could only wait an hr to check it out lol, its really crusty on the outside but soft, fluffy and springy on the inside and the air holes looked like a sour dough bread. Thank you again, it’s the best I’ve made so far, no funny taste and the best texture, and I will be trying it with yeast as a treat since I try to stay yeast free.
Amazing! We’re so glad it was a success, Cat. Thank you for the lovely review and for sharing your modifications! xo
Cat says
Hello again,
Since then, I have made your recipe a couple times with yeast, soooooo delicious!!! I make rolls and let it rise in the fridge overnight, and by mistake I added the pysllium husk powder to the dry ingredients but I loved the result of it. Thanks again for my favortite gluten free bread recipe :)
Thanks so much for sharing your experience, Cat! We’re so glad you’ve been enjoying the bread! xo
Nancy says
I have made many GF breads, but this is the recipe I’ve been looking for! Whoever came up with the psyllium husk powder idea is a genius! I used a mixer with a dough hook, a brotform and an Emile Henry ceramic bread pot for baking, omitting the ice. It didn’t take as long to bake, but had a great crust and nice interior. (Mine wasn’t as “holey” as your photos, but I used instant yeast, so next time I’ll try active.) I slashed the top to allow more oven spring. It came out great. THANKS!
Amazing! Thanks so much for the lovely review and for sharing your modifications, Nancy! xo
Cheryl says
This is the most amazingly flavorful, wonderfully textured bread on the planet, GF or not!!! After 8 years medically GF, I had basically given up on ever enjoying bread again, but to this gorgeous loaf I am completely addicted, and so is my non-GF husband! I cannot wait to share it with our Celiac daughter when she next visits!
Tips and modifications: I cut the sugar (maple syrup) in half, then INCREASED everything else by half (sliced and froze leftovers the same day so always fresh). I kept oven temps the same, used the Dutch oven method, determining the bread done when the internal temp reached 205 degrees F. I used a stand mixer, combining ingredients on the lowest speed, then bumping up to #2 speed for 3 minutes. The dough was too wet to shape so I transferred directly into a proofing bowl, then covered it with a dish towel, putting it into a cold oven, placing a 9” x 13” baking dish on the bottom shelf then filling it with boiling water (remember to remove it from the oven before preheating for the baking step!). Closed in my steaming DIY proofing drawer, dough was perfectly risen in 30 minutes. My only issue was mustering the patience not to cut into the loaf before cooled, but well worth the wait! It was perfect in every way (my third loaf is now cooling on the counter). Thank you again for the gift of being able to enjoy once again the satisfaction and pleasure of eating utterly delicious bread!
Aw, this makes us SO happy, Cheryl! This was definitely our goal in creating this recipe :) Thank you so much for sharing your experience! xoxo
Rachel J says
I love this recipe. I used my kitchen aid mixer to mix it. I’m going to try it in the bread maker(adding the liquid part after the psylium husk has gelled) next time and see how it turns out.
Amazing! We’d love to hear how that goes, Rachel! xo
Monica says
One MILLON stars!! This GF bread is life changing! I followed the baking sheet recipe and it came out absolutely perfect. I can’t stop eating it! The crust is seriously addicting and reminds me of wheat-based french crusty bread and the inside is springy and moist – definitely NOT like any other low fat GF bread I’ve bought or made. Which is a good thing! Thank you so much for this recipe and all the baking variations! I am on a low fat, GF, WFPB diet for medical reasons and I have been missing bread and butter so much. This bread with a small bit of vegan oil free aioli is perfection!
Woohoo! We’re so glad you enjoyed it, Monica! Thank you SO much for your lovely review. xo
JJ says
I am relatively new to gluten free baking. Most things I have made have not been a success. This bread was 10 out of 10! I recipe exactly as written and it turned out perfect. Great with a bowl of soup and made excellent toast in the morning the next day. Thank you!
We’re so glad this one was a success for you, JJ! Thank you for sharing your experience! xo
Samantha Hedges says
The bread was really good, but the inside was sticky, overall the texture was off. We used the Dutch oven method and waited for the loaf to cool completely before cutting. Any suggestions?
Hi Samantha, sorry to hear the texture wasn’t right! Did you make any modifications to the flours?
Samantha Hedges says
No, we followed the recipe exactly. My partners lovessss it so we are definitely fans. Just curious if you had any recommendations. Thanks.
It sounds like it was too wet for some reason! That would happen if the ratio of liquid to absorbent ingredients was too high. You could possibly try less water or a different brand of psyllium husk powder. Keep us posted if you give it another try!
Allie says
I made this bread and believe I followed the recipe correctly. However the bread turned out rock hard and like a brick. Any idea where I went wrong?
Oh no! Sorry that happened, Allie. Our best guess is the yeast didn’t activate and rise properly! Is it possible it was old/expired or the water was too hot/cold?
Alison says
If I want to use maple syrup instead of sugar, would it be the same amount?
Yes, same amount!
Brigitta says
I made this recipe, and I can say, being gluten intolerant for many many years, this is one of the best breads that I have ever made. Although it came out kinda flat, but I think its was the problem of my proofing basket being to wide.. But the texture, especially toasted is a dream! I will definitely making it again :) Thank you
We’re so glad you enjoy this bread, Brigitta! Thank you for sharing! xo
Vickie says
This bread came out great!
The last time I made bread, it was a brick but this is delicious.
I think my psyllium powder must be seed not husk. As another comment said, my dough was very wet, not shapeable, so I just poured into loaf pan and baked according to the instructions. This is better than any gluten free bread I’ve found in the store. The taste is good, the texture is good.
I am so pleased!
We’re so glad it still turned out well, Vickie! Thank you for sharing! xo
Kristin says
Made this for my GF friend & followed fantastic instructions exactly. We both loved the bread, but she was ESPECIALLY delighted bc she never has bread (GF bread is usually not wonderful). 2 days and we’ve housed almost half the loaf!
Only dilemma: didn’t rise much–the loaf was only about 1.5″ high when baked (Dutch oven). Yeast proved very well in warm water, ground my own psyllium flour in a grain mill from husks… My theories: water was too warm when proving yeast & it spent itself too early OR without gluten the loaf needs the support of a loaf pan to really rise (like a quick bread?). Going to try again & experiment, but I’d love your thoughts!
Even w no rise, this bread is FABULOUS!! Thank you for another great recipe!
We’re so glad it was still amazing! Thank you for sharing, Kristin! It sounds like it was maybe too wet, causing the loaf to spread and be shorter in height? It’s possible you needed more psyllium to absorb the moisture since homemade isn’t usually as finely ground as store-bought. Hope that helps for next time!
Mindy Galamaga says
I made this tonight and followed the impeccable instructions! It was my first bread I ever made and it was perfect, lol haven’t been this proud since I gave birth ! I made it in a Dutch oven that was oversized to the bread and it worked wonderfully to make a pretty round loaf that looked and tasted better than any bread ever and I can’t wait to make as gifts for the holidays. I rarely make recipes from an online source, sticking to cook books. I will definitely keep exploring but stay true to my minamalist baker cook book ! So grateful to eat healthy bread that everyone loves !
Aw, YAY! We’re so happy the instructions were helpful and that you had success! We’re honored you love it so much. Thank you for sharing, Mindy! xoxo
Mark Landow says
Made the bread, and the results are light and tasty with a great crust.
I followed the recipe exactly with the ingredients as specified. Only difference was my psyllium husk powder was purchased bulk from my local health food store. Yeast foamed and psyllium gelled nicely.
When I mixed everything the dough was very wet, despite mix/kneeling for 6 minutes. There was no additional flour to integrate. Too wet in my opinion. I wound up kneading additional flour into the dough so it would allow it to be handled. It wouldn’t stay in a ball shape due to its wet internal composition.
Next time I will use the metric values so I can weight the flour rather than volume measurements. Any thoughts on the wetness ?
Hi Mark, thanks so much for sharing your experience! Is it possible you were using psyllium seed powder instead of psyllium husk powder? We once bought psyllium seed powder and had a similar experience to what you’re describing. Another cause could be if using whole psyllium husks instead of powdered.
Mark Landow says
It was definitely powdered, I will check on the seed vs husk issue, and try again.
Thanks
Keep us posted!
Mark Landow says
I confirmed I was using psyllium husk powder.
I used the metric weights listed in the recipe and noted the following:
1 cup brown rice flour = 134 grams
1 cup & 3 1/3 tablespoons brf = 160 grams
3/4 cup potato starch = 119 grams
1/2 cup tapioca starch = 55 grams
Your recipe in metric calls for 160g, 120g, and 60g for each flour type.
Hi Mark, thanks for this info! It’s normal for there to be a little variation and for it to vary based on the method used to measure (scoop and level vs. pour and level) as well as the brand of flour. If you weigh them out a few times, you’ll get a different result each time :)
Liz says
Once again Minimalist Baker directions were impeccable. Added caraway seeds. I have made this three times now and it is just perfect every time. So EASY!!!!!!
Aw, YAY! We’re so happy to hear it, Liz. Thank you for the lovely review! And caraway seeds sound amazing – YUM! xoxo
Jill says
I made this yesterday, and the flavor was amazing, but the texture was very dense. I used my mixer to kneed it and wonder if that’s what happened? I followed the instructions to a t other than the mixer.
Oh no! Sorry that happened, Jill. We wouldn’t think a mixer would be an issue. Did your yeast activate? Did the bread rise/double in size?
Kelsey says
Question 1: Made this today! Love the recipe but our loaf had a huge hole. Looking for suggestions to try this again but avoid the hold in the middle. Tastes great, but didn’t love the hole.
Question 2: is there any way to make this loaf taller? If I did 1½ times the original recipe could that work? Look for the loaf to get a little taller.
Used the metric and followed recipe exactly by weight. Used a loaf pan and those specific instructions. They bread did double in size before I baked it – we let it cool for 3 hours before cutting.
THANK YOU
Hi Kelsey, Thanks so much for sharing your experience! It could be that the yeast created an air pocket in the middle while kneading/bringing it together – yeast is funny! It probably won’t have a hole the second time around, but really make sure everything is incorporated VERY well! We do think you could do 1 1/2 times the recipe for a taller loaf. You may need to bake slightly longer at the lower temp. Keep us posted!
Nina says
I totally messed up the recipe and it still turned out really good!! 😂 I forgot to add the psyllium husks to the yeast mix, so when I combined the wet and dry it became a loose batter. I quickly added the psyllium and it did thicken up, but it wasn’t going to be firm enough to shape into a ball. So I put it in a loaf pan instead and baked according to the loaf pan instructions. The crust came out a bit tough but the inside was soft and the taste was yummy! My 4-year old loved it and ate it plain saying it didn’t need anything on it. Next time, I’m excited to do it right 😂
We’re so glad it still turned out, Nina! Thank you for sharing your experience! xo
Louise Gagne says
What an amazingly recipe. Thank you from the bottom of my heart!
So good, my husband ate 2 big pieces for dinner last night, and he’s not even gluten free! He can’t wait for me to make more, so I’m in search for buns, English muffin, and other bread recipes. I’ve bookmarked your site to do a deep dive into your GF recipe files 😁
Aw, YAY! We’re so happy you both enjoyed the bread, Louise. Thank you for the lovely review! We have recipes for buns and English muffins :)
Pia says
I only have corn starch at home at the moment. Is it very essential to have tapioca (I can only find starch, not flour) AND potato starch? Thanks, love your recipes!
Hi Pia, tapioca starch and tapioca flour are the same thing! Tapioca starch gives it a stretchy quality, while potato starch is more drying and makes it light and fluffy. Corn starch is also drying vs. stretchy. The next best sub for tapioca would probably be arrowroot starch, but we haven’t tested it that way. We’d definitely recommend tapioca starch for the best loaf!
arla says
love this and thank u ..BUT can you substitute the tapioca starch.
Hi Arla, Tapioca starch helps give it a stretchy quality. Arrowroot starch might work, but we haven’t tested it and can’t guarantee it will turn out the same. Let us know if you try it!
Diane says
Hi Arla,
Did you try it with arrowroot. Just curious if it worked as I can’t have tapioca either.
Michelle says
I have tried dozens of gluten-free bread recipes. This by far is the absolute best. I double the recipe and used loaf pans. Next time I will try a Dutch oven. The measurements were perfect. The bread was crunchy on the outside and soft on the inside. Absolutely amazing taste!
Whoop! We’re so honored it’s your favorite recipe, Michelle! Thank you for the lovely review! xo
carrie s. says
I just found out i am sensitive to rice and rice flour. Would this work with another gluten free flour, like almond?
Hi Carrie, we wouldn’t recommend almond in this one. You could possibly try a combination of other whole grain gluten-free flours, but keep in mind it won’t turn out quite the same. Possibly a combination of oat, sorghum, teff, millet, and/or quinoa flours?
Sem says
Amazing Can’t wait to try this out.! Do you have an easy recipe for sourdough bread please?
Hi Sem, unfortunately we don’t have a sourdough recipe!
Lauren says
SO GOOD! I didn’t have psyllium husk powder nor potato starch but decided to go for it anyway. I used cornstarch instead of potato (subbed and equal amount), and whole psyllium husks instead of ground (3tbsp whole psyllium husk instead of the 1.5tbsp ground). I blended all the dry ingredients in my high-speed blender in hopes of powdering the psyllium a bit. It only needed to rise for about 45 minutes, and I did score it a bit before baking. I make gluten free bread all the time (I’ve made three artisan loaves this week) and have been trying to find a winning artisan loaf — this one is my fave so far!!!
Whoop! We’re so glad it turned out well. Thanks so much for sharing, Lauren! xo
Eve V Miller says
Will you please remove me from this pushpin or thread that I did not sign up for…would be most appreciated
Hi Eve, we don’t have the ability to change your push notification settings. It’s something you have to change in your web browser. You can find instructions for changing your settings here: https://www.pcmag.com/how-to/how-to-disable-web-notifications
ML bader says
Do you have the weight measurements for the flours, etc.? I find my baked goods turn out better following a recipe where ingredients are listed by weight rather than volume.
Yes! You can find the weight measurements by clicking “metric” beneath the ingredients header. Hope that helps!
Vicki says
Hi- can you use your gluten free blend (or bobs red mill) instead of the rice flour and potato starch? Thanks
Hi Vicki, we don’t think it will turn out as light and fluffy because it’s not enough potato starch.
Anita says
Can I use a 3.5 qt Dutch oven for this loaf?
Yes! We’ve done it in as small as a 2.5 qt. It’s a tight squeeze to fit the ice cubes, but it works!
The Vegan Goddess says
Ooh, this looks wonderful and doesn’t require too much yeast which I try to avoid. Do you think that lemon juice might work as a sub for yeast?
We wouldn’t recommend that! Lemon juice isn’t going to help it rise, so it will turn out dense.
The Vegan Goddess says
Maybe baking powder would be a good sub for the yeast.
Not sure if it would be an equal amount or less than the yeast. Usually there isn’t a need for too much baking powder in recipes, so I presume less could do the trick.
Arze says
Hello
Looks amazing , why it has to be powder ?
And if i want to make them yeast free or using sourdough starter how much do i need ?
Thank you 🙏🏻
Hi Arze, the powder absorbs the liquid a lot better than whole husks. We aren’t sure on the sourdough starter!
Cat Fergusson says
This sounds delicious, and i have psyllium husk, I’ll whizz it up into powder. Could you use a breadmaking machine?
Hi Cat, we tested making it into a fine powder using a spice grinder and it wasn’t quite as absorbent as the store-bought powder, so keep in mind you may need extra! We haven’t used a breadmaking machine so we’re not sure, but this recipe really benefits from kneading vigorously to incorporate the flours with the psyllium (not sure how well a bread machine does that!). Let us know how it goes!