
Being a baker is serious work. The precise measurements, complex ingredients and stacks of complicated equipment can make the task seem too much worth the effort at times. But if you’re like me, that’s half the fun. And tasting the final product makes it all worth it.
And, if you’re like me, you also don’t bother with all the extras, i.e. piping bags, frosting tips, Kitchenaid mixers, quesadilla makers, panini presses, emulsifiers, popover molds, culinary torches, etc., etc. You stick to the basics and make it work, just like any real ‘Merican baker would. Plus, who has space for all that junk anyways? Not I. Not little ‘ol minimalist I.

Something I’ve strongly considered buying multiple times in the past is a donut pan. Everyone has one, they’re all the rage, they make beautiful donuts, and they allow you to skip the frying process and opt for baking instead, which is obviously way healthier than drowned in oil.
But you know what? I really hate buying things, especially unnecessary things like pans that can only do one thing and take up a crapload of space. Just this week I had cooking spray on my grocery list but passed it up because it was $3 instead of the normal $1.50. Yeah, nevermind – didn’t need it that bad. So you can imagine I ruled out a donut pan for the same reasons.

But then there’s the fact that I’m a donut lover, so what do I do with that? (maple long johns anyone?)
I’ll tell you what you do with that. When you love something you find a way to get it, see it, make it, find it, do it. So that’s just what I did. I crafted a recipe that a) didn’t require a donut pan, b) maintained its vegan composure, and c) tasted lip-smacking delicious. And? It’twas a success.

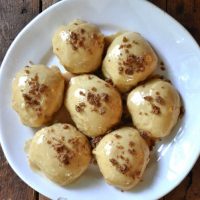
Espresso Glazed Vegan Donuts (No Pan Required)
Ingredients
DONUT
- 2 cups soymilk (I used light vanilla)
- 1/3 cup oil
- 1/3 cup maple syrup or agave*
- 1/2 cup sugar
- 1 package active dry yeast
- 1 tsp salt
- 4 – 4 1/2 cups flour (give or take)
ESPRESSO GLAZE
- 1 shot quality espresso or strong coffee (1 shot equals 2-3 Tbsp)
- 4 cups powdered sugar
STREUSEL TOPPING* (optional)
- 3-4 Tbsp vegan butter
- 1/2 cup brown sugar
- 2-3 Tbsp flour
Instructions
- Bring soy milk, oil, maple syrup or agave, and sugar to a boil in a small sauce pan.
- Once boiling, remove from heat and let cool until lukewarm or 110 degrees F / 43 C (30 minutes)
- Once cooled, stir in yeast and let set for 5-10 minutes.
- In a large bowl, add flour (starting with lesser end of range) and salt, then add to wet mixture and stir, mixing well, then covering with a towel and letting rise in a warm place for 1 hour.
- Once doubled in size, add the remaining flour (1/2 cup as original recipe is written // or until the dough is no longer incredibly sticky). Mix well and then let the dough sit for about 10 minutes.
- On a floured surface make about 2-inch balls and place them on a lightly greased cookie sheet, leaving room for expansion.
- Preheat oven to 350 degrees F (176 C) and cover with light towel while warming.
- Once preheated, bake for 10-11 minutes, being careful not to over bake as you don’t want the bottoms too brown.
- Prepare glaze and streusel while baking. Once donuts are done, let them cool slightly and then dunk in glaze and cover with streusel. I put the streusel on both top and bottom, and would recommend it for best flavor.
- Serve immediately for best result, or store in air-tight container for up to 2 days.
Notes
*For the streusel, you want a crumbly texture but not too dry or buttery. So add brown sugar and flour accordingly until you achieve your desired texture.
*Poking a hole in the middle of the donuts is optional for a more ‘traditional’ appearance, but I opted to not.
*Questions about substitutions, equipment, or troubleshooting? Check out our Recipe FAQ page.
*Adapted from namely marley.
*Nutrition information is a rough estimate calculated with glaze and streusel topping.
Nutrition (1 of 12 servings)

Wow, these donuts were incredible. Soft and pillowy with a coffee-spiked sweetness and crumbly streusel topping. I think I’m in love. This only marks the beginning of my no-pan donut baking adventures, but I consider this a stellar first attempt.

Enjoy,
Dana


Nisha says
These donuts did not bake correctly, they didn’t rise at all and were completely raw after 10 minutes. I continued to bake them but they stayed raw on top.
Oh no! We’re so sorry you had a negative experience with this recipe, Nisha. It sounds like the dough needed more flour and/or the yeast didn’t activate! Did the yeast get foamy in step 3?
Amit M says
Would the GF version just include 1:1 mixture instead?
Hi Amit, we aren’t sure this recipe would be a good fit for making gluten-free. If you wanted to try it, we’d recommend our Best 1-1 GF Blend.
Hilary says
This recipe is very simple and easy to follow – it also turns out pretty tasty, but I gave it only 3 stars because the result was more like rolls or almost biscuits than donuts. I did not try the glaze as a result. Curious how to make it more donut-y – perhaps less flour and slightly less liquid (so as not to make too sticky a dough)? I’ll have to cross-reference other recipes.
That said, dear readers, do not let this recipe dissuade you from the site – there are plenty of absolutely wonderful recipes here.
Thanks, Hilary! Admittedly these are a bit more dense as compared to traditional donuts. I’ll add a fluffier donut to my recipe list!
Cloud says
I am a HUGE minimalist baker fan. This is the first recipe that has been a total dismal fail. I wish I had read the comments earlier. 3 hours in and I have a mess. They are inedible. Perhaps you should remove recipies that just plain and simply don’t work since your newer recipes are all gems
Taylor says
How would you make the glaze less sweet? It was wayyyy too sweet for me and my friends liking!
Tiffany Sonterre says
More like rolls than donuts, but still delicious!
April says
I hhad a really hard time trying to get the glaze on the doughnuts (it was super thick glaze) without crushing the soft, delicate doughnuts… Ended up adding hot water to thin the glaze out, and just drizzling it over the doughnuts, and it worked better for me rather way. Also I found I had a surplus of streusel afterwards. But I think that’s because I made the doughnuts a little too big. Either way, while it took a little tweaking, the end result was a hit when I brought them to a friend’s house for boardgame night.
Jessica says
Looks very nice, I only missed the yeast in the ingredient list…
Dora Hanga says
I came across your recipe wanting a more or less vegan donut, but for sure a baked one. I made some substitutions and modifications to this recipe, mostly to match what I had in the cupboard. I did the following: used dairy milk instead of the plant-based one, I didn’t have maple syrup so I added a bit more sugar to the dough and used 1 part whole wheat flour and 3 part white flour, fresh yeast (about 25 g) instead of the dry active yeast. The result was a very nice rising dough that was really sticky, as you mentioned, after it rose. No big deal, I added one more cup of flour and oiled my hand as to be able to handle the still sticky but very nice dough. They came out quite nice and VERY fluffy. I didn’t use that much sugar for the glaze, I only used 1 cup of sugar and about 4 tbsp of strong coffee. Obviously, my glaze came out brown, but it was very tasty. Also, for the streusel, I used dairy butter (half the quantity you indicated) and substituted the flour with quick oats.
The result was great. I got something resembling a donut, but it was more satisfying than I thought it would be after reading most of the above comments.
Conclusion: This is GREAT! :D
Additionally I want to compliment you on this site and recipes. I have tryed many of them, with perfect result 99% of the time. Which is awesome. You are my go-to site when I want to try out a new recipe, which is like almost every week.
Greetings from Romania!
Sarah says
You are a ray of positive sunshine among some negative thoughts, I appreciate that when I’m looking at reviews of food. I will use your suggestions when I attempt this yummy recipe!
Madeleine says
If i use coconut milk will it still work ?
Jen says
Um, maple syrup is pretty expensive where I live, so can I use sugar instead?
And I only have instant dry yeast, will that work?
Thanks :)
Marie says
I’m just wondering how you use yeast in this recipe. Do you put it in warm water before you add it in with the other ingredients? I’ve been looking up stuff about it but it’s confusing.
Casey says
Hi there,
These look great. I’m wondering if it is possible to form them into rings when placing them on the pan?Similar to when I’m making bagels – I start with a ball of dough in my hand and then work my finger out from the middle to make a ring.
I would love to be able to make them with that real donut shape.
Mary says
Just tried this recipe over the weekend. YUM! I had some chopped apples that needed to be gotten rid of, so I threw them in the pan with the sugar & milk, added some cinnamon to the dough, and did a plain glaze instead of espresso. OK, so it was kind of a different flavor, but the dough was a perfect base and I can imagine using it as a jumping-off point for all kinds of amazing flavors! Thank you for posting!! I’ll definitely be making them again!
Rex says
You can’t put glaze on a bread roll and call it a donut. Major disappointment, don’t waste your time.
Regina says
Hi Dana! I LOVE your website. Thanks so much for all the fun recipes and the beautiful photos.
I was wondering if I could make these with gluten free flour? If so, what modifications would you recommend? Thanks!!
Marissa says
Made these yesterday, subbing more maple syrup for the sugar. Fluffy, yes–but not doughnuts! Definitely nice sweet buns.
Carolina says
Hi I have a question! Is there any way you can make these donuts gluten free too?
Grace McDonald says
Great donuts, iffy recipe. My dough was too sticky for only a half cup more flour so I added another cup. Also, for the glaze, the recipe call for WAY too much powdered sugar, so I tweaked it making the glaze 3 tablespoons of coffee to 1 cup of powdered sugar. Hope this comment helps for anyone struggling with this recipe :-)
Dani says
i really want to try this but Its unclear of how much yeast to use and the flour, would it be plain?
Dez says
the blogger posted above:
1 packet yeast should be 2 1/4 tsp
Firas says
Just made these guys. They were delicious. I subbed the soy milk w/ almond milk. When it came time to add the rest of the 1/2 c flour, I basically covered the dough and did not mix it in because I didn’t want to deflate the well risen dough. It allowed me to easily cut the dough into small balls. I split half onto a baking sheet and half into a muffin tin. The ones that went into muffin tins came out perfectly round. The ones on the sheet came out a tad lopsided. Would add that it’s best to double layer the baking sheet so not to burn the bottoms (that is, use two baking sheets underneath the muffin tin). I needed 19 minutes to fully cook the baking sheet donuts, and 18 to cook the muffins. By themselves without frosting, the donuts are basically bread rolls. The frosting makes them all that more special. It’s also great they aren’t fried and taste very light.
Thanks for sharing!!
Casey says
Mine are in the oven now and glaze is done…ekkk can’t wait!
Tara Smith says
Hello! I made these tonight and after following the recipe to the letter the mixture failed to become anything but a sticky wet mess until I added two or three cups of flour which made them very much like little sweet buns not doughnuts at all. I read a few other people who had also had a similar problem. Is there something we are doing wrong? Is there any advice? Ive had to throw most of the mixture away.
Thanks
Kunday Samuel says
And this is why being a vegan is not a magical cure for loosing weight . Still a good recipe it seems.
josephine.darella says
You really should change the name of this recipe. These are not a donut at all. They are a sweet roll like many others have commented. That is fine, but at least call it what it is. I was really excited to have a donut and these unfortunately do not hit the spot. They are tasty, but not what I had been hoping for. Please rename this so that others who are wanting a donut will know to steer clear of this recipe or at least modify your recipe so that these are actually like a donut. Wish I had read the comments before being half way through this recipe as I wasted a ton of ingredients.
Mia says
“1 package” is an incredibly vague and unhelpful measurement for the yeast. Not even an indication of how much should be in the package by weight, I have no idea what amount of yeast this recipe is calling for and I really doubt it’s the whole 100g jar of yeast. Ooh so cryptic.
1 packet yeast should be 2 1/4 tsp – sorry for the confusion Mia!
Jacquie says
Have you guys tried subbing the oil with applesauce? Yay for donuts without having to buy a donut pan just to make ’em and satisfy the ever so occasional doughnut craving. =)
Isabella says
These came out very much like sweet bread rolls and not at all like donuts. Not a successful recipe, im still a big fan of this blog though
jn says
I wish there was a photo of one cut open to see the inside! Or at least one without glaze on it.
Brooke says
I was really excited for this recipe, I followed it exactly, it didnt work at all. The dough was way to thin and no matter how much flour i added it never stopped being incerdibly sticky. Maybe i used the wrong kind of oil because the recipe didnt specify which to use, maybe i scewed up somewhere else without realizing, i dont know. I don’t know how they would turn out baked, but the dough is imposible to work with, huge waste of time, just as much of a disappointment. I would not recommend this recipe.
abby says
what kind of oil did you use for this?
Arpi says
I noticed in the instructions, you don’t mention when to add the salt. Also, are the doughnuts supposed to be covered the whole time they are baking? Or just when the oven is heating up?
Lauren says
I may have done something wrong with the recipe – or perhaps I made the doughnuts too big but they came out tasting very bland! The streusel and glaze help but the dough tastes more like a bagel than a doughnut.
luki says
Mine tasted more like bread rolls than donuts :/ not sure what I did wrong, maybe they didn’t rise enough??
Alicia says
This is such an adventurous recipe to come up with! Nothing goes better than coffee and donuts — this is a genius idea!
Caroline @ chocolate & carrots says
Ahh….you got a new website while I was on “Mommy leave”! :D I love it Dana! Your photography is stunning by leaps and bounds by what it used to be. And these donuts look fantastic!
You are so kind! Thanks for stopping by – I featured your cheesecake recipe on my work’s website today (dietsinreview.com) – stunning photos and lovely recipe!
Strawberry Mint says
Man oh man – I’ve got to try these ASAP!
Caitlin says
i love your philosophy! and the donuts look incredible.
Paula says
Look yummie! Do you think it would work to make them on a muffins tray? :-)
I’d say yes! Although they may cook a bit faster as they’ll be surrounded by more metal, so watch them a bit more closely : )
Genevieve says
These look delicious! I’ve wanted to give baked doughnuts a try. We make fried vegan and gluten free pumpkin doughnuts that are SOO good.
Yes, my mom calls those kinds of kitchen things “one purpose” space fillers. The only thing I DO want is a kitchen aid though. They do wonders with cakes. I borrow my sisters whenever I make one and it always turns out WAY better.
Thanks for the recipe! Can’t wait to try it.
Genevieve
Katherine says
Ok, I know this was posted a while ago. But, do you have a recipe for your donuts?! I am vegan and want to make fried donuts! But I always find baked donut recipes.. as if the fact that I don’t eat animal products means that I don’t want to eat sugary fried dough or something ;)
Genevieve says
Hi Katherine! I’d love to share it with you. Please send me your email and I’ll send it to you.
jenny(at)ykwc(dot)net
Genevieve
Jen says
Do you mind sending one to me too?
Robin says
could you please send me the recipe too? I’m gluten free and allergic to eggs and finding a gf eggless fried donut recipe has become like a hunt for a unicorn… partyartbyrobin@gmail.com
Veronica says
Love that you did it without a pan! I’ve held off getting one too for the same reason. I already have way too many things I don’t use very often. Annoyign! This are gorgeous and sound divine. Can’t wait to try them!
Mimi says
LOL @ not buying cooking spray because it’s $3 rather than $1.50! I passed up on it this week as well!
Sharlee@believinginsomething says
Yes! This is why I’m so excited about your blog. I do not EVER buy anything that can only be used for one purpose. Yay for donuts without pan. And these look AMAZING…even though I don’t do coffee. I will anxiously await the next donut post. :)